Laser Cutting Acrylic: The Complete Guide to Clean Cuts and Engraving
Acrylic is the material that made me respect machine choice more than any other. Run it on the wrong laser and you get a hazy, half-melted mess; run it on the right one with the right air pressure and you get a cut edge so glassy it looks flame-polished straight off the bed. After running 47-plus acrylic samples across my OMTech Polar 350 CO2 and my diode machines (the xTool S1 and the Atomstack X20 Pro I enclosed in-house), I’ve learned that acrylic rewards precision and punishes guessing. This is the deep guide to cutting and engraving it well — and to never putting the look-alikes that gas you out anywhere near the bed.
If you want the one-line version: cast acrylic on a CO2 laser, with low air assist (5–10 PSI), produces polished cut edges no diode can match on clear stock. Everything below is the long version — the why, the settings logic, the masking, the fume reality, and how colour changes the result. For a broader view of every material a laser touches, this cluster sits underneath our laser cutting materials guide, which covers acrylic at overview level; here we go all the way down on the one material. If you’re brand new, the complete beginner’s guide is the place to start before this one.
Why Acrylic Is the Friendliest Hard Material to Cut
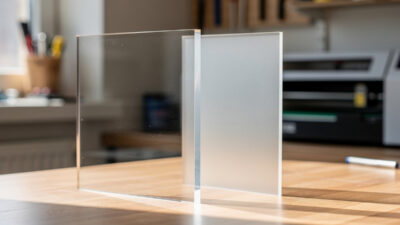
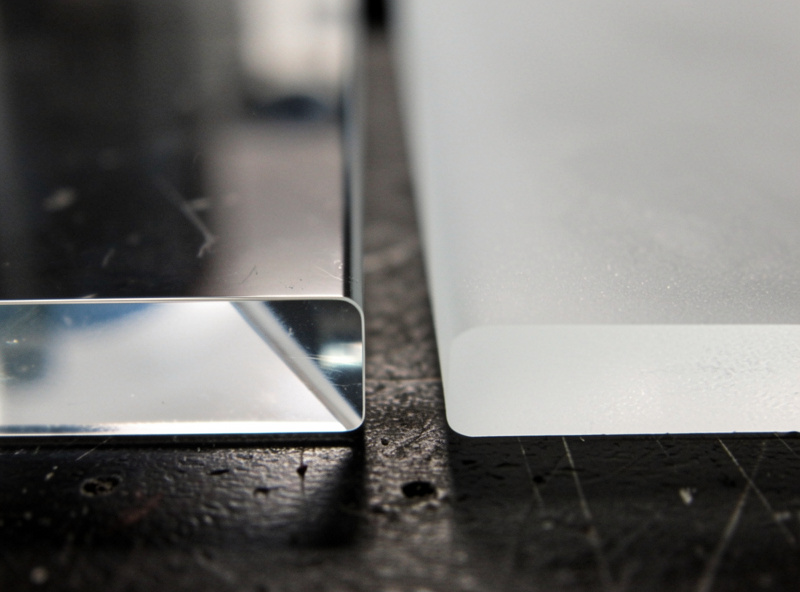
Acrylic (PMMA) cuts cleaner than almost anything else a hobby laser handles, because the cutting mechanism is melt-and-vaporise rather than burn-and-char. Wood scorches; acrylic flows. On a tuned CO2 machine, a cast clear sheet comes off the bed with a polished, transparent edge that needs zero sanding — the cut edge is effectively self-finishing. That’s the single biggest reason sign shops, trophy makers, and display builders live on acrylic: the edge that would cost you a sanding-and-buffing step in wood or metal comes finished straight off the laser, so the part is done the moment the cut completes. It’s also why a frosted engrave on clear acrylic reads so crisply — the surrounding material stays optically clear, so the white frost pops against it with no background noise.
The catch is that “acrylic” is not one material. The same sheet thickness can be cast or extruded, clear or opaque, pigmented in a dozen colours, and each variable changes how the laser couples energy into it. The operators who get consistently bad edges almost always blame their settings when the real culprit is the sheet — extruded stock where they assumed cast, or a diode trying to do a CO2’s job. Get the material identification right and the settings fall into place. Compared with the wood I run most, acrylic is less forgiving of a wrong machine but far more forgiving of a clean cut: there’s no grain to fight and no char to sand.
Cast vs Extruded: The Difference That Decides Edge Quality
This is the first fork in every acrylic job, and it’s the one I see beginners skip. Cast acrylic is poured into moulds and cured slowly into a uniform polymer; extruded acrylic is forced through a die under pressure, leaving directional internal stress. They look identical on the shelf. They cut nothing alike.
Cast acrylic melts smoothly at the kerf and leaves a glassy, polished edge. Extruded acrylic releases its internal stress as it melts, scattering light into a hazy white edge that no setting fixes — you’d have to hand-polish or flame-polish it back. There is genuinely no power-speed combination that makes extruded cut like cast; the difference is baked into the polymer. So for anything with a visible edge — signs, display cases, edge-lit panels — I buy cast and verify it on the label, not the price. Extruded isn’t useless, though: it’s flatter, cheaper, and perfectly fine when the edge is hidden or the part is engrave-only. The full breakdown gets its own dedicated cast vs extruded acrylic deep-dive in this cluster.
Diode vs CO2: Why Wavelength Decides Everything on Acrylic
Here’s the rule that saves the most wasted sheets: a diode laser cannot cut clear or transparent acrylic at any setting. The diode’s blue light (around 450–460 nm) passes straight through transparent PMMA without depositing energy — the polymer is effectively invisible to it. Black and dark opaque acrylic cut fine on a diode because the pigment absorbs the blue light, but on clear stock the beam just goes through the sheet and marks your honeycomb.
A CO2 laser at 10,600 nm interacts with the PMMA polymer itself regardless of colour, which is why CO2 is the correct tool for any serious acrylic cutting. My OMTech Polar 350 cuts clear cast acrylic up to about 10–12 mm; my Atomstack X20 Pro diode is restricted to dark opaque sheet and even then it’s slow and prone to a chunkier edge. If you only own a diode and you need clear acrylic cut, the honest answer is you need a CO2 or a cut service — there’s no settings trick around the physics. I’ve watched plenty of new owners burn an afternoon turning the power up on a diode trying to force clear acrylic, scorching the honeycomb underneath while the sheet stays untouched, because the beam simply isn’t being absorbed. Knowing that one fact before you buy a machine saves you both the wasted sheets and the wrong purchase. The wider machine-class logic is in our diode vs CO2 vs fiber comparison, and if you’re choosing a machine specifically for acrylic, the best laser engraver picks tag the CO2 options.
| Job | Best Machine Class | Why |
|---|---|---|
| Clear / transparent acrylic cutting | CO2 | Diode passes through; CO2 couples to the polymer |
| Black / opaque acrylic cutting (thin) | Diode or CO2 | Pigment absorbs blue light; diode works but slower |
| Thick acrylic (5 mm+) | CO2 | Diode can’t deliver the energy density cleanly |
| Frosted engraving on clear acrylic | CO2 | Diode can’t ablate a clear surface it passes through |
| Polished edge requirement | CO2 + cast sheet | Clean melt edge; diode kerf is rougher |
Settings: Power, Speed, Passes, and the Air-Assist Twist
Acrylic settings invert one habit from wood cutting: you want LESS air assist, not more. On wood I run 15–25 PSI to clear smoke and kill flame-up. On acrylic, that much air cools the molten kerf too fast and frosts the edge. The acrylic sweet spot is 5–10 PSI — enough to clear smoke, not enough to chill the melt. For the glassiest edges on cast clear I’ll drop to about 5 PSI and add 10–15% speed, which keeps the edge hot enough to re-flow, and I never leave that cut unattended because lower air means higher flame-up risk.
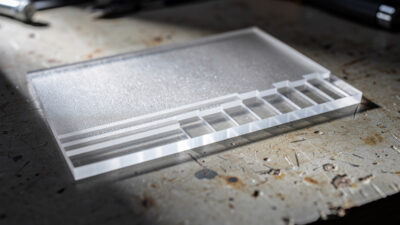
Power and speed scale with thickness the way you’d expect — more power and slower speed for thicker sheet — but acrylic strongly prefers a single slow pass over multiple fast ones. Each extra pass re-melts material that’s already cooled and re-deposited at the kerf, which dulls the edge. I dial in a one-pass cut wherever the machine has the headroom. As with every material, I cut a quick power-speed test grid on the actual sheet lot before a production run, because even “cast clear” varies brand to brand. I run that grid in LightBurn as a small array of squares stepping power down each row and speed up each column, cut it on a corner offcut from the same sheet, and read the cleanest fully-through square straight off the bed — two minutes of setup that saves a ruined full sheet. The same materials test card discipline I apply to wood and leather is the single habit that separates consistent acrylic edges from lucky ones. The exact, per-machine, per-thickness numbers from my test logs live on the dedicated acrylic laser cutting settings page rather than being re-listed here, so this hub stays a map rather than a duplicate table.
Choosing Thickness: Matching Sheet to Job
Thickness is the variable beginners pick last and should pick first, because it drives everything downstream — whether your machine can even cut it, how long the job takes, and whether the part is rigid enough for its purpose. As a working rule on my bench: 1.5–2 mm for tags, keychains, and ornaments where weight matters; 3 mm as the default for signs, panels, and most display work because it’s rigid without being slow; 5–6 mm for edge-lit panels and standing signs that need to hold themselves upright; and 8–12 mm for chunky display bases, awards, and anything where the edge itself is the feature.
The trade-off is that cut time and flame-up risk both climb steeply with thickness. A 3 mm cast clear sheet cuts in one comfortable pass on my Polar 350; 10 mm is a slow, watch-it-the-whole-time job that I’d never run unattended. If you’re on a diode and limited to dark opaque sheet, stay at 3 mm and below — the energy density just isn’t there for thick stock, and pushing it produces a scorched, incompletely-cut edge that’s worse than not cutting at all. When in doubt, prototype in 3 mm: it’s the most forgiving thickness across both machine classes and the cheapest to waste while you dial the design in.
Masking: Leave the Film On, Mostly
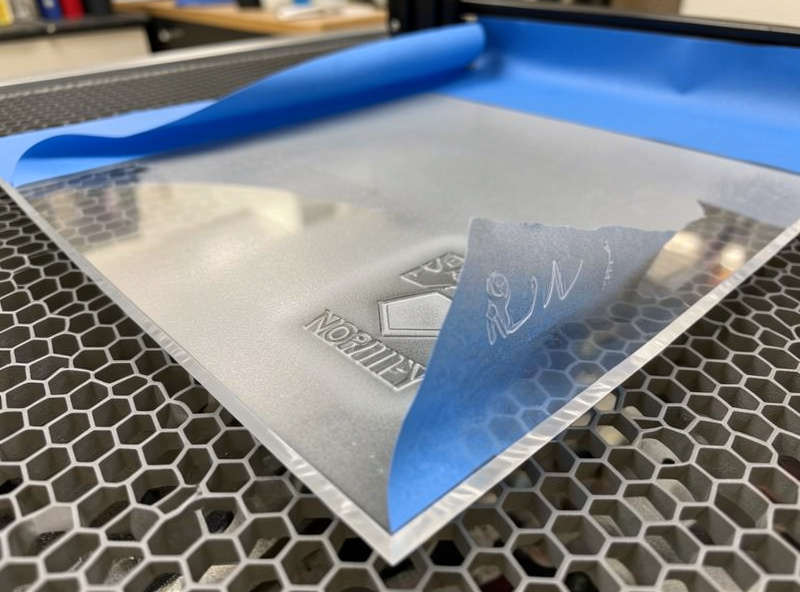
Most cast acrylic ships with a paper or polythene protective film on both faces, and whether you cut through it matters. Leaving the film on for cutting protects the surface from smoke deposition — the part comes off clean and the film peels away taking the soot with it. Strip it first and you’ll be cleaning smoke haze off the surface with isopropyl afterwards.
My default: leave the film on to cut, peel after the part is out. For engraving I peel only the film over the engraved area and leave the rest for handling protection. If a sheet arrives bare, I apply paper transfer tape as substitute masking and engrave straight through it. Paper film is my preference over polythene for engraving because it lies flatter and the frost forms cleaner under it, whereas poly can lift slightly and trap a little smoke at the edges. The one place I peel everything off first is a deep multi-pass engrave, where the masking can scorch and bond burnt paper into the channel — residue that’s harder to clean than the smoke it was meant to stop. There’s real nuance here — paper vs poly film, which masks engrave cleaner, when masking actually hurts you — and it gets its own deep treatment in the masking acrylic deep-dive later in this cluster.
Engraving vs Cutting: Two Jobs, Two Mindsets
Cutting acrylic is a vector job; engraving is a raster job, and the depth distinction matters more on acrylic than on most materials. Frosted surface engraving is a shallow ablation that produces white-on-clear graphics — the everyday acrylic engrave. Deep engraving cuts 1–3 mm into the surface for tactile signage and the backlit panels where the engraved channels glow under an LED. The settings, line interval, and pass strategy diverge completely between the two, and confusing them is why people either melt through a frost or fail to get any depth.
One acrylic-specific quirk that trips people up: you usually engrave acrylic with the film removed (the frost forms on the bare surface) but cut with the film on. So a part that’s both engraved and cut needs a film-management plan — peel the engrave zone, run the raster, then cut through the still-masked outline. The full power-vs-depth treatment gets a dedicated engrave-vs-cut-depth spoke in this cluster.
Edge-Lighting: Acrylic’s Best Party Trick
Acrylic pipes light along its length — shine an LED into the edge of a clear sheet and engraved areas glow while the rest stays dark. That’s total internal reflection at work: the light bounces along inside the sheet until it hits an engraved area, where the roughened surface scatters it out toward your eye. That’s the whole basis of edge-lit signs and night-lights, and it’s where cast clear acrylic plus a controlled engrave depth really pays off. On my Polar 350 I run the engrave as a moderate-power, high-speed fill aimed at an even matte frost rather than a deep gouge, because going too deep just creates bright hotspots instead of a uniform glow — the depth that lights evenly is shallower than most people expect. Extruded stock and any internal haze kill the effect, so this is one place where the cast-only rule is absolute. The technique (engrave depth for an even glow, why cast beats extruded here, choosing the LED base) is general enough to deserve its own edge-lit technique guide; if you want to follow a finished build start to finish, our edge-lit acrylic night-light project walks one all the way to the LED base.
Fumes: Acrylic Is Cleaner Than Wood, But Not Clean
Acrylic fume is less acrid than burning wood and far less dangerous than the materials it’s confused with, but “cleaner than wood” is not “safe to breathe.” Cutting PMMA releases methyl methacrylate vapour and fine particulate, and it has a sharp sweet smell that lingers. Every acrylic cut on my bench runs on the same non-negotiable I apply to everything: air assist on, ducted exhaust to outside — never recirculated into the room. A box fan in a window is not extraction; my workshop ventilation setup runs an inline blower ducted outside with a charcoal stage for engraving polish. The full ventilation picture, including duct and blower sizing for acrylic specifically, gets a dedicated fumes-and-ventilation spoke in this cluster.
The Look-Alikes That Must Never Enter the Laser
This is the part the “look how easy acrylic is” videos skip, and it’s the part that protects your lungs and your laser. Several plastics are sold in the same sheets and colours as acrylic and are catastrophic in a laser. Polycarbonate (Lexan) looks identical, cuts terribly, yellows, and outgasses — never cut it. PVC and vinyl release chlorine gas that corrodes your machine and harms your lungs; this is the single hardest ban on my bench and it never bends. If you can’t positively identify a clear plastic, you don’t cut it — the snap test (acrylic breaks glassy and brittle; polycarbonate flexes and resists) is the field check, and “I think it’s acrylic” is not identification. Our PVC laser cutting dangers piece covers the chlorine reality in full, and the broader laser safety essentials cover the fire and eye side.
Colour Changes the Result More Than You’d Think
Pigment doesn’t just change how a sheet looks — it changes how it cuts and engraves. Black opaque sheet absorbs diode light and cuts where clear won’t; white and light pastels behave differently again; fluorescent edge-glow acrylics are their own animal. Engraving contrast also swings hard with colour: a frost reads brilliant white on dark sheet and almost vanishes on white. The per-colour behaviour from my test cards gets its own colored acrylic results spoke in this cluster.
Common Acrylic Problems and What Actually Causes Them
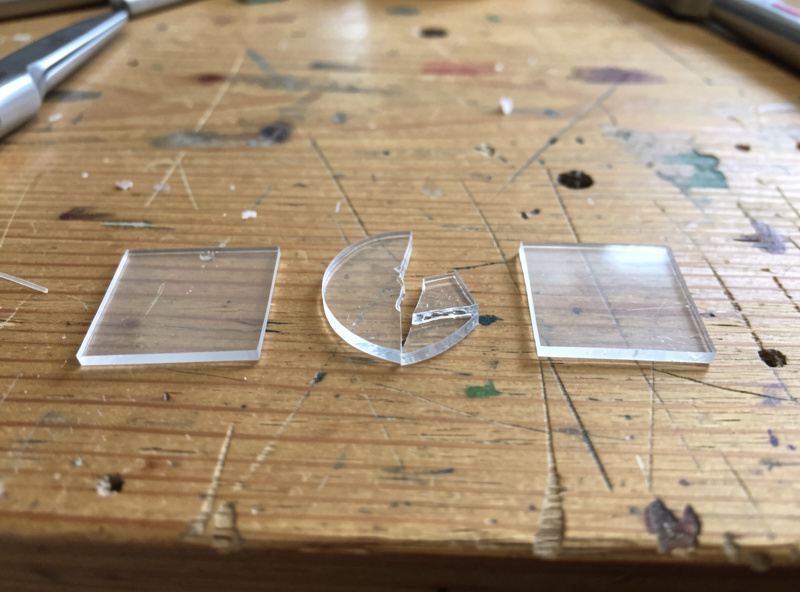
When an acrylic job goes wrong it’s almost always one of a handful of repeat offenders, and the fix is rarely “more power.” A hazy, frosted edge on a clean cut means extruded sheet or too much air assist — confirm the material is cast and drop the pressure to 5–10 PSI before touching power. An incomplete cut that didn’t go all the way through usually means focus is off or you tried clear acrylic on a diode; re-run your focus and confirm machine class. Flame-up and a bubbled, charred kerf means the beam dwelled too long — speed up and make sure air assist is actually flowing, because a clogged nozzle silently kills it. A milky, residue-streaked face after engraving means you ran without masking and deposited smoke; mask the engrave zone next time. For the general fault-finding flow across every material, our troubleshooting guide walks the diagnostic order.
The meta-lesson under all of these: acrylic faults are diagnostic, not random. A clean cut on a tuned machine with the right sheet is the default state, so when it goes wrong something specific changed — the material lot, the focus, the air line, or the masking. Work that short list in order and you’ll fix it faster than throwing power at it.
Frequently Asked Questions
Can a diode laser cut clear acrylic?
No, not at any setting. The diode wavelength near 450 nm passes straight through transparent acrylic without depositing energy. Diodes cut only black or dark opaque acrylic, where the pigment absorbs the light. For clear or transparent acrylic you need a CO2 laser.
Why does my laser-cut acrylic have a hazy white edge?
Almost always because you cut extruded acrylic instead of cast, or your air assist pressure is too high. Cast acrylic at 5 to 10 PSI air assist gives glassy polished edges; extruded never does no matter the settings. Drop the air pressure and confirm the sheet is cast.
What air assist pressure should I use for cutting acrylic?
5 to 10 PSI, much lower than the 15 to 25 PSI used for wood. Higher pressure cools the molten kerf too fast and frosts the edge instead of leaving it polished. For the glassiest edge run about 5 PSI and watch closely, because lower air raises flame-up risk.
Is laser-cut acrylic fume dangerous?
It is less acrid than burning wood but not harmless. Cutting acrylic releases methyl methacrylate vapour and fine particulate. Run air assist and ducted exhaust to outside on every cut, never recirculated into the room. It is far safer than PVC, which must never be lasered at all.
How do I tell acrylic apart from polycarbonate?
Snap a corner off a scrap. Acrylic breaks with a glassy, brittle fracture; polycarbonate flexes and resists snapping. Polycarbonate looks identical on the shelf but cuts badly, yellows, and outgasses, so if you cannot positively identify a clear plastic, do not put it in the laser.
What thickness of acrylic is easiest to start with?
3 mm cast acrylic is the most forgiving across both diode and CO2 machines. It is rigid enough for signs and panels, cuts in a single comfortable pass on a desktop CO2, and is cheap enough to waste while you dial in a design before scaling to thicker stock.