Edge-Lit Acrylic: The Laser Engraving Technique That Glows
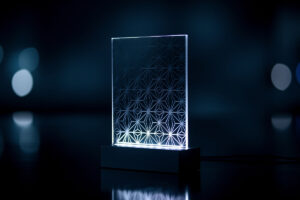
The first time I edge-lit a piece of acrylic I genuinely grinned at the bench. You engrave a design into a sheet of clear acrylic, stand it in a slotted base with an LED firing into the bottom edge, and the engraved lines light up while the rest of the sheet stays dark and invisible. It looks like magic and it’s pure physics — total internal reflection piping light along the sheet until your engraving scatters it out. This is the technique behind every edge-lit sign, nameplate, and night-light, and once you understand the three variables that control it you can make any of them.
What most people get wrong is chasing a brighter LED when the real lever is engrave consistency: use clear cast acrylic, engrave to a consistent shallow depth, and light the bottom edge with a focused LED, and the glow takes care of itself. Below I’ll walk the whole technique — why cast, how the light actually travels, dialling engrave depth for an even glow, and the cutting and base details — as a general method that builds on the wavelength logic in the diode vs CO2 comparison. If you’d rather follow one finished build start to finish, the edge-lit acrylic night-light project does exactly that; this is the technique behind it. Both sit under the laser cutting acrylic guide.
How Edge-Lighting Actually Works
Clear acrylic is a light pipe. When light enters one edge at a shallow enough angle, it bounces off the internal faces of the sheet by total internal reflection and travels the length of the panel instead of escaping — the same principle that carries light down a fibre-optic cable. As long as the surface is smooth, the light stays trapped and the sheet looks dark.
Engraving breaks that smoothness. Every frosted pit you ablate into the surface is a spot where trapped light hits a rough face and scatters out toward your eye, so the engraved areas glow while the untouched sheet stays clear. That’s the entire trick: the engraving is a controlled defect that releases light exactly where you want it. It also means the quality of your glow is the quality of your engraving — uneven depth means uneven brightness, and that’s the single thing beginners get wrong.
Why Cast Clear Acrylic Is Non-Negotiable Here
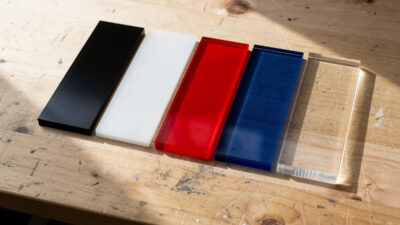
Edge-lighting demands optical clarity through the whole sheet, and that rules out extruded acrylic immediately. The cut edge where your LED enters needs to be glassy so light couples in cleanly — an extruded sheet’s frosted cut edge scatters the LED’s light before it even gets into the panel, killing the effect at the source. Cast acrylic cut on a CO2 laser gives you that clean optical entry edge for free.
It also has to be clear, not just colourless-looking. Some bargain acrylic has a faint tint or internal haze that dims the glow over distance. I buy known cast clear stock for edge-lit work and test a small offcut first: engrave a few lines, light the edge, and check the glow reaches the far end evenly. If it fades badly across a small sample, it’ll be worse on a full panel. This is also strictly CO2 territory — a diode can’t cut or frost clear acrylic at all, for the wavelength reasons covered in the cast vs extruded breakdown and the main guide.
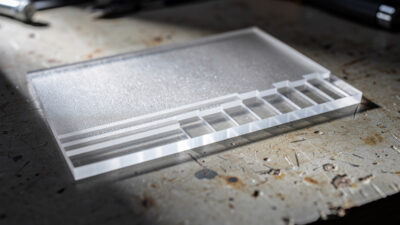
Engrave Depth: The Variable That Makes or Breaks the Glow
This is where the technique lives. Engrave too shallow and the design barely lights; engrave too deep and you get bright, blotchy hotspots and the surface starts to melt and bubble. The target is a consistent, moderate frost — deep enough to scatter clearly, shallow enough to stay even across the whole design.
On my Polar 350 I run edge-lit engraving as a fill at moderate power and fairly high speed with a tight line interval, aiming for an even matte frost rather than a deep gouge. The exact numbers depend on your machine, but the method is universal: cut a test panel with a few blocks of fill at stepped power levels, light the edge, and pick the lowest power that gives a bright, even glow. Going past that point buys you nothing but hotspots. Line interval matters too — tighter spacing gives a smoother, more solid glow for filled areas, while line-art designs glow as crisp bright strokes. The starting power-and-speed numbers I use for acrylic fills live on the acrylic laser cutting settings page, and the deeper relationship between engrave power and the depth you actually cut gets its own dedicated spoke in this cluster.
One more consistency factor: engrave with the protective film removed over the design area so the frost forms cleanly on bare acrylic. If the bed isn’t dead flat or the sheet bows, depth varies across the panel and so does the glow — hold the sheet flat with light masking-tape tabs or a magnet at the corners.
Which Face to Engrave
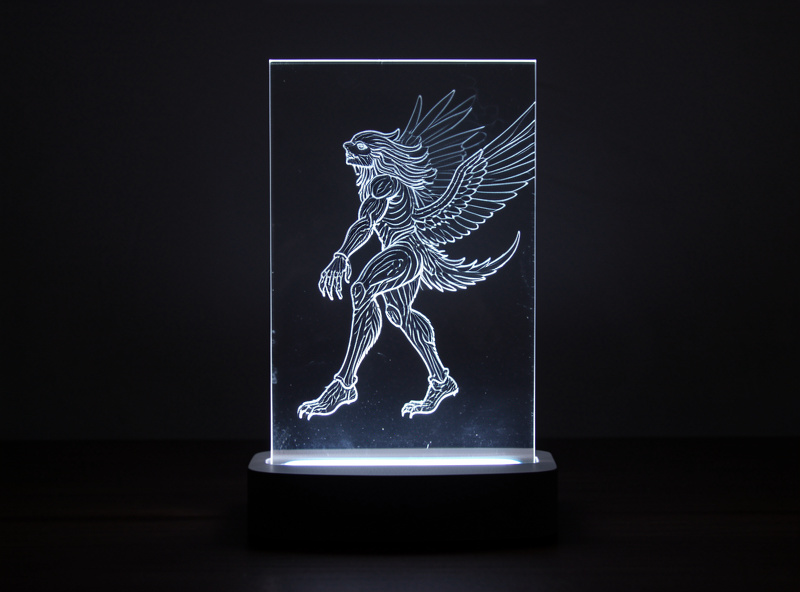
You can engrave the front or the back face, and it changes the look. Engraving the back face (away from the viewer) gives a clean, slightly recessed glow with the smooth front surface protecting the design — my default for nameplates and signs. Engraving the front face puts the frost right at the surface for a sharper, more textured glow that catches room light even when the LED is off. Neither is wrong; pick by the look you want, and stay consistent within a single piece. For two-layer effects, two thin engraved panels stacked with a small gap produce a genuine sense of depth.
| Choice | Look | Best for |
|---|---|---|
| Back-face engrave | Clean, slightly recessed glow; smooth front protects the design | Nameplates, signs, anything handled often |
| Front-face engrave | Sharper, textured glow; catches room light even with the LED off | Decorative pieces where the frost itself is part of the look |
| Cool white LED | Brightest, crispest glow | Signage and text where legibility matters |
| Warm white LED | Softer, cosier glow | Night-lights and ambient pieces |
| RGB / colour LED | Changeable colour, but dimmer than white | Display pieces where mood beats raw brightness |
Cutting the Panel and the Base Slot
The panel outline is a normal CO2 cut on cast acrylic — nothing special except that the bottom edge, where light enters, wants to be as clean and square as possible, so keep air assist low for a polished kerf there. Avoid putting the LED-entry edge on a curve if you can; a flat bottom edge couples light far more evenly than a curved one.
The base holds the panel upright and hides the LED strip firing up into that bottom edge. You can laser-cut a slotted acrylic or wood base, 3D-print one, or buy a ready-made LED base. The slot needs to be a snug press fit — measure your panel thickness and your kerf, and tune the slot width so the panel stands without wobble but slides out for cleaning. A loose slot lets the panel tilt and the entry edge drift off the LEDs, which dims and unevens the glow.
Choosing the LED Base and Light Source
The light source is the last variable, and the rule is “focused, white, and aimed at the edge.” A strip of LEDs running the full length of the bottom edge gives the most even glow; a single point source lights unevenly. Colour is a choice — cool white reads crisp and bright, warm white is softer, and RGB bases let you change it, though pure colours dim the apparent brightness compared with white. The base should fully enclose the LEDs so you see the glow in the panel, not the diodes themselves.
For a finished piece I reach for a couple of consumables. A sheet of clear cast acrylic in 3–5 mm is the panel itself, and a ready-made edge-lit LED light base saves building one if you just want the panel to shine — it slots in, plugs in, and lights the bottom edge evenly. Both are cheap relative to how finished they make the result look.
As an Amazon Associate I earn from qualifying purchases. These are the materials I actually use for edge-lit panels; the links never change the method.
Frequently Asked Questions
What acrylic do I need for edge-lit signs?
Clear cast acrylic, cut on a CO2 laser. The cut entry edge must be glassy so the LED light couples in cleanly, which extruded acrylic cannot give because it frosts at the cut. Cast clear in 3 to 5 mm is the standard choice for edge-lit panels.
How deep should I engrave acrylic for edge-lighting?
Aim for a consistent moderate frost, not a deep gouge. Run a stepped power test, light the edge, and pick the lowest power that gives a bright even glow. Going deeper than that only creates hotspots and surface bubbling. Even depth matters far more than depth itself.
Can a diode laser make edge-lit acrylic?
No. A diode cannot cut or frost clear acrylic because its blue wavelength passes straight through the transparent sheet. Edge-lighting needs clear acrylic, so it is strictly a CO2 laser job. A diode can only work dark opaque acrylic, which does not edge-light.
Why is my edge-lit glow uneven?
Almost always uneven engrave depth, a bowed sheet, or the LED not aligned to the bottom edge. Hold the sheet flat while engraving, use a consistent fill power, and make sure the LED strip runs the full length of the entry edge in a snug base slot.
Should I engrave the front or back of the panel?
Either works. Engraving the back gives a clean recessed glow with the smooth front protected, which is the usual choice for signs. Engraving the front gives a sharper textured glow that catches room light even when off. Stay consistent within one piece.
What LED colour is best for edge-lit acrylic?
Cool white reads brightest and crispest; warm white is softer. Pure colours and RGB look good but appear dimmer than white because they use fewer of the LED emitters. Whatever colour you choose, a full-length strip along the bottom edge glows more evenly than a point source.