Troubleshooting Laser Cutting and Engraving Burns Incomplete Cuts and How to Fix Them
When Things Go Wrong: Systematic Problem Solving
Every laser operator encounters problems that produce disappointing results. Understanding systematic troubleshooting transforms frustrating failures into learning opportunities and quick resolutions. Rather than randomly adjusting settings hoping for improvement, methodical diagnosis identifies root causes so you apply correct solutions efficiently. This approach saves material, time, and the discouragement that drives beginners away from laser technology.
This comprehensive troubleshooting guide covers the most common laser problems including charring and incomplete cuts, uneven engraving and focus issues, power inconsistency, mechanical problems causing banding or drift, and material-specific difficulties. Each problem section provides diagnostic steps leading to probable causes and specific solutions you can implement immediately.
Charring and Excessive Burn Marks
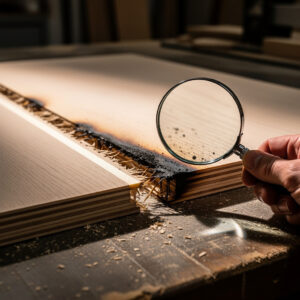
Charring occurs when material overheats during laser processing, leaving dark residue on cut edges or engraved surfaces. While some char is normal and removable with cleaning, excessive charring indicates suboptimal settings, focus problems, or inadequate air assist. Addressing charring improves both aesthetic quality and reduces post-processing cleanup time.
Diagnosing char causes: Examine the location and pattern of charring. Uniform char along cut edges suggests excessive power or slow speed heating material beyond vaporization into combustion. Soot on the top surface above cuts indicates insufficient air assist allowing smoke to deposit before extraction. Dark, deep char on engraved areas means excessive power density for the material. Charring concentrated at corners or start points suggests dwell time issues as the laser decelerates.
Power and speed adjustments: Reduce power percentage or increase speed to deliver less total energy to the material. As a starting point, try 10-15 percent less power or 20-30 percent faster speed. Run test cuts after each adjustment to assess improvement. The goal is minimum effective energy to cut through cleanly without heating adjacent material excessively. Document optimal settings for future reference. Stone is one of the most setting-sensitive materials — small power or speed changes shift contrast dramatically. For tested granite parameters, the laser engrave granite settings guide gives starting points for diode and CO2 machines with test-grid methodology.
Air assist verification: Verify air assist compressor operates and delivers air to the nozzle. Check pressure with a gauge, low pressure (under 10 PSI) often causes excessive char. Confirm the nozzle points directly at the cut point and sits at appropriate height (typically 5-10mm from material surface). Clean clogged nozzles that restrict airflow. For materials prone to flaming (thick acrylic, dense woods), increase air pressure to 25-30 PSI.
Material-specific considerations: Softwoods (pine, cedar) char more readily than hardwoods due to resin content. Plywood glue lines can burn excessively. Acrylic chars when cut too slowly, but also risks flaming when cut too fast with inadequate cooling. Test different material batches as manufacturing variations affect optimal settings. Some char is inevitable and requires post-processing cleanup, but excessive char indicates correctable problems.
Review material-specific guidance for your specific stock, as different materials require fundamentally different approaches to minimize char while achieving clean cuts.
Incomplete Cuts and Penetration Failures
When the laser fails to cut completely through material, leaving attached sections or thin membranes holding pieces together, the cause usually relates to insufficient power delivery, improper focus, or material inconsistencies. Diagnosing the specific failure mode guides appropriate solutions without wasteful guesswork.
Power delivery issues: Verify your laser tube operates at rated power by checking recent cuts of known-good materials. Tubes degrade over time, particularly CO2 glass tubes rated for 2,000-10,000 hour lifespans. Cloudy or pink discharge in the tube indicates degradation. Clean or replace degraded optics (mirrors and lenses) that reduce beam power reaching the material. Verify power supply voltage stability and connections. If the machine has operated successfully on similar material previously, gradual tube degradation is the likely culprit.
Focus problems: Incomplete cuts frequently result from improper focus settings. Verify the focal point sits at the material surface or slightly within the material for thick stock. Check focus height gauge or autofocus calibration. For multi-pass cutting, verify you adjust focus depth between passes to track through material thickness. Small focus errors compound power insufficiency, particularly on thick materials.
Speed versus power balance: Excessive speed for available power leaves insufficient energy to vaporize material completely through the thickness. Reduce speed or increase power in 10 percent increments until consistent penetration occurs. Remember that speed and power interact, sometimes a small speed reduction achieves penetration better than large power increases with less charring side effects.
Material inconsistencies: Plywood voids, glue pockets, and density variations cause localized incomplete cuts. Wood knots and grain density changes affect cutting differently across a sheet. Acrylic formulations vary between manufacturers and even batches. When incomplete cuts occur in specific spots rather than uniformly, suspect material issues. Use higher quality, more consistent stock for critical projects. Flip materials and cut from the reverse side if one surface resists penetration.
Uneven Engraving and Inconsistent Depth
Engraving should produce uniform depth and contrast across the entire design. Uneven results indicate focus inconsistencies, power fluctuations, material surface variations, or mechanical problems. These issues particularly frustrate photo engraving and detailed text work where uniformity matters aesthetically.
Focus uniformity across the bed: Laser beds are not perfectly flat, and material may warp or vary in thickness. Focus set at one point may be incorrect at distant bed locations. Test focus at multiple points across your work area to verify bed flatness. Shim low spots with masking tape or thin cardstock. Consider upgrading to better honeycomb or blade beds if flatness problems are severe. For critical engraving jobs, use autofocus or manual focus at the specific engraving location rather than bed center.
Power consistency issues: Engraving requires precise, stable power output. Power supplies may fluctuate with temperature or input voltage variations. Check power stability during long jobs by observing whether early engraving matches late engraving in the same file. Voltage stabilizers or UPS units can improve consistency. If power fluctuates widely, investigate power supply health and electrical supply quality.
Material surface preparation: Uneven material surfaces produce uneven engraving. Warped wood, bowed acrylic, or textured leather create depth variations unrelated to laser settings. Flatten materials before engraving using weights, clamps, or vacuum hold-down systems. Apply masking tape creating uniform surface texture that engraves more consistently than raw material variations. Clean surfaces to remove oils or contaminants that affect laser absorption.
Mechanical consistency: Worn bearings, loose belts, or inconsistent stepper motor stepping create banding or uneven engraving patterns. Inspect mechanical systems for wear. Listen for unusual noises during operation indicating mechanical problems. Tighten loose components. Lubricate lead screws and bearings per manufacturer specifications. Banding that appears at regular intervals often indicates mechanical issues rather than settings problems.
Banding, Lines, and Mechanical Defects
Banding manifests as visible horizontal or vertical lines across engravings that should be uniform. These artifacts indicate mechanical problems in the motion system rather than laser settings issues. Diagnosing and correcting mechanical problems restores the precision that makes laser work attractive.
Stepper motor and driver issues: Banding at regular intervals matching stepper motor step distances indicates microstepping problems or driver current settings. Verify stepper drivers provide adequate current for smooth motion without missed steps. Adjust microstepping settings if available. Overheating stepper motors or drivers cause missed steps creating visible artifacts. Ensure adequate cooling and verify motor temperatures during operation.
Belt and pulley problems: Loose belts allow positional slippage creating banding or positioning errors. Inspect belts for wear, fraying, or stretching. Tighten belts to manufacturer specifications, tight enough to prevent skipping but not so tight that they bind bearings. Check pulleys for wear and set screws for tightness. Clean accumulated debris from belt paths that might cause inconsistent engagement.
Bearing and rail maintenance: Worn linear bearings or contaminated rails cause sticky motion that translates to engraving artifacts. Clean rails and bearings regularly removing dust and debris. Lubricate per manufacturer specifications using appropriate lubricants. Listen for grinding or irregular sounds indicating bearing problems. Replace worn bearings before they cause permanent rail damage.
Weight and acceleration limits: Engraving heavy materials or operating at excessive acceleration stresses mechanical systems causing positioning errors. Verify your machine operates within rated capacity. Reduce acceleration settings in software if banding appears during direction changes or rapid movements. Support heavy materials adequately to reduce gantry loading.
Focus Drift and Alignment Problems
Focus position determines cut width, edge quality, and engraving depth. When focus drifts during jobs or differs between cuts, results suffer predictably. Focus problems stem from mechanical issues, temperature effects, or procedural errors in setting procedures.
Temperature effects on focus: CO2 laser tubes heat during operation, causing thermal expansion that shifts optical paths slightly. Allow machines to warm up for 10-15 minutes before critical jobs to reach thermal equilibrium. Some high-precision applications require focus adjustment after warm-up. Water cooling temperature stability affects tube length and thus focus. Maintain consistent water temperatures through quality chillers rather than simple radiators.
Mechanical focus system issues: Loose focus mechanisms drift from vibration during operation. Check that focus gauges, adjustment screws, or autofocus systems maintain settings securely. Clean focus mechanisms removing debris that might interfere with smooth operation. Verify autofocus probes or contact switches function consistently. Replace worn focus components that no longer maintain precise positioning.
Material height variations: Warped materials create focus variations across the work surface. Flatten materials before cutting or engraving. Use vacuum hold-downs or weights to maintain flatness. For irregular surfaces, consider multiple focus zones or use shallow depth of field lens configurations that tolerate height variations better. Map material thickness variations and adjust focus regionally if necessary for critical jobs.
Power Inconsistency and Fading
When laser output varies during operation or gradually fades over time, suspect power supply issues, tube degradation, optical contamination, or electrical problems. These issues progressively worsen if not addressed, eventually rendering the machine non-functional.
Laser tube degradation: CO2 laser tubes lose efficiency as gas mixtures deplete over operating hours. Tube color changes from pale pink to bright pink or purple indicating gas degradation. Power output decreases gradually requiring higher settings to achieve previous results. Eventually, tubes fail to ignite or sustain plasma. Document operating hours and plan tube replacement proactively before catastrophic failure during critical jobs. Quality tubes last 5,000-10,000 hours with proper cooling and operating practices.
Optical contamination: Mirrors and lenses accumulate dust, smoke residue, and contaminants that absorb laser energy before it reaches the material. Clean optics regularly using appropriate lens cleaning solutions and lint-free wipes. Check for pitting or coating damage that requires lens replacement. Even slight contamination significantly reduces effective power output. Establish regular cleaning schedules based on your material types and operating hours.
Power supply and electrical issues: Unstable input voltage causes power fluctuations visible as output variations. Loose connections create intermittent power delivery. Test power supply output stability under load. Check input voltage with a meter during operation to identify supply issues requiring voltage stabilizers or electrical work. Power supply failures may manifest as arcing, unusual noises, or complete output loss requiring component replacement.
Material-Specific Problem Solving
Different materials present unique challenges requiring specific troubleshooting approaches. Understanding material behavior helps you distinguish machine problems from material limitations.
Acrylic challenges: Acrylic melts and reflows if cut too slowly, creating ugly edges. It flames if cut too fast with inadequate air assist. Strike balance with moderate speed and adequate air pressure. Frosting on cuts indicates excessive heat, increase speed or reduce power. Cloudy edges suggest contaminated optics from acrylic vapor, clean mirrors and lenses immediately after heavy acrylic use.
Wood variations: Different species and densities require different approaches. Resinous woods (pine, cedar) char excessively, requiring faster speeds. Dense hardwoods need more power than softwoods. Plywood glue layers may resist cutting or burn darkly. Grain direction affects edge quality, test different orientations. Knots and defects cause localized problems, position designs avoiding obvious defects or use higher quality stock.
Leather and fabric issues: These materials burn readily, requiring careful speed and power balance. Chrome-tanned leather releases toxic chromium compounds, avoid entirely or ensure extreme ventilation. Synthetics like polyester may melt and seal rather than cut cleanly. Natural fibers cut and engrave most predictably. Use masking tape to prevent smoke staining on light-colored materials.
Our comprehensive materials guide provides detailed processing guidance for safe and unsafe materials, helping you avoid fundamental incompatibilities before they cause problems.
When to Seek Professional Help
While most laser problems yield to systematic troubleshooting, certain situations require professional service. Recognizing these limits prevents making problems worse through inexperienced repairs and ensures safety when dealing with high-voltage or precision optical systems.
High voltage safety boundaries: CO2 laser power supplies operate at lethal voltages (15,000+ volts). Never open power supply enclosures or access high-voltage components. If you suspect power supply failure, contact qualified service technicians. Do not attempt capacitor discharges or voltage testing without proper training and equipment.
Optical alignment procedures: CO2 lasers require precise mirror alignment directing the beam through the optical path. Misalignment causes power loss and potentially dangerous stray beams. While minor cleaning is user-serviceable, realignment procedures require specialized knowledge and equipment. If cleaning optics does not restore power, professional alignment may be necessary.
Controller and electronics failures: Intermittent controller operation, communication errors, or complete system failures may require component-level diagnosis beyond typical user capabilities. Document symptoms carefully before contacting support, as intermittent problems are particularly challenging to diagnose remotely.
Systematic troubleshooting skills develop with experience, gradually reducing the frequency and severity of problems you encounter. Document your solutions for future reference and share insights with the laser community. Combine troubleshooting knowledge with proper workflow practices to minimize problems before they occur, and when ready, apply your skills to practical projects that build competence and confidence.