How to Choose Your First Laser Cutter or Engraver A Decision Framework
Moving Beyond Reviews to Real Understanding
Search engines overflow with laser cutter reviews claiming to identify “the best” machine for everyone. This approach fundamentally misunderstands how laser technology works and what different users actually need. The optimal laser for a jewelry designer producing metal pieces differs dramatically from what serves a sign maker cutting acrylic letters or a hobbyist engraving wooden keepsakes. Rather than asking which machine is best, you must determine which machine matches your specific applications, workspace constraints, and growth plans.
This framework replaces the review-chasing approach with systematic decision-making based on five critical dimensions: power requirements for your materials, work area size for your projects, enclosure and ventilation realities, software compatibility with your design workflow, and budget allocation that accounts for hidden costs. Each dimension builds on the others, creating a decision tree that leads to the right machine rather than the most popular one.
Understanding these dimensions before shopping prevents expensive mistakes. Buyers frequently purchase machines with insufficient power for their intended materials, discover their workpieces do not fit the bed size, or realize their workspace cannot accommodate the ventilation requirements. Others select machines with proprietary software that locks them into frustrating workflows or ignore the total cost of ownership including ventilation, cooling, and consumables. This framework helps you avoid these pitfalls through structured analysis rather than impulse purchasing.
Power Requirements: Matching Wattage to Materials
Power represents the most critical specification because it directly determines what materials you can cut, how fast you can work, and what thicknesses are practical. However, power ratings alone tell incomplete stories without understanding power density, beam quality, and material absorption characteristics. A well-engineered 50-watt machine often outperforms a poorly constructed 80-watt system through better optics and motion control.
Minimum power thresholds by application: For engraving-only work on wood, leather, and cardboard, 5-10 watts suffices for diode lasers or 40 watts for CO2 systems. Cutting through 3mm acrylic or plywood reliably requires 40-50 watts on CO2 systems or 15-20 watts on diode systems with multiple passes. Processing 6mm materials consistently demands 60-80 watts on CO2 machines. Cutting 10mm+ materials or metal marking requires 80-100+ watts or specialized fiber systems.
Understanding power density: The laser spot size dramatically affects real-world cutting capability. A 50-watt laser with a tight 0.1mm spot cuts more effectively than an 80-watt laser with a 0.3mm spot because energy concentrates in a smaller area. Quality machines specify not just wattage but beam quality (M² factor) and focal spot size. This explains why budget machines with inflated wattage ratings disappoint when beam quality suffers from cheap optics.
Material-specific power needs: Acrylic cuts cleanly at relatively low power settings because it vaporizes smoothly without char. Wood requires more power but produces char that increases with excessive heat input. Leather and fabric need moderate power with careful speed control to prevent burning. Metals generally require fiber lasers or extremely high-power CO2 systems with oxygen assist. Understanding your primary materials helps you avoid over-buying or under-specifying power.
Growth planning: Consider whether your projects will grow more demanding over time. Starting with 40-50 watts accommodates current needs while leaving upgrade headroom. Buying exactly what you need today often means outgrowing the machine within a year. Conversely, purchasing 100+ watts for occasional light cutting wastes money and space. Honest assessment of your trajectory, not just current needs, guides proper power selection.
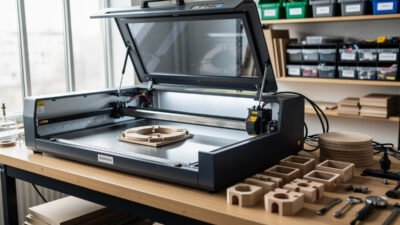
Work Area Size: Matching Bed Dimensions to Projects
Work area size constrains your creative and commercial possibilities as rigidly as power constraints material thickness. While oversized machines waste money and space, undersized beds force compromises that limit project scope, increase assembly complexity, or require material waste through inefficient nesting. Understanding typical project dimensions helps you select appropriately without over-specifying.
Common work area sizes and applications: Compact diode lasers often offer 8×8 to 12×12 inch work areas suitable for jewelry, coasters, small signs, and electronics enclosures. Desktop CO2 machines typically provide 12×20 to 16×24 inch beds accommodating medium signs, panel projects, and garment pieces. Mid-range CO2 systems offer 20×28 to 24×36 inch areas for furniture components, large signage, and efficient material utilization. Industrial machines exceed 36×48 inches for architectural projects and production efficiency.
Pass-through considerations: Many CO2 lasers offer pass-through doors or removable panels allowing material longer than the bed to slide through during cutting. This feature dramatically extends effective work area for cutting long pieces like signage, rails, or trim while maintaining compact machine footprints. If your projects include long linear elements, prioritize pass-through capability over raw bed size.
Material sheet efficiency: Standard material sheets (12×24 inches, 24×48 inches, or 48×96 inches) should fit efficiently within your work area with minimal waste. A 12×20 inch bed accommodates one-quarter of a 24×48 sheet with some waste, while a 20×28 inch bed uses half-sheets more efficiently. Consider your typical material purchases and how they will nest into the available space.
Rotary attachment compatibility: If you plan to engrave cylindrical objects like tumblers, bottles, or rolling pins, verify that your chosen machine supports rotary attachments and that the work area accommodates them. Rotary devices consume significant Z-axis height and may limit X-axis travel. Confirming compatibility before purchase prevents disappointment when attempting to expand your capabilities later.
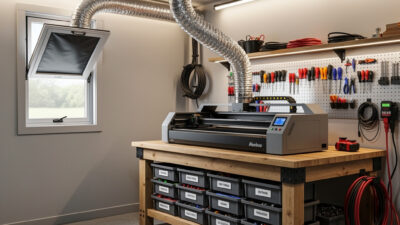
Enclosure and Ventilation: Critical Safety Infrastructure
Laser operation generates fumes, particulates, and potentially harmful gases depending on materials processed. Proper enclosure and ventilation protect your health, prevent fire hazards, and ensure legal compliance with workplace safety regulations. Ignoring these requirements creates dangerous situations that can cause respiratory damage, fire incidents, or legal liability. This dimension often surprises beginners who focus exclusively on machine specifications.
Enclosed versus open-frame designs: Fully enclosed machines contain fumes, reduce fire risks, and comply with safety standards requiring interlocks that disable lasers when doors open. Open-frame diode lasers require separate enclosure builds or operation in well-ventilated workshop spaces. CO2 lasers generally include enclosures, but quality varies regarding fume sealing and safety interlocks. Fiber marking lasers often lack enclosures but operate at lower fume generation levels.
Ventilation requirements by machine type: Diode lasers under 10 watts generate minimal fumes suitable for desktop operation near windows with simple exhaust fans. CO2 lasers above 40 watts require active exhaust systems ducting fumes outside through dedicated ventilation ports or filtered exhaust units. The required airflow, measured in cubic feet per minute (CFM), depends on laser power and work volume. Expect to need 200-400 CFM for desktop CO2 machines and 600+ CFM for larger systems or continuous production.
Exhaust routing realities: Ducting laser exhaust through windows, walls, or roofs requires planning. Window inserts, wall penetrations, and weatherproof exterior vents add cost and complexity. Some users install filtered exhaust systems that recirculate cleaned air indoors, eliminating external ducting but requiring filter maintenance. Our detailed workshop setup guide covers exhaust system design and CFM calculations for various configurations.
Material-specific hazards: Beyond general ventilation, certain materials release toxic gases requiring additional precautions. PVC and vinyl produce hydrochloric acid when lasered, damaging machines and posing health risks. Some plastics release cyanide compounds. Painted or treated materials may emit heavy metals or volatile organic compounds. Understanding material safety informs both ventilation requirements and material selection policies. Our materials guide details safe and unsafe material choices with specific hazard information.
Software Compatibility: Your Design Workflow
The software ecosystem connecting your design tools to the laser controller significantly impacts productivity and creative possibilities. Some machines lock you into proprietary software with limited capabilities, while others offer open compatibility with industry-standard design programs. Understanding your preferred design workflow helps you avoid machines that force uncomfortable software transitions or limit design complexity.
Design software options: Adobe Illustrator and Inkscape dominate vector design for laser work, offering precise control over cut paths, engraving fills, and layer organization. CorelDRAW maintains strong following in certain regions and industries. CAD programs like AutoCAD, Fusion 360, or SolidWorks serve users with engineering backgrounds. Raster graphics from Photoshop or GIMP work for engraving photographs but require different preparation approaches. Your existing skills and preferences should inform machine selection.
Controller and software compatibility: Machines using Ruida, Trocen, or similar DSP controllers typically work with LightBurn, the industry-standard laser control software offering powerful features and excellent user interface. GRBL-based diode lasers often use LaserGRBL or Candle. Some budget machines force proprietary software with limited functionality. Verify that your preferred design programs export formats compatible with your chosen machine’s workflow, typically SVG, DXF, AI, or PDF for vectors and PNG or BMP for raster engraving.
LightBurn advantages: For CO2 lasers, LightBurn compatibility should factor heavily into your decision. This software offers intuitive design tools, powerful camera alignment systems, batch processing, material library management, and excellent support communities. Machines incompatible with LightBurn force users into less capable software ecosystems that limit productivity and creative options. Our workflow guide demonstrates LightBurn integration throughout the design-to-finished-piece process.
Learning curve considerations: If you are new to design software, factor learning time into your project timeline. Vector design skills transfer between programs, but each interface requires adaptation. Some users prefer starting with laser-specific design tools included in machine software, then graduating to professional programs as skills develop. Others commit immediately to professional workflows knowing that early investment pays dividends in capability and efficiency.
Budget Allocation: Total Cost of Ownership
The purchase price represents only the beginning of laser ownership costs. Understanding total cost of ownership prevents budget overruns and ensures you can actually operate the machine you purchase. Hidden costs including ventilation infrastructure, cooling systems, software licenses, consumables, and maintenance often equal or exceed the machine purchase price over the first few years of operation.
Ventilation infrastructure costs: Budget $100-300 for inline exhaust fans and ducting for small machines, $300-800 for larger systems requiring substantial airflow, or $800-2,000 for filtered recirculating systems that avoid external ducting. Window inserts, wall penetrations, and weatherproofing add $50-200 depending on installation complexity. These costs are mandatory for safe operation and should not be deferred.
Cooling system requirements: CO2 lasers require cooling water circulated through the laser tube to prevent overheating. Small machines may use passive radiators or small chillers costing $100-300. Higher-power systems need industrial water chillers running $300-800 or more. Diode lasers generally use air cooling built into the machine. Factor cooling infrastructure into your total budget, as inadequate cooling dramatically shortens laser tube lifespan.
Software and accessory costs: LightBurn software costs $60-80 for the license depending on controller type. Rotary attachments add $150-400. Air assist systems improve cut quality and cost $50-200. Honeycomb or blade cutting beds optimize material support for different applications at $100-300. Lens and mirror cleaning supplies, spare lenses, and backup laser tubes (for CO2 systems at $200-600) represent ongoing operational costs.
Material and consumable budgets: Acrylic, wood, leather, and other materials represent recurring costs scaling with your production volume. Establish material suppliers and pricing before committing to laser ownership to ensure project economics work. Consumables like lens cleaning solution, replacement focus lenses, and maintenance parts require ongoing budgeting. A machine you cannot afford to feed creates frustration rather than capability.
Decision Framework: Walking Through Your Selection
With understanding of the five critical dimensions, apply this systematic process to narrow options to the right machine for your situation. This framework prevents the paralysis of endless reviews while ensuring you consider all essential factors.
Step 1: Material analysis. List the top five materials you intend to process regularly. Determine thicknesses and quantities. Research which laser types handle these materials effectively. If your list includes bare metals, you likely need fiber laser capability. If acrylic and wood dominate, CO2 serves best. If thin wood and cardboard with occasional metal marking, diode or low-power CO2 suffices. Eliminate machine types incompatible with your material needs.
Step 2: Project size assessment. Measure typical finished piece dimensions for your intended applications. Add margin for material handling and fixturing. Determine minimum workable bed size. If you foresee larger projects, consider pass-through capability versus larger beds. Cross-reference with machines meeting your material requirements from Step 1.
Step 3: Infrastructure reality check. Honestly assess your workspace ventilation options. Can you duct outside through a window or wall? Do building codes or landlords restrict external modifications? Is noise from exhaust fans acceptable? Calculate required CFM for machines under consideration. Eliminate options requiring infrastructure you cannot provide.
Step 4: Software workflow confirmation. Verify that machines under consideration work with your preferred design software or acceptable alternatives. Download trial versions or community editions to test workflows. Check that export formats align between your design tools and machine control software. Avoid machines forcing you into uncomfortable software ecosystems.
Step 5: Total budget calculation. Sum machine cost plus mandatory infrastructure (ventilation, cooling, safety equipment), necessary software, and initial consumable inventory. Compare against your available budget. If totals exceed budget, either delay purchase or identify which features can be deferred without compromising core capability.
Avoiding Common Selection Mistakes
Certain mistakes recur frequently among laser buyers, causing disappointment, safety hazards, or expensive upgrades shortly after purchase. Awareness of these patterns helps you avoid them through better decision-making.
Mistake 1: Power envy without purpose. Buyers often over-purchase power assuming bigger is always better. Excessive power increases cost, ventilation requirements, and operating expenses without benefit if your materials do not require it. Match power to actual needs with reasonable growth margin, not maximum budget.
Mistake 2: Underspending on infrastructure. Diverting budget from ventilation and safety to afford a more powerful machine creates dangerous situations. Inadequate ventilation damages your health and limits what materials you can safely process. Budget infrastructure first, then allocate remaining funds to machine capability.
Mistake 3: Ignoring software ecosystems. Machines with incompatible or limited software constrain your productivity regardless of hardware quality. The best laser tube and motion system underperform when paired with frustrating control software. Prioritize LightBurn compatibility or proven, capable alternatives.
Mistake 4: Neglecting community and support. Established brands offer user communities sharing settings, troubleshooting advice, and project ideas. Obscure brands may offer attractive prices but leave you isolated when problems arise. Research community activity and manufacturer support reputation before committing.
Finalizing Your Decision
After applying this framework, you should have a shortlist of machines meeting your technical requirements, infrastructure constraints, and budget limitations. The final selection among qualified options often comes down to specific features, brand reputation, warranty terms, and availability.
Feature prioritization: Among qualified machines, identify which features matter most for your workflow. Autofocus saves time when switching material thicknesses frequently. Camera alignment assists precise positioning of designs on materials. Rotary compatibility expands cylindrical engraving capability. Wireless connectivity reduces cable clutter. Rank features by importance to your specific applications.
Vendor evaluation: Research vendor reputation through community forums, social media groups, and review sites. Evaluate warranty terms, availability of spare parts, and responsiveness to technical questions. Some vendors offer excellent machines with poor long-term support. Others provide mediocre hardware but outstanding customer service. Balance these factors based on your technical confidence and support needs.
Remember that your first laser need not be your last. Many users start with modest machines to learn fundamentals, then upgrade as skills and business needs grow. The decision framework presented here helps you make an informed choice, but do not let perfect become the enemy of good. Understanding laser technology fundamentals prepares you to use whatever machine you select effectively.
Once you have selected your machine, immediately turn attention to safety preparation and workshop infrastructure. The time between ordering and delivery should be spent preparing your space, understanding safety requirements, and learning design software. This preparation ensures you start creating safely and effectively from day one rather than learning through costly mistakes.