12 Practical Laser Projects That Build Your Skills Step by Step
Learning by Doing: Progressive Skill Building
Reading about laser theory and settings prepares you for success, but actual competence develops through hands-on projects that challenge you with new techniques and materials. This collection of twelve practical projects progresses from simple introductions through intermediate complexity to advanced work, each teaching specific skills that accumulate into comprehensive laser mastery. Working through these projects systematically builds your capabilities while producing useful, attractive, and gift-worthy items.
Each project includes learning objectives, material requirements, design considerations, step-by-step execution guidance, and connections to foundational knowledge covered in other pillar articles. Internal links throughout help you reference deeper explanations of techniques when needed. Complete these projects in sequence for optimal skill development, or select specific projects targeting techniques you wish to master.
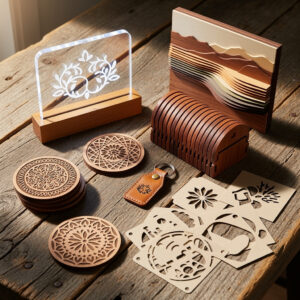
Project 1: Simple Coasters — Foundation Skills
Learning objectives: Basic vector design, material setup, focus setting, power and speed testing, and post-processing cleaning. This project introduces workflow fundamentals without complex geometry or precision requirements.
Materials: 3mm Baltic birch plywood or 3mm cast acrylic, 100mm x 100mm squares. Masking tape for surface protection.
Design and execution: Create 90mm diameter circles in your design software with a simple pattern inside, perhaps concentric rings or basic geometric shapes. Export as SVG following proper workflow preparation. Apply masking tape to material surface to prevent smoke staining. Perform test cuts on scrap to establish clean-through settings with minimal char. Cut four coasters from your material sheet. Remove from machine, peel masking tape, and lightly sand edges to remove any soot residue.
Skills developed: You have now executed a complete laser workflow from design through finished piece. You understand test cutting importance, material preparation with masking tape, and basic post-processing. These coasters may be simple, but they represent genuine laser-produced items you can use or gift immediately.
Project 2: Personalized Keychains — Text and Scaling
Learning objectives: Text design, scaling for small items, precise focus on detailed work, and handling small parts after cutting.
Materials: 3mm acrylic or plywood, 25mm x 75mm rectangles. Keychain rings or clips.
Design and execution: Design rectangular keychain blanks with rounded corners. Add text engraved on the surface, names, initials, or short words. Include a small hole (3-4mm diameter) for the keyring. Verify your material settings for both cutting (vector paths) and engraving (raster text). Position designs efficiently on your material sheet. Execute engraving first, then cutting to maintain material stability during text processing. Clean pieces thoroughly after cutting, small parts require tweezers or picks for removal.
Skills developed: Combining cut and engraved operations in single jobs. Managing small parts that might shift during processing. Text design at small scales requiring legibility considerations. This project produces personalized items suitable for gifts or small business products.
Project 3: Phone Stand — Interlocking Parts
Learning objectives: Designing interlocking 3D assemblies from 2D parts, kerf compensation for proper fit tolerances, and multi-piece assembly.
Materials: 6mm plywood or acrylic, approximately 200mm x 300mm sheet. Wood glue for plywood or acrylic cement for acrylic.
Design and execution: Design a simple phone stand using two interlocking pieces, a base with slots and an upright with matching tabs. Angle the upright approximately 70 degrees for comfortable viewing. Account for kerf width (typically 0.1-0.2mm) by making slots slightly narrower than material thickness for snug fit. Test fit tolerances on scrap material before cutting final pieces. Cut both pieces, clean edges, and assemble by sliding tabs into slots. Apply glue to permanent joints if desired.
Skills developed: Kerf compensation for press-fit assemblies. Understanding how 2D laser cutting creates 3D structures. Tolerance testing and adjustment. This project introduces the fundamental technique enabling complex laser-cut furniture and products.
Project 4: Living Hinge Book Cover — Flexible Materials
Learning objectives: Living hinge patterns that create flexibility in rigid materials, pattern density effects, and bookbinding basics.
Materials: 3mm Baltic birch plywood or hardwood, 150mm x 220mm (standard A5 book size). Small notebook or journal to fit inside.
Design and execution: Create a rectangular cover slightly larger than your book. In the spine area (center third), design a living hinge pattern using parallel lines cut through the material, spaced 1-2mm apart with small connecting bridges holding the pattern together. The cuts allow the wood to flex along the spine while the bridges maintain structural integrity. Test pattern density on scrap, too sparse and the hinge breaks, too dense and flexibility suffers. Cut the cover, clean thoroughly, and flex the spine gently to break it in. Attach your notebook inside.
Skills developed: Living hinge theory and practical application. Pattern design for material flexibility. Understanding material behavior under stress. This technique appears in laser-cut boxes, containers, and products requiring curved surfaces from flat stock.
Project 5: Layered Artwork — Depth and Dimension
Learning objectives: Multi-layer designs creating dimensional effects, material color combinations, and precise layer alignment.
Materials: 3mm acrylic in contrasting colors (clear, white, black, and one bright color). Four 150mm x 200mm sheets.
Design and execution: Design a simple scene or abstract pattern with four distinct layers. Each layer cuts different elements from different colored acrylic. When stacked, they create depth through transparency and color overlap. Design registration marks (small holes or notches) on all layers to ensure alignment during assembly. Cut each layer separately from appropriate color material. Clean all pieces thoroughly. Stack layers in order, using the registration marks to align precisely. Frame or mount the finished piece.
Skills developed: Thinking in layers and depth planes. Registration techniques for multi-part assemblies. Color and transparency design. This project introduces advanced approaches used in layered signage, artwork, and decorative products.
Project 6: Leather Wallet — Organic Materials
Learning objectives: Working with leather, understanding material variability, and post-processing flexible materials.
Materials: 1.5-2mm vegetable-tanned leather, approximately 200mm x 300mm piece. Leather conditioner and edge finishing supplies.
Design and execution: Verify you have vegetable-tanned leather, not chrome-tanned which releases toxic fumes. Design a simple bi-fold wallet pattern with card slots and bill pocket. Include stitching holes if you plan to hand-sew, or design for adhesive assembly. Apply masking tape to leather surface to prevent smoke marking. Test settings on leather scrap to achieve clean cuts without excessive char. Cut the wallet pieces. Remove masking tape and clean any residue with leather cleaner. Apply edge treatments and conditioner. Assemble using contact cement or saddle stitching.
Skills developed: Organic material handling different from rigid sheet stock. Edge finishing techniques. Understanding how laser cutting integrates with traditional hand-finishing crafts. This project bridges digital fabrication and traditional leatherworking.
Project 7: Acrylic Signage — Professional Presentation
Learning objectives: Signage design principles, text legibility at various scales, standoff mounting techniques, and professional finishing.
Materials: 6mm clear or colored acrylic, 300mm x 400mm. Standoff mounting hardware (four posts and screws).
Design and execution: Design a professional sign with business name, logo, or decorative text. Include mounting holes sized for your standoff hardware. Balance positive and negative space for visual impact. Cut the sign from acrylic using settings that produce polished edges. For enhanced effect, engrave text on the back surface (reverse engraving) so the front remains smooth and glossy. Clean thoroughly removing all dust and fingerprints. Mount using standoffs projecting the sign from the wall surface.
Skills developed: Design for professional applications. Edge quality optimization. Mounting and presentation techniques. This project produces portfolio-quality work demonstrating professional laser capabilities.
Project 8: Jigs and Templates — Production Efficiency
Learning objectives: Designing production aids, repeatable positioning systems, and workflow efficiency improvements.
Materials: 3mm plywood or MDF, sized to your laser bed. Target material for production runs.
Design and execution: Create a jig holding multiple identical pieces for batch processing. Design the jig with pockets matching your product shape and registration features ensuring consistent positioning. Include tabs or bridges on the product design that fit into the jig, holding pieces secure during lasering. Cut the jig from plywood. Load your production material into the jig pockets. Run your laser job cutting or engraving all pieces simultaneously. Remove finished pieces and repeat with new material.
Skills developed: Production thinking and efficiency optimization. Fixture design principles. Batch processing workflows. This project introduces techniques essential for commercial laser operations producing multiple identical items.
Project 9: Inlay Work — Precision Fitting
Learning objectives: Precision tolerances for inlay assembly, contrasting material combinations, and advanced fit techniques.
Materials: 3mm dark hardwood (walnut, wenge) and 3mm contrasting light material (maple, acrylic, or veneer). Two 150mm x 150mm sheets.
Design and execution: Design a pattern where pieces cut from one material fit precisely into cavities cut into the other material. Geometric patterns, logos, or decorative motifs work well. Account for kerf width to achieve press-fit tolerances, typically making inlay pieces 0.1-0.2mm larger than cavities. Cut the base material with cavities. Cut inlay pieces from contrasting material. Test fit individual pieces, sanding inlay pieces slightly if too tight or adjusting design for next iteration if too loose. Glue inlays into cavities flush with the surface. Sand smooth and finish.
Skills developed: Precision tolerance design. Two-material assembly thinking. Inlay techniques applicable to jewelry, furniture, and decorative arts. This project represents intermediate precision work requiring careful measurement and adjustment.
Project 10: Engraved Glassware — Advanced Material
Learning objectives: Glass engraving techniques, wet masking methods, and handling cylindrical objects with rotary attachments (if available).
Materials: Clear glass cups, tumblers, or flat glass pieces. Newspaper or masking liquid.
Design and execution: Review glass engraving safety and techniques. Apply wet newspaper or masking liquid to the glass surface, this prevents excessive fracturing and improves mark quality. Design text or simple graphics suitable for engraving. If you have a rotary attachment, set up the cylindrical glass rotating during engraving. If working on flat glass, position carefully at the laser focal point. Use lower power and slower speed than wood engraving, glass requires different energy levels. Engrave the design. Clean thoroughly removing masking residue. Test on inexpensive glassware before attempting valuable pieces.
Skills developed: Non-organic material processing. Surface preparation techniques for difficult materials. Cylindrical object handling. This project expands your material repertoire into permanent marking applications.
Project 11: Complex Box with Lid — Advanced Construction
Learning objectives: Finger joint or tab construction, fitted lids, precise dimensional control, and box-making mathematics.
Materials: 3mm plywood or hardwood, approximately 400mm x 600mm sheet. Wood glue and clamps.
Design and execution: Design a six-sided box (four sides, bottom, lid) using finger joints or interlocking tabs for assembly. Calculate dimensions precisely accounting for material thickness, for example, a 100mm x 100mm x 80mm box requires side panels 80mm tall with finger joints matching the 3mm material thickness. Design the lid either as a separate piece or with a lip fitting inside the box opening. Test joint tolerances on scrap to ensure snug fits without gaps or forcing. Cut all pieces. Dry-fit assembly to verify before gluing. Glue joints and clamp until set. Optional: add hinges or magnets for lid retention.
Skills developed: 3D construction thinking from 2D parts. Joinery design. Dimensional precision and tolerance management. This project demonstrates advanced laser capabilities applicable to product design, packaging, and furniture.
Project 12: Custom Stamp or Seal — Specialized Application
Learning objectives: Reverse design thinking for stamp applications, depth control for functional parts, and understanding specialized laser uses.
Materials: 3mm rubber stamp material or deep-engravable acrylic. 50mm x 50mm size. Wood or acrylic handle material.
Design and execution: Design your stamp pattern (initials, logo, or decorative motif). Mirror the design horizontally so it stamps correctly. For stamps, you want raised areas where the design is, recessed background. In the laser file, design the background to engrave deeply while leaving the design elements unengraved (or engrave them only slightly for contrast). This is opposite of typical engraving where you engrave the design. Engrave the background deeply (1-2mm) into rubber or engravable material. Cut the stamp shape from the material. Cut a handle from wood or acrylic. Attach the stamp to the handle using adhesive.
Skills developed: Reverse thinking for functional applications. Deep engraving control. Understanding laser applications beyond decorative cutting. This project demonstrates the versatility of laser technology for practical tool creation.
Building Your Portfolio and Skills
Completing these twelve projects establishes comprehensive laser competence covering essential techniques: basic cutting, text and engraving, interlocking assembly, living hinges, layered design, organic materials, professional finishing, production efficiency, precision fitting, advanced materials, complex construction, and functional applications. Each project builds upon previous skills while introducing new challenges.
Document your completed projects with photographs and notes about settings, challenges encountered, and solutions applied. This portfolio demonstrates your capabilities to potential customers if selling your work, or simply tracks your personal progress. Share your results with laser communities to receive feedback and inspiration.
As you complete these foundation projects, continue deepening your theoretical understanding through our other pillar articles. Reference decision frameworks as you consider equipment upgrades, maintain safety consciousness as you tackle more challenging projects, and apply workflow optimization to increase your efficiency and quality.
These projects transform you from a laser owner into a laser craftsperson capable of designing, executing, and finishing professional-quality work. The skills developed here apply to unlimited creative and commercial applications limited only by your imagination and continued learning. When you want a broader reference organized by material and difficulty, the laser engraving project ideas guide covers 30+ builds across wood, acrylic, metal, glass, and leather.