Laser Engraving Specialty Materials: The Right Machine for Each
Laser engraving specialty materials comes down to one rule I have proven dozens of times: match the machine class to the material. A 40W diode frosts glass and chars bamboo, but only a 1064nm fiber marks bare anodized aluminum in one pass.
Get that pairing wrong and you waste stock, scorch good work, or worse, set something smoldering. This guide is the map I wish I had when I started running odd materials through the machines. I run a diode (xTool S1), a desktop CO2 (OMTech Polar 350), and a fiber marker side by side, and over the years I have pushed glass, mirror, anodized aluminum, bamboo, cork, fabric, mylar, and a long list of stone and plastic through them. Below I lay out which machine each specialty material actually wants, the settings range to start from, and the safety lines you do not cross. The deep how-to for each material lives in its own dedicated guide; this hub is the decision layer above all of them.
Which Laser Handles Each Specialty Material?
Diode lasers (the blue 5-40W class) handle organics and coated surfaces: bamboo, cork, fabric, leather, painted metal, and frosting on glass. CO2 (10.6 microns) adds clean acrylic and deeper stone. Fiber (1064nm) is the only class that marks bare metal like anodized aluminum directly. Roughly 80% of specialty-material jobs land on a diode or CO2.
The physics is not negotiable. A diode’s 450nm blue light is absorbed by dark, organic, and coated surfaces but passes straight through clear glass and reflects off bare polished metal. That is why you frost glass (you are abrading a sprayed coating or the surface itself), why a diode marks anodized aluminum only by bleaching the dye layer, and why bare stainless needs a 1064nm fiber beam that the metal actually absorbs. When I get an unfamiliar material on the bench, the first question is always “what wavelength does this surface absorb,” and that answer picks the machine before I touch a single setting. If you are still choosing hardware, my diode vs CO2 vs fiber breakdown walks through the trade-offs material by material.
I learned this the expensive way early on, trying to “engrave” a polished aluminum flask with my diode and getting nothing but a faint heat haze and a lot of wasted time. The flask was bouncing the beam straight back. Once I understood that absorption, not power, decides whether a material marks at all, my whole approach changed. Now I sort every specialty material into one of three buckets before I switch a machine on: organic and coated surfaces that a diode loves, clear and acrylic-class materials that want CO2’s 10.6-micron wavelength, and bare metal that only a fiber will touch. That three-bucket sort saves more material than any settings tweak ever has.
It also reframes what “best machine” means. The xTool S1 is my most-used machine purely because the largest share of specialty work, the bamboo, the cork, the fabric, the leather, the coated tags, lands in the diode bucket. But “most-used” is not “best for everything.” The day I need a crisp permanent mark on a bare anodized luggage tag, the diode does not even get powered up; that job is the fiber’s, full stop. The skill is not loyalty to a machine, it is reaching for the right one without ego.
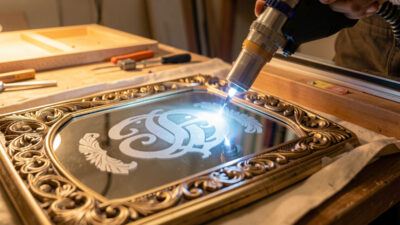
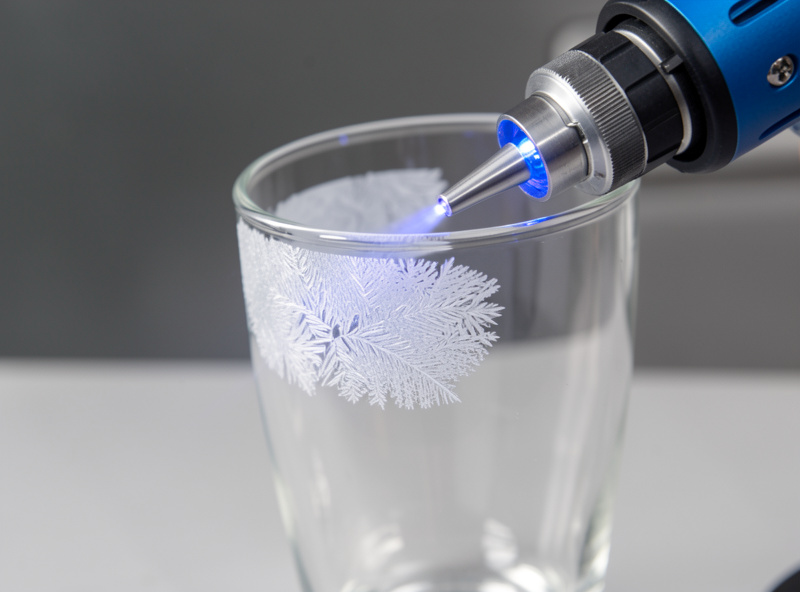
Glass and Mirrors: Frost, Don’t Cut
Glass cannot be cut on a hobby laser; it can only be surface-frosted. A diode or CO2 at roughly 15-25% power and 150-250mm/s produces a sandblasted-look frost. Mirrors add a twist: engraving the front frosts the glass, but engraving through the back removes the silvered backing for a see-through reverse mark.
I run most clear glassware as a frost job on the diode, often with a thin smear of dish soap or wet newspaper over the surface to even out the thermal shock and stop micro-chipping. The full technique, the soap trick, and the wet-newspaper method for cylindrical glassware are documented in my glass frosting guide. Mirrors are their own problem because of the metallic backing, and I treat reverse-engraving a mirror as a distinct technique with its own settings rather than lumping it in with clear glass; the front-versus-back call and the settings for each live in my mirror engraving guide. Either way, glass throws fine particulate, so air assist and exhaust are not optional.
The detail most beginners miss is that glass does not engrave so much as fracture in a controlled way. The laser superheats a microscopic spot, the glass expands, and a tiny chip pops off the surface. Do it cleanly and you get an even, sandblasted frost; do it too hot and you get a rough, chipped, milky mess with sharp flakes. That is the entire reason for the soap or wet-paper layer: it pulls heat off and keeps each fracture small. On my bench I keep the power low and the speed moderate, then run two passes if I want a deeper frost rather than cranking power on one pass. Cranking power is what gives you that ugly chipped halo around the engrave.
Anodized Aluminum: The Fiber-and-Diode Split
Anodized aluminum has two valid paths. A fiber laser ablates the dye for a permanent bright-silver contrast mark at around 20-40% power and 800-1200mm/s. A diode can also bleach the dye on dark anodized stock at slow speeds, but cannot touch bare or clear-anodized aluminum at all. Anodized marking releases almost no fume.
This is the one specialty material where my fiber marker genuinely earns its keep. On a black anodized aluminum tag, the fiber bleaches the dye down to the bright aluminum underneath in a single fast pass, and the mark is dead permanent. My diode can do a passable job on dark anodized stock if I crawl the speed, but it is fighting the physics. Bare mill-finish aluminum is a hard no for diode and CO2 alike. The full fiber-and-diode settings split for this stock is in my anodized aluminum engraving guide. If you are marking metal regularly, the same logic that drives my stainless tumbler settings applies, and choosing the right fiber is covered in my fiber laser for metal guide.
One nuance worth knowing: anodized marking is a removal, not an engraving. You are not cutting into the metal, you are vaporizing the colored anodic layer to reveal the bright substrate, which is why the mark is silver-on-color and why over-powering it does nothing useful, it just risks melting the surface. I keep the fiber fast and at moderate power and let multiple quick passes build contrast if a single pass looks weak. This is also why anodized aluminum is the cleanest specialty material to run from a fume standpoint: there is almost nothing being burned, just a thin dye layer being lifted, so it is the one job where I am not nervously watching the exhaust. It does not change the rule, air assist still runs, but anodized is as close to a worry-free specialty mark as I get.
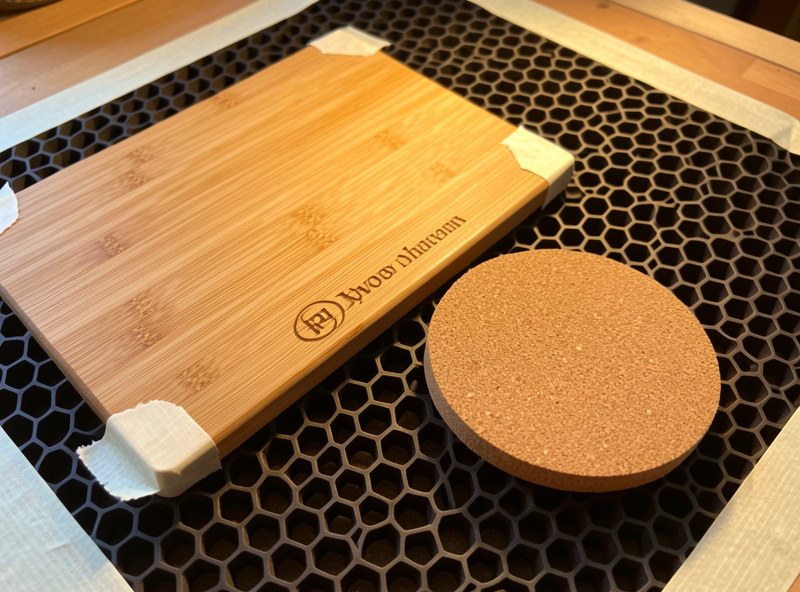
Bamboo and Cork: Organics That Char Fast
Bamboo and cork are diode-and-CO2 friendly organics. Bamboo’s hard, resin-rich surface engraves dark and crisp at roughly 70-90% power and 250-400mm/s, but its density varies node to node. Cork is the opposite: soft and low-density, so it marks at 20-40% power before it crumbles or burns through.
I keep both on the bench because they are fast, cheap, and forgiving for gifts and signage. Bamboo cutting boards and utensils engrave beautifully but the grain and the silica content mean I always run a fresh materials test card on each new lot, because one bamboo board takes 80% power and the next chars at 70%. Cork is a different animal entirely: it is so soft that excess power just turns it to ash. Both produce that sweet-acrid organic smoke that needs ducted exhaust, not a recirculating filter in the room.
Bamboo also hides a trap: most “bamboo” cutting boards are not solid bamboo, they are bamboo strips glued into a block, and the glue lines engrave differently from the fibers. I have pulled a board off the bed with a beautiful logo across the bamboo and a faint, blotchy patch exactly where a glue seam ran underneath. The fix is to lay the design out so the engrave avoids the seams, or accept that the contrast will vary and pick a design that hides it. Cork’s trap is the opposite: it is so consistent and soft that the temptation is to rush it at high speed, but cork holds detail poorly above a certain power, so I keep it gentle and let the contrast come from the natural color shift rather than a deep burn. A scorched cork coaster looks cheap; a lightly toned one looks intentional. I keep the per-lot test-card numbers for both in my bamboo and cork settings guide.
Fabric and Textiles: Speed Is Everything
Fabric engraves and cuts fast and low. Natural fibers like cotton, denim, felt, and canvas mark at roughly 15-30% power and 300-500mm/s for a tonal “distressed” engrave; cutting takes a single pass at higher power. The hard line: never laser synthetic fabrics with unknown coatings, and never anything containing PVC or vinyl.
Fabric is where diode owners get the best bang for the watt, because you are not trying to vaporize a dense material, just scorch the surface fibers for tonal contrast or slice a thin sheet. Denim and canvas take a gorgeous faded engrave that looks like genuine wear. The danger is the coating you cannot see: a poly-blend with a flame-retardant finish, or worse, vinyl-backed upholstery fabric, can outgas chlorine or other toxics. When in doubt, I burn a corner scrap by hand first and smell it, exactly the discipline I apply to any unknown stock per my PVC danger writeup.
The biggest practical issue with fabric is movement and flammability. A loose sheet of fabric will lift in the air-assist stream and a lifted edge near a hot beam is a fire waiting to happen, so I always tape or weight the fabric flat and never walk away from a fabric job, not even for thirty seconds. Engraving works best on natural fibers because they scorch to a controlled brown; many synthetics simply melt into a hard, ugly bead instead of toning. For a distressed denim engrave I run low power and fast speed and accept a subtle effect, then build it up rather than blasting it dark in one pass, because once you have melted or burned through fabric there is no undo. Felt and canvas cut cleanly in a single pass, but I still keep the extinguisher right there, because of every material on this list, dry fabric is the one most likely to flare. The full engrave-and-cut settings by fabric type are in my fabric engraving guide.
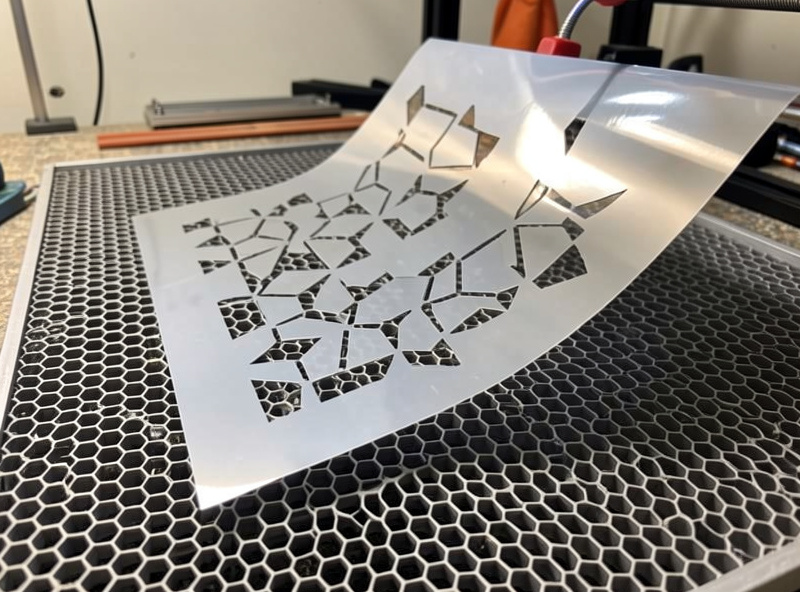
Mylar and Thin Films: Stencils and Masks
Mylar (PET film) cuts cleanly on diode and CO2 for stencils, masks, and templates at low power and high speed, typically 15-30% power and 200-350mm/s in a single pass on 5-10 mil film. The critical safety check: confirm the film is genuine polyester PET, never PVC-based “vinyl” film, which releases chlorine gas.
Thin films are deceptively easy to cut and deceptively easy to get wrong. Genuine mylar (biaxially-oriented PET) cuts a crisp edge for airbrush stencils and solder-paste masks, and because it is so thin you want speed over power to avoid melting and warping the kerf. The label on the roll matters more than the settings: a lot of craft “vinyl” film is PVC, and that is a hard non-negotiable ban on my bench. If a film is not clearly identified as PET polyester, it does not go near the laser until I have tested and identified it.
The practical headache with mylar is that the thin film wants to lift, curl, and shift the instant the beam touches it, ruining alignment on a multi-part stencil. I hold it flat with a piece of low-tack masking tape at the corners or run it on the honeycomb bed with a light magnet hold-down at the edges. Air assist actually helps here too, because the airflow keeps the molten edge from beading back into the kerf. And because the film is so thin, I would rather make two fast light passes than one slow hot pass; the slow pass dumps heat into the film and you get a warped, fused edge instead of a clean cut. Mylar is one of the few materials where the honeycomb bed genuinely beats a flat slat bed, since it lets the cut-through energy and airflow escape underneath. The single-pass settings for stencils and film thicknesses are in my mylar sheet cutting guide.
Specialty Materials: Machine and Settings at a Glance
Use this table as the starting decision, then always confirm with a test card on your specific lot. Power and speed ranges assume a 40W-class diode or 50W CO2 unless fiber is noted; your machine will differ, which is exactly why the materials test card is the most-used tool on my bench.
| Material | Best Machine | Action | Starting Power | Starting Speed | Fume Risk |
|---|---|---|---|---|---|
| Clear glass / mirror | Diode or CO2 | Surface frost only | 15-25% | 150-250mm/s | Particulate |
| Anodized aluminum | Fiber (or diode on dark) | Dye ablation | 20-40% | 800-1200mm/s | Very low |
| Bamboo | Diode or CO2 | Engrave / cut | 70-90% | 250-400mm/s | Organic smoke |
| Cork | Diode or CO2 | Engrave | 20-40% | 300-450mm/s | Organic smoke |
| Natural fabric | Diode or CO2 | Engrave / cut | 15-30% | 300-500mm/s | Moderate |
| Mylar (PET) film | Diode or CO2 | Cut | 15-30% | 200-350mm/s | Low (PET only) |
| Leather (veg tan) | Diode or CO2 | Engrave / cut | 30-60% | 150-300mm/s | Organic smoke |
| Ceramic tile | Diode or CO2 | Coated mark | 80-100% | 150-250mm/s | Coating fume |
Materials You Should Never Put Near a Laser
Three materials are permanent bans regardless of machine: PVC and vinyl (chlorine gas that corrodes the machine and damages lungs), polycarbonate (yellows, catches fire, cuts terribly), and any unknown coated stock until identified. This is not caution; it is a hard operating rule on every laser bench.
I treat the never-laser list as religion because the failure mode is not a ruined part, it is a ruined machine and a hospital visit. PVC is the headline danger: the chlorine gas it releases will pit your optics and rails and is genuinely toxic. Polycarbonate (Lexan) looks like acrylic but laser-cuts into a yellow, flaming mess. And the silent killer is the unknown coating, the mystery laminate or the “leather-look” vinyl that is actually PVC. If I cannot identify a material with certainty, it does not run, full stop. My deep dive on PVC dangers and the broader laser safety essentials cover the why in detail.
Fume, Fire, and Air Assist on Every Job
Specialty materials produce specialty fumes, and the rule is identical for all of them: air assist on every cut, ducted exhaust to outside, never a recirculating box fan in a window. A fire extinguisher and fire blanket stay within arm’s reach, and no job ever runs unattended. These are not optional add-ons; they are the cost of entry. The exhaust airflow targets I size my blower against come straight off the laser-safety control hierarchy in ANSI Z136.1, and the laser-eyewear optical-density ratings I match to each machine class follow ANSI Z87.1 wavelength marking, not guesswork.
The variety of materials in this guide is exactly why fume management has to be a build-once decision rather than a per-job afterthought. Organic smoke from bamboo and leather, particulate from glass, and coating vapor from ceramic and fabric all want the same thing: moving air pulling the byproducts away from your lungs and out of the building. I run a dedicated air-assist pump on every machine and a ducted inline blower to the outside, with a charcoal stage to polish engraving odor. The full build logic lives in my workshop ventilation and exhaust guide. And the never-unattended rule is the one I will repeat forever, because the one time a small flare-up happened on my bench, I was standing right there to kill the job.
Where Each Material’s Deep Guide Lives
This hub is the decision layer; each specialty material that earns a full treatment has its own dedicated guide. For the materials covered in detail elsewhere, go straight to the source: the leather settings guide for veg-tan versus chrome-tan behavior, the ceramic tile coating method for jet-black photo tiles, and the slate engraving guide for stone work. For anything in the broader category, my master materials guide is the wide-angle reference. And when a job needs to compare laser against a router, my laser versus CNC breakdown sorts out which physics wins.
If I Were Starting With Specialty Materials Today
If you are standing at the bench wondering where to begin, start with the three-bucket sort and a materials test card, in that order. Identify which wavelength your material wants before you waste an inch of stock, then prove the settings on a scrap grid rather than your good piece. That single habit, the test card on every new lot, has saved me more material than any other practice in the workshop.
My honest advice after years of this: master one bucket completely before chasing the others. Most people get the best return by getting genuinely good at the diode-friendly organics first, the bamboo, cork, fabric, and leather, because that is where the cheap stock, the fast jobs, and the giftable projects live. Add CO2 when clear acrylic and thick hardwood become a real need, and add a fiber only when bare-metal marking becomes a recurring job rather than a novelty. The materials in this guide each have a dedicated deep-dive when you are ready to go further, but the decision layer never changes: pick the machine the material’s physics demands, prove it on a test card, run air assist and ducted exhaust on every cut, and never leave the laser running while you step away. Get those four right and the specialty materials stop being intimidating and start being fun.
Frequently Asked Questions
What is the most versatile laser for specialty materials?
A 40W-class enclosed diode handles the widest range: glass frosting, bamboo, cork, fabric, leather, mylar, and dye-bleach marking on dark anodized aluminum. It cannot mark bare metal or cut clear acrylic, which is where CO2 and fiber earn their place.
Can I engrave bare aluminum with a diode laser?
No. A diode can bleach the dye on dark anodized aluminum at slow speeds, but it cannot mark bare, polished, or clear-anodized aluminum at all. Bare metal marking requires a 1064nm fiber laser, which the metal actually absorbs.
How do I know if a film is safe to laser cut?
Confirm it is genuine PET polyester (mylar), not PVC-based vinyl. PVC releases chlorine gas that corrodes the machine and harms lungs. If a film is not clearly labeled PET, do not laser it until you have identified it with certainty.
Why does my diode laser pass straight through clear glass?
A diode’s 450nm blue light is not absorbed by clear glass, so it transmits through instead of marking. You frost glass by abrading the surface or a sprayed coating. That is also why bare metal reflects the beam and needs a fiber laser instead.
Do specialty materials need air assist and exhaust?
Yes, on every job without exception. Glass throws particulate, organics like bamboo and leather produce smoke, and coatings on fabric and ceramic vapor. Run air assist on every cut and ducted exhaust to the outside, never a recirculating fan.