Laser Engraving Ceramic Tile: The Coating Method for Jet-Black Photos
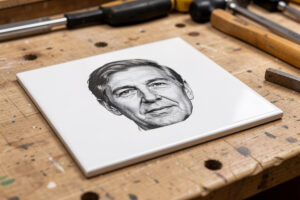
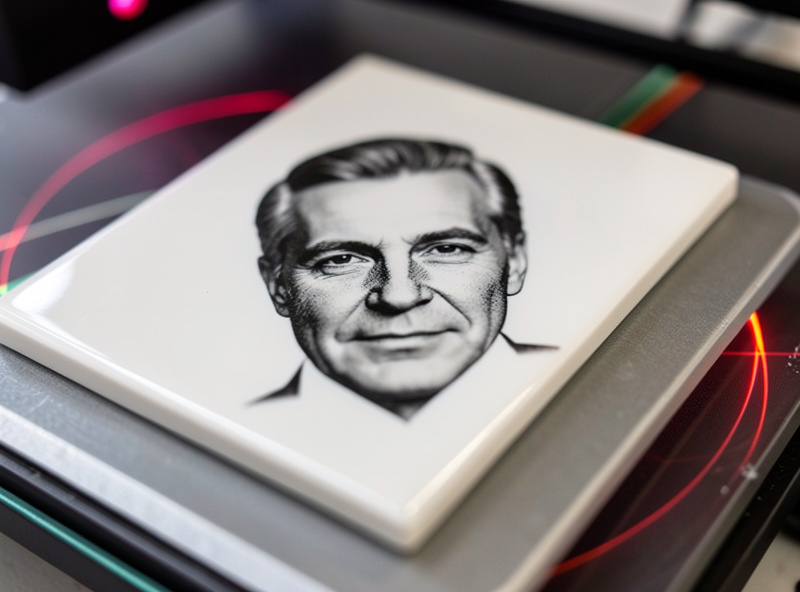
Laser engraving ceramic tile is the project that turns a fifty-cent hardware-store tile into a jet-black photographic engrave that looks like it cost real money. The catch is that ceramic tile does not engrave the way wood or slate does — a glazed tile is a glassy surface, and a bare laser pass on most glazes gives you a faint, frosty grey at best. The technique that unlocks tile is a thermal-bonding coating: you spray or paint the tile, fire the design through the coating, and the heat fuses a permanent black mark into the glaze while the unlasered coating wipes clean off. Once you understand that one step, tile becomes one of the most rewarding materials on the bench. I run tile on both my diode and my CO2, and the results are good enough that I keep a stack of white gloss tiles on the shelf purely for photo work.
This build covers choosing the right tile, the coating method that produces a true black, the diode and CO2 settings that bond it cleanly, and how to prep a photo so it actually reads on tile. If you have already worked through the stone engraving guide, this is the deep dive on the one stone-family material that behaves more like a coated surface than a raw mineral.
Choosing the Right Tile
Start with cheap, glossy, light-coloured ceramic tile — the plain white or off-white gloss field tiles sold in bulk at any home centre are ideal. The gloss glaze gives the thermal coating a smooth surface to bond to, and the light body provides the contrast that makes a black engrave pop. Avoid heavily textured, matte, or dark tiles for your first runs: texture breaks up the image, matte surfaces grab the coating unevenly, and a dark tile gives you no contrast for a dark mark.
Porcelain works too but behaves slightly differently from standard ceramic because it is denser and the glaze is harder, so test it separately rather than assuming your ceramic settings transfer. The single rule that overrides everything: never laser a tile whose glaze or coating you cannot identify. Some glazes and decorative coatings outgas when heated, and an unknown surface is the same hard stop as any unknown coated stock — you test a corner in a ventilated enclosure before you commit. Buy a known plain tile and you sidestep the whole problem.
The Thermal-Bonding Coating Method
This is the heart of ceramic tile engraving. You apply an even coat of a marking spray or a thermal-bonding coating designed for hard surfaces, let it dry fully, then engrave through it. Where the laser fires, the coating fuses permanently into the glaze as a black mark; everywhere else it stays loose and washes away with soap and water, leaving a crisp black-on-white image. The coat has to be even — blotchy coverage gives blotchy marks — so I spray light passes rather than one heavy wet coat, and I let it dry completely before the tile goes on the bed.
The same recess-and-fill logic that I use on porous stone applies to tile differently: on glazed tile you are not filling a recess, you are bonding a coating into a glassy surface, so coverage and dry time matter more than rubbing pressure. After the engrave, wash the tile thoroughly to remove every trace of unbonded coating — any residue left around the mark dulls the contrast. The first time a clean black photo emerges from under the washed-off coating is genuinely one of the more satisfying moments in laser work.
A few coating habits save a lot of grief. Shake the can properly and warm it slightly if it is cold, because cold spray goes on coarse and uneven. Hold the can far enough back that you are misting, not flooding — pooled coating runs and dries thick, and a thick patch bonds differently from a thin one, leaving a visible density change in the finished mark. Let each light coat flash off before the next, and let the final coat cure fully; a coat that is still tacky smears under the air assist and contaminates the bonded mark. If you are doing a batch, coat them all at once on a covered surface so the dry time is consistent across the run, and your settings stay valid from the first tile to the last.
Diode and CO2 Settings for Tile
On my 40W-class diode, coated tile bonds at a moderate power and a moderate-to-fast raster speed with air assist running — enough heat to fuse the coating without scorching or cracking the tile. The CO2 does the same job faster and couples more readily into the glossy glaze, which is why I reach for the OMTech on larger photo tiles or a production batch. Neither needs a fiber laser; tile is firmly diode-and-CO2 territory, as the diode vs CO2 vs fiber breakdown lays out.
Exact numbers vary by your machine, your coating, and the specific tile, so you do what you do for every material: run a materials test card on a spare coated tile first. I cut a small power-and-speed grid, wash it, and pick the cell that gives the blackest, sharpest mark with no cracking — too much power cracks the tile and can over-darken into a muddy grey, while too little leaves a weak bond that wipes away with the coating. Keep the tile flat and level so the focus holds across the whole image; a tile that rocks even slightly will smear focus across the photo and soften half the picture.

Preparing a Photo for Tile
A photo engrave on tile lives or dies in the image prep. You are converting a continuous-tone photograph into something a laser can render as bonded coating, so the contrast, brightness, and dithering all matter. I convert to grayscale, push the contrast so the highlights and shadows are clearly separated, and use a dither or halftone process suited to the tile so the laser lays down dots that read as shading from a normal viewing distance. Over-detailed images with fine mid-tones turn to mud; bold portraits and high-contrast scenes shine.
The same grayscale prep discipline carries over from photo engraving in LightBurn on other materials, just tuned for the way the coating bonds. Test a small crop before committing the full image — a 50mm test square of the busiest part of the photo tells you whether your dither and settings hold the detail. Once it does, the full tile is a formality, and you can batch a whole set of matching photo tiles knowing the recipe holds.
Safety on Coated Tile
Tile itself is inert, but the coating is not nothing. Marking sprays and thermal coatings have their own ventilation requirements, so the enclosure stays closed and the ducted exhaust runs the entire job — the same fume discipline from the laser safety essentials rundown applies here as on any material. Air assist stays on, both to bond cleanly and to clear the coating fumes off the surface. And the universal rule does not lapse because the material is a humble tile: never run the job unattended. A coated surface and a focused beam still deserve a fire-watch.
Disclosure: Some links below are affiliate links. If you buy through them I may earn a small commission at no extra cost to you. I only point to materials I actually use on my own bench.
For tile photo work you need two things: a stack of white gloss ceramic tiles sized for your bed, and a laser marking spray for ceramic and hard surfaces to bond the black mark. Buy a few extra tiles for your test cards — they cost almost nothing and save you ruining the good ones.
Tile Engraving Methods Compared
| Method | Result | Best Machine | Best For |
|---|---|---|---|
| Bare glaze engrave | Faint frosted grey | CO2 | Subtle decorative marks |
| Thermal-bonding coating | True jet black | Diode or CO2 | Photos, logos, lettering |
| Paint-fill engrave | Coloured recessed mark | CO2 | Coloured designs (unglazed) |
Frequently Asked Questions
How do you get a black mark on ceramic tile?
Apply an even coat of a thermal-bonding marking spray, let it dry, then engrave through it. The laser fuses the coating into the glaze as a permanent black mark, and the unbonded coating washes off, leaving a crisp black-on-white image.
Can a diode laser engrave ceramic tile?
Yes. A 40W-class diode bonds a marking coating into glazed tile cleanly at moderate power with air assist running. CO2 is faster and couples more readily into glossy glaze, but a diode handles tile photo engraves well.
What tile is best for laser engraving photos?
Cheap white or off-white gloss ceramic field tiles are ideal. The gloss glaze bonds the coating smoothly and the light body gives the contrast a black engrave needs. Avoid textured, matte, or dark tiles for photo work.
Why is my tile engrave faint?
A faint mark usually means the coating bond was weak, from too little power, an uneven coat, or skipping the coating entirely on a bare glaze. Run a test card on a coated tile, increase power slightly, and ensure the coat is even and fully dry.
Do you need a special coating to engrave tile?
For a true black mark, yes. A thermal-bonding marking spray made for ceramic and hard surfaces is what fuses into the glaze. A bare laser pass on most glazes gives only a faint frosted grey with little contrast.