Fiber Laser Metal Marking: The Complete Guide
Fiber laser metal marking is the process of using a 1064 nm fiber laser to permanently mark, anneal, etch, or engrave bare metal — and unlike a diode or CO2 laser, a fiber actually couples into the metal instead of bouncing off it. On my bench a 20W fiber lays a crisp black anneal on stainless in a single pass at around 300 mm/s; a diode needs a sprayed coating to do the same job badly.
I run diode, CO2, and fiber machines side by side, and metal is the one job where the machine class is not a preference — it is physics. This guide is the map for the whole fiber-and-metal corner of the workshop: what fiber light actually does to metal, the five distinct marks you can make, the settings that matter, the coatings that let a diode or CO2 cheat its way onto metal, and the fume-and-fire discipline that the “no enclosure needed” crowd skips. Every number here comes off my own machines — a 20W desktop fiber/MOPA marker, the xTool S1 diode, and the OMTech Polar 350 CO2 — and the deeper how-tos live in the linked guides.
Why fiber, and not diode or CO2, for metal
Bare metal reflects most of the light a CO2 laser throws at it. CO2 runs at 10,600 nm, and polished aluminum or stainless sends that long wavelength straight back — which is also why you never aim a CO2 at a shiny metal target inside the cabinet. A blue diode at 450 nm couples a little better into dark or oxidized metal, but on bare bright stock it still mostly scatters. The fiber laser at 1064 nm sits in the wavelength window where metals absorb readily, so the energy goes into the surface and does work instead of heating your mirrors.
The other half of the story is beam quality and pulse structure. A fiber source delivers a tiny, near-perfect spot — typically 20–40 microns on a desktop F-theta lens — and fires in nanosecond pulses with enormous peak power. That combination is what melts, vaporizes, or oxidizes a controlled spot of metal without cooking the whole part. I cover the three-way decision in depth in my diode vs CO2 vs fiber breakdown, but for metal specifically the short version is: fiber for marking and engraving metal, CO2 for clean acrylic and thick hardwood, diode for cheap-and-fast wood and leather. If your whole goal is metal, start with the right fiber machine for metal rather than forcing a diode to do it.
The five marks a fiber laser makes on metal
People say “engraving” for everything, but a fiber does at least five physically different things to metal, and choosing the wrong one is why marks rub off or look muddy. The distinction between marking, engraving, and etching is worth understanding before you touch a setting — I break the terminology down in marking vs engraving vs etching, but here is the working version off my own logs.
Annealing heats the metal below its melting point so it grows an oxide layer, producing a smooth black or grey mark with zero depth — you cannot feel it with a fingernail. It is the cleanest, most corrosion-resistant mark on stainless and titanium, and my go-to for medical-style tags and knife makers’ marks. Etching melts a shallow surface layer, frosting it light grey or white; fast, shallow, and high-contrast on stainless. Engraving vaporizes metal to remove material and cut a recess you can feel. Deep engraving is just engraving driven for many passes to reach 0.1 mm and beyond — a different settings world I cover in deep metal engraving. And color marking, which only a MOPA fiber does reliably, tunes the oxide thickness to throw interference colors on stainless and titanium.

The reason this matters: if a customer wants a mark that survives a dishwasher or a salt-spray test, you anneal, you do not engrave — a deep engrave gives corrosion somewhere to start. If they want bold and tactile on a tool, you engrave. Picking the mark type first is half the job; the settings follow from it.
Fiber source types: Q-switched vs MOPA
Two source architectures dominate desktop fiber markers, and the difference decides whether color marking is even on the table. A Q-switched fiber fires at a fixed pulse duration, usually around 100 nanoseconds, with frequency adjustable over roughly 20–60 kHz. It is cheaper, rugged, and perfectly good for black anneal, etch, and engrave on steel. What it cannot do well is stainless color, because it cannot vary the pulse width that controls oxide thickness.
A MOPA (Master Oscillator Power Amplifier) fiber lets you tune pulse duration — typically 2 ns up to 200 ns or more — independently of frequency that can run past 1 MHz. That extra knob is what unlocks repeatable stainless color, cleaner marks on thin or heat-sensitive parts, and deeper black on anodized aluminum without burning through. My bench marker is a MOPA for exactly that reason; the full color workflow lives in MOPA stainless color marking. If you only ever mark steel black, a Q-switch saves money. If you want color or you mark thin and delicate parts, MOPA earns its premium.
Galvo head: why fiber markers look nothing like your engraver
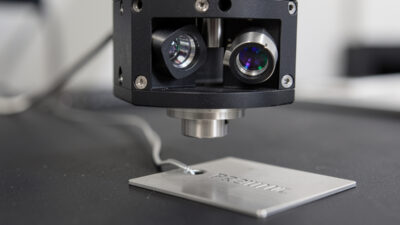
Almost every fiber metal marker uses a galvo head — two mirror-mounted galvanometers steering the beam through an F-theta lens across a small fixed field, usually 100×100 mm or 150×150 mm. There is no moving gantry; the part sits still and only the beam moves, which is why galvo markers hit marking speeds of 7,000 mm/s and beyond — orders of magnitude faster than the belt-driven gantry on a diode or CO2 engraver. The trade-off is the small work area and the fixed focal height you set by raising or lowering the head on a Z column.
Some larger fiber systems use a gantry to move a galvo head, or split-field stitching to cover bigger parts, and the choice changes accuracy, speed, and price meaningfully. I lay out where each wins in galvo vs gantry fiber lasers. For nearly all hobby and small-shop metal marking — tags, knives, tumblers, jewelry — a fixed galvo field is the right and cheaper answer.
The settings that actually move the mark
Fiber software (EZCAD-class, or LightBurn’s fiber/galvo mode) exposes more parameters than a diode, but five do the heavy lifting. Power as a percentage of source wattage. Speed in mm/s — galvo speeds are huge. Frequency in kHz, which spaces the pulses; low frequency hits harder per pulse for engraving, high frequency lays a smoother surface for etch and anneal. Hatch spacing (line interval), the gap between fill lines, where too wide leaves stripes and too tight wastes time and overheats. And passes, which you stack for depth.
The discipline that keeps me out of trouble is the same one I preach for every machine: run a materials test card before any production run. On the fiber I burn a power-versus-frequency grid for each new metal and finish, photograph it, and log the winning cell. Stainless from two different suppliers can need different frequency for the same black, and guessing wastes parts. This is the single habit that separates repeatable marks from “it looked good once.” For the broader method across all materials, see my laser materials settings guide.

Software: EZCAD vs LightBurn for fiber
Fiber markers historically shipped with EZCAD2, the EZCAD-class software bundled with the galvo controller. It is functional, ugly, and powerful — full control over hatch patterns, fill angles, wobble, and per-layer power and frequency, plus the lens-correction and red-dot framing that keep marks square across the field. If your marker came with it, learn it; the deep parameter access is genuinely useful for color and deep-engrave work.
LightBurn added a fiber/galvo mode that many of us moved to because it is the same interface we already run on the diode and CO2. I keep my LightBurn workflow consistent across machines, which means a design drawn for the CO2 transfers to the fiber with only the layer settings changing. LightBurn’s fiber license costs more than the GCode tier, but if you already live in LightBurn it removes a whole second program from your head. Either way, the framing-then-fire discipline is identical: red-dot frame the part, confirm focus, then mark.
Focus, lens, and keeping the fiber happy
A galvo focuses at one fixed height set by the F-theta lens — commonly a 110 mm or 174 mm focal length giving a 70×70 or 150×150 mm field. You set focus by moving the head up or down on its Z column until the part sits at that working distance, and you confirm it the same way every time: the red-dot pointers converge, or you run a quick focus-finder. Out-of-focus on a fiber does not just blur — it spreads the spot, drops power density, and turns a crisp black anneal into a weak grey. Eyeballed focus is the number-one reason a “good settings” recipe stops working.
Fiber sources are sealed and far lower maintenance than a CO2 — there are no mirrors to align and no tube to age out the way I cover in the CO2 mirror alignment guide. What you do maintain is the F-theta lens: metal-marking throws fine particulate, and a hazed lens scatters the beam and scorches marks. I wipe mine with lens tissue and isopropyl when contrast starts dropping, never a dry shop rag. Keep the protective window clean, keep the field free of stray reflective scrap, and a desktop fiber will mark for years. The broader habit set lives in my laser maintenance guide.
Marking method by metal and machine
Different metals want different marks, and not every machine can reach every job. The table below is the cheat sheet I keep taped inside the cabinet — starting points off my own logs, always confirmed with a test card before a real run.
| Metal / finish | Best mark type | Machine that does it | Starting point (20W fiber) |
|---|---|---|---|
| Stainless steel | Black anneal | Fiber (MOPA cleaner) | 40% power, 300 mm/s, 30 kHz, hatch 0.01 mm |
| Stainless steel | Color | MOPA fiber only | Tune pulse width 4–200 ns, low power |
| Anodized aluminum | White etch (ablate dye) | Fiber, diode, or CO2 | 30% power, 1000 mm/s, single pass |
| Bare aluminum | Frosted etch / engrave | Fiber | 80% power, 200 mm/s, 50 kHz, 2–5 passes |
| Brass / copper | Engrave (reflective) | Fiber (MOPA helps) | 90% power, 150 mm/s, low frequency |
| Coated / painted steel | Marking-spray or ablate | Diode, CO2, fiber | Cermark on bare; ablate coating to substrate |
| Titanium | Color anneal | MOPA fiber | Low power, high frequency, pulse-width tuned |
Two notes that save parts. First, anodized aluminum is the one “metal” a diode or CO2 marks beautifully, because you are only ablating the colored dye layer to reveal white aluminum underneath — no coupling into bare metal needed. That is why I have a dedicated anodized aluminum settings guide that covers fiber and diode side by side. Second, brass and copper are reflective even to fiber light; a MOPA’s tunable pulse and a slower pass make the difference between a clean engrave and a smeared one.
Steel, aluminum, titanium, brass: a metal-by-metal rundown
Each metal couples and oxidizes differently, and the recipe that nails stainless will disappoint on aluminum. Here is how I approach the four I mark most, all confirmed on a test card per lot before a production run.
Stainless steel is the friendliest metal a fiber marks. It anneals to a deep, smooth black at moderate power and high frequency without removing material, which is why it dominates knife marks, tags, and tumblers. Push power and drop frequency and you shift from black anneal into a frosted etch, then into a removed-material engrave — three different looks from one alloy by moving two knobs. My starting black on 304 stainless is around 40% power, 300 mm/s, 30 kHz, hatch 0.01 mm, and I cover the curved-part version in stainless tumbler settings.
Aluminum splits into two jobs. Anodized aluminum is the easy one — the laser ablates the colored dye to reveal bright aluminum underneath, so a diode or CO2 does it as well as a fiber, and I keep a dedicated anodized aluminum guide for it. Bare aluminum is harder: it conducts heat fast and wants high power, slower speed, and several passes to frost or engrave, because the surface sheds energy before it can build a mark. Expect to push toward 80% power and stack passes.
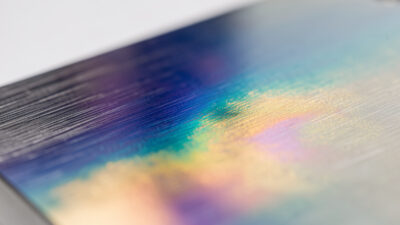
Titanium is the showpiece. Like stainless it anneals, but its oxide layer throws vivid interference colors across a wide window, so a MOPA fiber turns a plain tab into blues, purples, and golds purely by tuning pulse width and frequency — no dye, no paint. It is heat-sensitive, so low power and high frequency keep the colors clean. Brass and copper are the awkward pair: both reflect strongly even at 1064 nm, so a Q-switch struggles and a MOPA’s shorter tunable pulse, lower speed, and lower frequency are what get a clean engrave instead of a smeared, inconsistent one. I always run extra test-card cells on brass because alloy and lacquer vary so much between suppliers.
Marking metal without a fiber: coatings and sprays
If you own a diode or CO2 and not a fiber, you are not locked out of metal — you cheat with a bonding coating. Products like CerMark and Thermark are a spray or paste of metal oxides; the laser’s heat fuses them permanently to the substrate, leaving a durable black mark on bare stainless, brass, or aluminum where the laser alone would do nothing. My xTool S1 diode lays a solid black on a coated stainless tumbler that looks every bit as permanent as a fiber anneal, and it is how most diode owners mark metal at all.
The full workflow — surface prep, coat thickness, the exact power and speed that fuse without scorching, and cleanup — is its own guide: CerMark and Thermark for laser marking. I also walk through it on real parts in my stainless tumbler settings write-up. The coating route costs a few dollars a job in spray and is the right call when metal is occasional; if metal is your main work, the fiber pays for itself fast in time and consumables.
As an Amazon Associate I earn from qualifying purchases. If you are going the coating route, a can of CerMark-type laser marking spray is the consumable to start with, and a pack of proper 1064 nm fiber-rated safety glasses is non-negotiable kit before you ever fire the fiber.
Rings, knives, and small parts: jigs and curved surfaces
Most fiber work is small parts, and the limiting factor is holding them flat in the focal plane. A galvo focuses to a fixed height across its field, so anything tall or tilted goes soft at the edges. For flat tags I use a simple fence to register position; for curved parts like rings and tumblers I bring in a rotary attachment so the surface stays tangent to the beam as it turns. Ring marking has its own quirks — inside-band engraving, tiny text, precious-metal reflectivity — that I cover in ring and jewelry laser marking.
This is where the polymath workshop pays off. I print fiber-marker jigs on the 3D printer to hold odd parts at the right height, the same way I build laser jigs for the diode — an engraved tag on the fiber and a routed sign on the CNC solve the same customer problem with different physics, and knowing which to reach for is half the skill. A flat, repeatable hold beats a fancy setting every time.
Troubleshooting muddy, grey, or rubbing marks
When a fiber mark goes wrong it is almost always one of four things, and the fix is faster than re-buying settings off a forum. A weak grey mark where you wanted black usually means focus drifted or frequency is too high for an anneal — drop the head back to working distance, lower frequency, and slow down so each pulse does more work. A mark that rubs or scratches off on stainless means you etched a loose oxide instead of annealing into the surface, or you tried to mark over a contaminant; clean the part with isopropyl, re-anneal at lower speed, and confirm with a fingernail test.
A striped or banded fill is hatch spacing set too wide for the spot size — tighten the line interval until the stripes close, typically to 0.01–0.02 mm. And a mark that looks burnt or yellowed around the edges means too much heat in one place: raise frequency, raise speed, or split the job into more passes at lower power so the part sheds heat between them. The constant across all four is that you do not guess — you go back to the materials test card, change one variable, and re-burn the grid. A documented grid per metal and finish is what turns “it worked once” into a recipe you trust, and it is the single habit I would keep if I had to give up every other shortcut on the bench.
Safety and fume: metal does not get a pass
People assume metal marking is clean because there is no flame, and that assumption is wrong in two ways. First, fiber light at 1064 nm is invisible and your blink reflex does nothing to protect you — it focuses straight through to the retina. ANSI Z136.1, the U.S. standard for the safe use of lasers, is what defines the optical density (OD) your eyewear needs at a given wavelength and power — so you wear OD-rated 1064 nm glasses (not the orange CO2/diode goggles, which are the wrong wavelength) every time the source is armed. An open fiber marker is a Class 4 laser product under the FDA’s 21 CFR 1040.10 classification, which is the reason it belongs in an interlocked enclosure rather than on an open bench. Second, vaporizing metal and burning off coatings throws fine metal-oxide particulate and, on coated stock, organic fumes — both of which belong in ducted extraction to outside, never recirculated into the room. I built my fume rules the hard way; the full setup is in workshop ventilation and exhaust and the eye-and-fire essentials in laser safety essentials.

And the rule that overrides everything: never put PVC, vinyl, or unknown coated stock near any laser. Chlorine-bearing plastics release chlorine gas that corrodes the machine and harms your lungs — this matters on metal work too, because powder-coated and unknown “metal” parts can hide a chlorinated topcoat. If you cannot identify the coating, you test and confirm before you mark. The full reasoning is in why you never laser PVC. A CO2/ABC extinguisher and a fire blanket stay within arm’s reach, and no job — coating burns especially — ever runs unattended.
When a fiber pays for itself
The honest buying question is not “is a fiber better at metal” — it obviously is — but “do you mark enough metal to justify a second machine.” A desktop 20W fiber marker lands in the same ballpark as a mid-tier diode, and it does exactly one family of jobs: metal and a handful of hard plastics. If metal marking is occasional, the coating route on a diode or CO2 you already own is the smart money, and I would point you to the right first laser before a dedicated fiber.
The math flips the moment metal becomes regular work. Coating sprays cost a few dollars per job and add prep and cleanup time to every part; a fiber marks bare metal with zero consumable and at galvo speed, so the per-part time collapses from minutes to seconds. For knife makers, tag and tool work, jewelry, and anyone batching tumblers, the time and spray you stop spending is the payback — not a revenue claim, just consumables and minutes you get back. Once you are sure metal is a permanent part of the workshop, the buying decision moves to which fiber for metal and whether the color and thin-part work you plan justifies stepping up from a Q-switch to a MOPA.
How to use this cluster
If you are new to the metal side, read marking vs engraving vs etching first to get the vocabulary straight, then come back here. If you own a diode or CO2 and want metal now, jump to CerMark and Thermark. If you are buying, start with the best fiber laser for metal and the galvo vs gantry comparison. And the same enclosure-and-exhaust logic that keeps the fiber bench safe is the through-line for the whole workshop — it is the discipline that runs the laser, the CNC, and the welder alike.
Frequently Asked Questions
Can a diode or CO2 laser mark metal?
Not bare metal directly in any useful way. A diode or CO2 can mark metal only with a bonding coating like CerMark or Thermark, which the laser fuses to the surface. They mark anodized aluminum well because they ablate the dye layer, not the metal itself.
What is the difference between annealing and engraving metal?
Annealing heats metal below melting to grow an oxide layer, leaving a smooth black or grey mark with no depth you can feel. Engraving vaporizes metal to remove material and cut a recess you can feel. Anneal resists corrosion better; engrave is bold and tactile.
Do I need a MOPA fiber or is a Q-switched one enough?
A Q-switched fiber handles black anneal, etch, and engrave on steel perfectly well. You only need MOPA for stainless and titanium color marking and for cleaner marks on thin or heat-sensitive parts, because MOPA lets you tune pulse width independently of frequency.
What wattage fiber laser do I need for metal marking?
A 20W fiber marks and anneals steel, aluminum, and brass for almost all hobby and small-shop work. Move to 30W or 50W mainly for faster throughput and deep engraving, where extra passes at higher power cut the cycle time on recesses past 0.1 mm.
Is fiber laser metal marking safe to do indoors?
Only with the right protection. Wear OD-rated 1064 nm fiber glasses, keep the source in an interlocked enclosure, and duct metal-oxide and coating fumes to outside rather than recirculating them. Keep an extinguisher within reach and never run a coating-burn job unattended.
Why won’t my fiber laser mark brass or copper well?
Brass and copper are reflective even at 1064 nm, so much of the energy bounces. A MOPA fiber with a tunable shorter pulse, lower speed, and lower frequency couples better. Run a test card per alloy, because brass and copper lots vary more than steel.