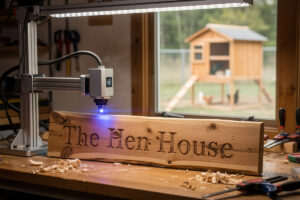
Laser-Engraved Coop Signs and Leg Bands: A Functional Project Guide
A diode laser engraves a cedar coop sign in 8-12 minutes and a numbered aluminum leg band in under 60 seconds. For a backyard chicken keeper with 6-12 hens, the typical project run is 1 main coop sign, 4-8 nest box labels, 12-15 leg bands, and 2-3 feed-area signs — about 90 minutes of total laser time over a Saturday afternoon. Material cost: under $15. Same kit at a custom-sign shop: $200-350.
This guide walks through the materials that engrave cleanly (and the ones that produce toxic fumes), the laser power and speed settings for each common substrate, the LightBurn or LaserGRBL workflow that delivers consistent results across a full project run, and the open-source SVG templates that get you started without learning vector design from scratch.
Why Coop Engraving Is the Right First-Real Project
Most beginner laser projects are abstract — a wood-burned phrase, a generic ornament — and end up in a drawer. Coop signs and leg bands are the opposite: every part has a specific function (predator-name labels for breed identification, hen-name signs for the kids, numbered bands for tracking individual layer production), all of them get used outdoors where the durability of a properly engraved part actually matters, and the project scales naturally as the flock grows. It’s the kind of project that genuinely sells someone on a $300 diode laser purchase.
Materials That Engrave Cleanly
Six materials cover 90% of coop projects. Each has a clean engraving profile and an unsuitable cousin to avoid:
Cedar (use western red cedar — avoid pressure-treated)
The default choice for outdoor coop signs. Cedar’s natural rot resistance handles weather without sealing for 3-5 years. Pressure-treated lumber contains arsenic and chromium compounds that vaporize during engraving — never engrave PT lumber. Also avoid plywood with formaldehyde-based glue (most CDX, BC plywood) — it produces toxic fumes. Use exterior-grade Baltic birch (PVA glue) or solid cedar for signs.
Acrylic — clear and colored cast acrylic only (avoid extruded)
Engraves into a frosted-white finish that pops against any background. Cast acrylic (e.g., Plexiglas G) engraves cleanly. Extruded acrylic melts and produces uneven results — and engraving polycarbonate (often confused with acrylic in big-box stores) creates dangerous chlorine compounds. Always check the data sheet.
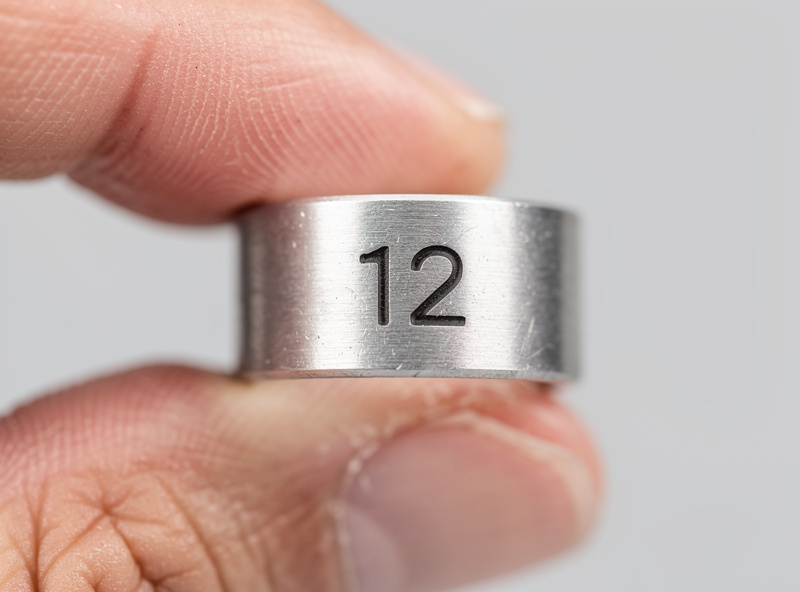
Anodized aluminum (perfect for leg bands)
Diode lasers engrave anodized aluminum at low power by burning off the dye layer, exposing bright silver underneath. Bare aluminum requires a marking spray (CerMark, Brilliance) for visible results. Black anodized aluminum is the ideal leg band substrate — high contrast, long-lasting, lightweight.
Slate
Natural slate engraves into white relief and lasts decades outdoors. Best for permanent signs (coop name plate, breed identification placards). Heavier and more fragile than wood, so reserve it for the one or two pieces that justify the weight.
Stainless steel (for permanent ID tags)
Requires a CO2 laser or CerMark spray on a diode. Use only for parts that need to survive 10+ years. Standard household stainless tags engrave perfectly with a 40 W CO2 at 100% power, 200 mm/s.
Cork (chalkboard signs, soft labels)
Cork engraves cleanly at low power and is forgiving of beginner setting mistakes. Good for indoor coop labels (feed schedule reminders, collected-egg tallies) but not weatherproof.
Settings by Material and Laser Class
| Material | Diode 5W | Diode 10W | Diode 20W | CO2 40W | Notes |
|---|---|---|---|---|---|
| Cedar 1/4″ (engrave) | 80% / 1500 mm/min | 50% / 2500 mm/min | 30% / 4000 mm/min | 25% / 350 mm/s | 2 passes for darker contrast |
| Cedar 1/4″ (cut through) | Not feasible | 100% / 200 mm/min, 4 pass | 100% / 600 mm/min, 2 pass | 100% / 30 mm/s | Air assist mandatory |
| Anodized aluminum | 80% / 800 mm/min | 40% / 2000 mm/min | 20% / 4000 mm/min | 15% / 500 mm/s | Black anodize works best |
| Cast acrylic 3 mm (engrave) | 40% / 2000 mm/min | 25% / 4000 mm/min | 15% / 6000 mm/min | 20% / 600 mm/s | Use blue tape masking on top side |
| Slate | 80% / 1500 mm/min | 50% / 3000 mm/min | 30% / 5000 mm/min | 30% / 400 mm/s | Preheat slate slightly for clarity |
| Cork (sheet) | 30% / 3000 mm/min | 15% / 5000 mm/min | 10% / 8000 mm/min | 10% / 800 mm/s | Very forgiving — beginner friendly |
The complete material settings library (which we keep updated with community-tested values) lives in our leather engraving settings reference and the best wood for laser engraving guide. The exact same workflow concepts apply across substrates — only the speed/power numbers change.
The LightBurn Workflow for Multi-Part Project Runs
The single biggest time saver on a 15-piece project run is batching parts into a single LightBurn file with material-specific layers. Instead of laying out one sign, engraving it, swapping material, laying out the next — set up all 15 pieces on one virtual workspace, group by material, and execute by group.
- One LightBurn file per project. Set the workspace to your laser bed size (typically 400 x 400 mm for diode, 600 x 400 for CO2). Layout all parts with 5 mm spacing.
- One layer per material. Cedar engraves on Layer C00 at 50% / 2500. Aluminum bands on Layer C01 at 40% / 2000. Acrylic on Layer C02. Slate on Layer C03.
- Number the parts visibly. Add a small “01” label to each part during design so you can match physical pieces back to their digital layer when finishing.
- Print preview before each material run. Confirm only the active material’s layer is enabled. Run that group, swap material, enable the next group.
- Save as project template. Re-use for the next coop expansion. New names just replace text fields; everything else is locked in.
Software-wise, LightBurn is the standard ($60 lifetime). LaserGRBL is the free alternative for diode lasers — slower but capable. The full software comparison is in our best laser engraving software guide and the free laser software options for budget builds.
Numbered Leg Bands: The 60-Second Workflow
Numbered leg bands are the highest-volume, highest-value engraving project for a chicken keeper. They let you track which hen lays which eggs (improving feed-to-output decisions), which birds are aggressive in the pecking order (informing flock management), and which breeds perform best in your specific climate.
- Buy 16 mm anodized aluminum bands in lots of 25-100 from any poultry supply (Premier 1, Cutler Supply). About $0.30-0.60 each.
- Set up a jig. Any flat board with a 16 mm circular cutout that holds the band flat during engraving. Cuts setup time from 5 minutes per band to 30 seconds.
- One LightBurn file with 25 bands laid out in a 5×5 grid, each with a sequential number (01-25). Engrave at 40% / 2000 mm/min on a 10W diode.
- Total run time: 25 bands in 22-26 minutes, hands-off.
For the chicken-keeping side of why this matters — individual hen tracking, productive vs unproductive bird identification, breed comparison decisions — our partner site covers the full management workflow in the best chicken coop brands and accessories guide, including the bands and tracking practices that work alongside engraved IDs.
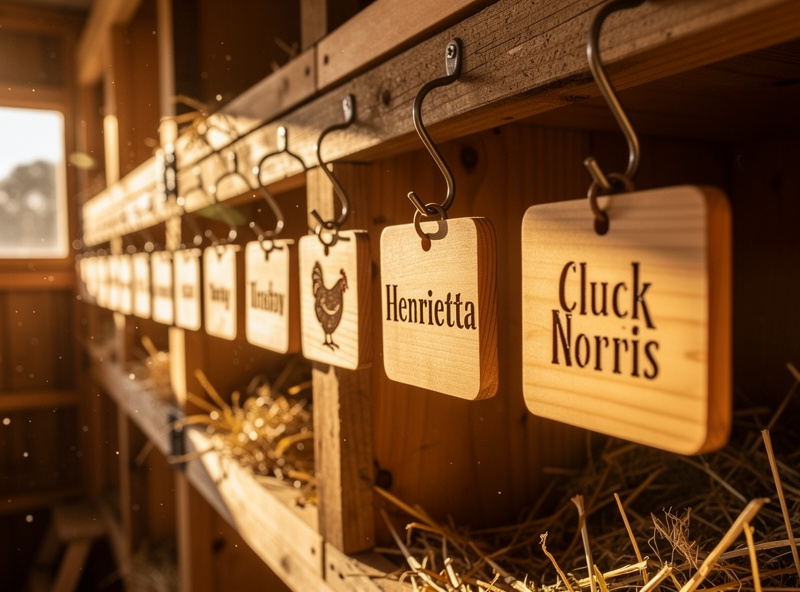
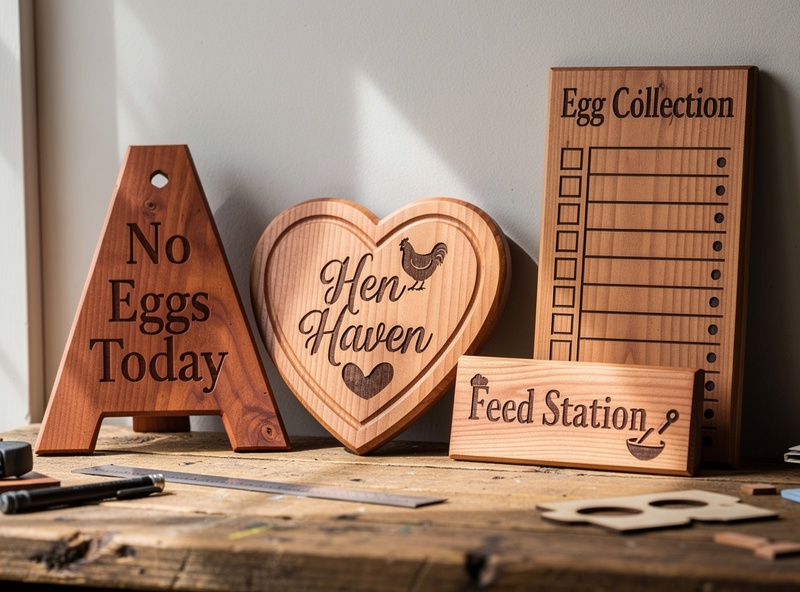
Coop Sign Project Examples
Five repeatable sign designs that work for almost any coop:
- Coop name plate (8″ x 12″). Mounted above the door. Cedar at 50% / 2500 mm/min, two passes for darker contrast. Print time: 14 minutes.
- Egg collection tally board (6″ x 8″). Includes columns for hen name and daily egg counts; you mark with chalk or a wet-erase marker. Print time: 8 minutes per board.
- Nest box name labels (3″ x 1.5″). One per nest box. Print time: 4 minutes each, easily batched.
- Feed station label. Prevents kids and visitors from feeding the wrong amount. Engraved with calorie or grams per hen per day.
- Predator-warning placard. Standard “close gate, lock at dusk” reminder for visiting helpers.
Open-Source SVG Templates
Three places to grab editable starter files:
- Thingiverse — search “chicken coop sign SVG” or “leg band template.” 80+ files, mixed quality.
- SVGRepo — free SVG icons including chicken silhouettes, eggs, farm motifs. CC0 licensed.
- LightBurn Forum — community-shared project files with tested settings included.
For the laser-software-side workflow tutorials, see photo engraving in LightBurn and the glass engraving frosting guide — same principles apply to project planning across substrates.
What to Build First This Weekend
- Saturday morning: Cedar coop name plate (one piece, 14-min run) + egg tally board (8 min). Laser warm-up, mounting, and cleanup add 30 minutes. Total 1 hour.
- Saturday afternoon: Six cedar nest box labels (4 min each, batched 24 min total).
- Sunday morning: 25 numbered aluminum leg bands (one batched run, 22-26 min).
- Sunday afternoon: Sealing the cedar pieces with exterior polyurethane or tung oil. Mount everything. Photograph for the project portfolio.
Total weekend: 90 minutes of laser time, 2-3 hours of design and finishing work, 32 pieces of completed coop hardware. Material cost: under $15.
For the broader laser cutting and engraving foundation — machine selection, dust collection, ventilation, and the safety framework that should be in place before any wood project — see the laser cutting materials guide covering the substrates beyond what’s used in this project.
For background on safe materials and ventilation, the ATX Hackerspace materials safety reference is the most-cited community guide on what is and isn’t safe to laser, and the US OSHA workplace safety portal covers the laser-class regulations applicable to home and small workshop installations.
Frequently Asked Questions
Can a diode laser actually engrave numbers on aluminum leg bands?
Yes — black anodized aluminum bands engrave cleanly with any 5W or stronger diode laser. The laser burns off the dye layer to reveal bright silver underneath, producing high-contrast numbers that last 5+ years outdoors. Bare aluminum requires a marking spray like CerMark for visibility.
What wood is safest and best-looking for outdoor coop signs?
Western red cedar is the standard. It engraves cleanly, has natural rot resistance for 3-5 years without sealing, and the engraved areas darken to a rich brown that contrasts well with the lighter cedar surface. Avoid pressure-treated lumber (arsenic vapor) and avoid plywood with formaldehyde glue.
How long does it take to engrave a typical coop sign project?
For a 6-hen coop, expect 90 minutes of total laser time spread across the weekend: a 14-minute coop name sign, 6 nest box labels at 4 minutes each, an 8-minute egg tally board, and 25 numbered leg bands in a single 22-minute batched run. Most of that is unattended.
Do I need LightBurn or can I use the free LaserGRBL?
LaserGRBL handles all the projects in this guide for free, just slower. LightBurn ($60 lifetime) is faster, has better camera alignment, and saves substantial time on multi-part project runs through its layer system. For one-off hobbyist use, LaserGRBL is fine. For ongoing projects across many materials, LightBurn pays for itself in workflow speed within a month or two.
What laser power do I need for cedar coop signs?
A 5W diode laser engraves cedar at 80% power and 1500 mm per minute, but cuts cedar very slowly. A 10W diode is the practical minimum for the project workflow described — engraves cleanly at 50% / 2500 and can cut 1/4 inch cedar in 4 passes. A 20W or 40W CO2 laser cuts cedar in a single pass and runs at much higher engraving speeds.
Are 3D-printed leg bands a cheaper alternative?
Cheaper per band but much less durable. PETG leg bands work for 1-2 seasons but become brittle in cold weather and crack at the closure. Anodized aluminum bands at $0.30-0.60 each last 5+ years and are the standard choice for serious flock tracking. The labor savings of laser engraving 25 bands in one batch matters more than the per-unit cost difference.
Is it safe to engrave indoors without a fume extractor?
Cedar and slate produce minimal fumes and are tolerable indoors with a window cracked open and a small box fan moving air. Acrylic, leather, and any plywood produce significant fumes that need active extraction — either a dedicated fume extractor (Wynn Environmental, OmTech) or running the laser in a garage with the door open. Never engrave PVC or vinyl indoors or outdoors — chlorine gas.