3D-Printed Jigs for Laser Engraving: Five Hybrid Project Examples
3D-printed jigs solve the single biggest production problem in laser engraving: positioning. A custom-printed jig drops a tumbler, pen, coaster, or oddly-shaped object into the same coordinates every time, so you align the design once in LightBurn and run 50 identical pieces without recalibrating between each. The combination of $5 worth of PLA and 4 hours of design work converts a hobby laser into a small-batch production tool.
This guide walks through five specific 3D-printed jig projects that pair directly with common laser-engraving workflows — pen registration, tumbler rotary, batch coaster, photo-engraving frame, and rotary glass adapter. Each comes with the design constraints that matter, the print profile that holds dimensional accuracy, and the LightBurn coordinate setup that makes the jig actually pay off.
Why Print a Jig Instead of Eyeballing It Each Time
Without a jig, every laser job requires manual alignment: position the workpiece on the bed, frame the design with the laser pointer, adjust, frame again. For one-offs that is fine. For any batch above 5 pieces, the alignment overhead consumes more time than the actual engraving. A simple PLA jig with locator pins drops to 5 seconds of placement time per piece — a 6-10x speedup on small-batch runs.
Beyond speed, jigs improve consistency. Hand-aligned pieces drift 1-3mm between runs depending on how careful you are. Jig-aligned pieces hold within 0.2mm — the dimensional accuracy of the underlying 3D print. For commercial work, jig consistency is what justifies charging for a 50-pen logo job versus a 5-pen logo job.
The Five Hybrid Jig Projects Worth Building
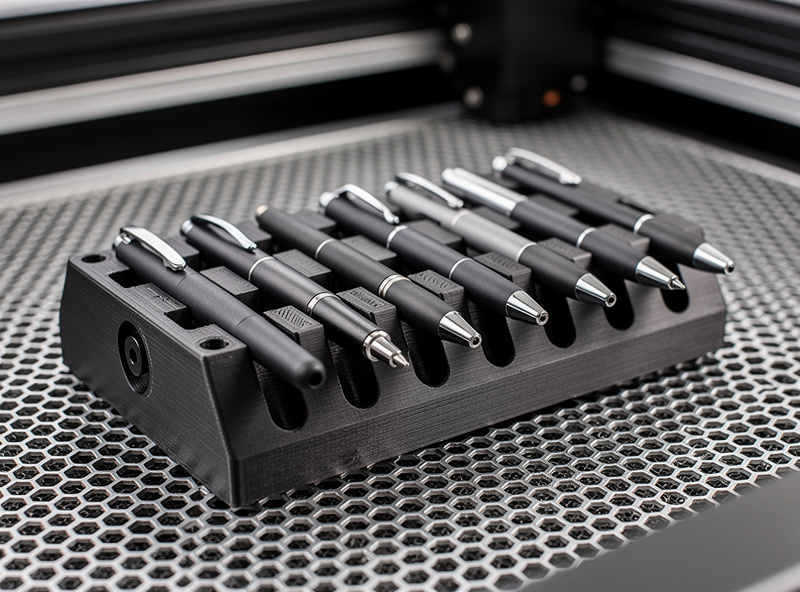
Project 1 — Multi-Slot Pen Engraving Jig
The most useful first jig. Six to eight slots sized to a specific pen body diameter (typically 9mm-13mm depending on pen model). The pens drop in flat, the laser engraves a logo or name on each, and you advance to the next batch in seconds. Useful for promotional pen orders, club gifts, and small business branding work.
Design constraints: print in PLA at 0.2mm layers, 3 perimeter walls, 30% infill. Slot diameter should be 0.3mm larger than nominal pen diameter to allow easy drop-in. The jig footprint must match your laser's known coordinates — design with reference holes that align to the laser's home position.
Print time per jig: 4-6 hours. Material cost: $2-3. Pen capacity: 6-8 per cycle.
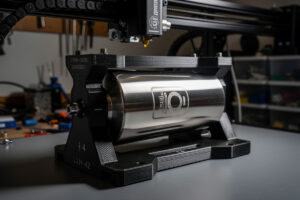
Project 2 — Tumbler Cradle for Rotary Engraving
Rotary engraving on stainless steel tumblers benefits from a printed cradle that holds the tumbler securely in the rotary chuck and prevents drift during long engravings. Design the cradle as a partial ring with rubber-band tensioners — print the ring in PETG (more wear-resistant than PLA at chuck contact points).
For a 20oz Yeti-style tumbler, the cradle inner diameter is 87mm with a 5-degree taper to match the tumbler shape. The cradle clamps to the rotary chuck via two M5 bolts in printed bosses. Print time 6-8 hours, material $4. Tumblers per cycle: 1, but the setup time drops from 90 seconds to 10 seconds per tumbler.
Project 3 — Batch Coaster Carrier
Hardwood and slate coasters are the bread and butter of small Etsy laser shops. A six-position printed carrier drops six round 4-inch coaster blanks into a known grid. Engrave all six in a single LightBurn job using grouped placements. Throughput goes from 3-4 coasters per hour (manual alignment per piece) to 12-18 per hour (load, run, unload).
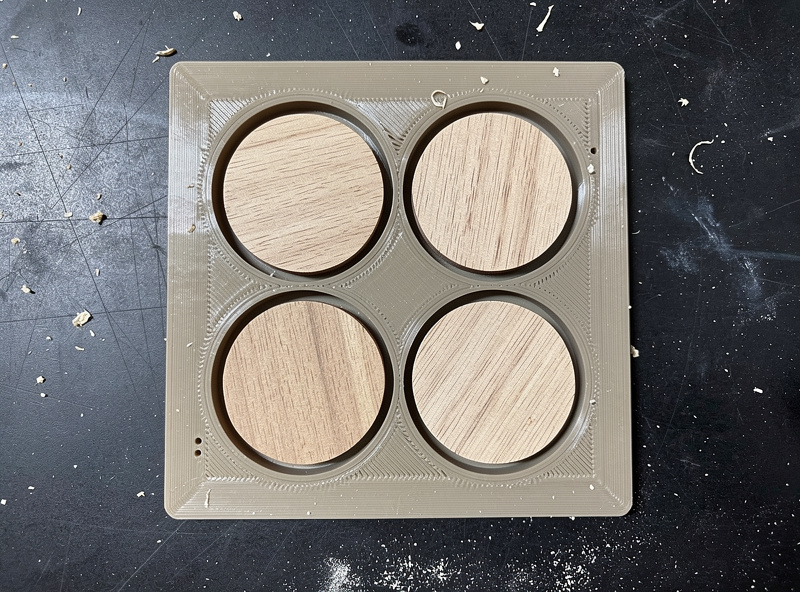
Print constraints: PLA at 0.25mm for speed, 20% infill, 2 perimeter walls. The carrier itself is mostly thin walls — print time 5-7 hours, material $3. The blanks register against printed corner tabs that match the coaster diameter within 0.5mm.
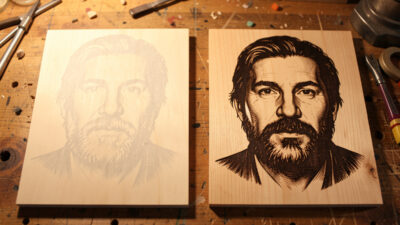
Project 4 — Photo-Engraving Frame for Anodized Aluminum Cards
Photo engraving on anodized aluminum business cards or wallet cards needs sub-millimeter alignment. A 3D-printed frame with corner registration tabs and a transparent acrylic top hold-down keeps the cards perfectly flat and positioned. The frame screws to the laser bed via printed mounting tabs that match your laser's T-slot pattern.
Design needs PLA+ or PETG for stability — ABS warps too much at the temperatures near the laser cutting head. Print four corner tabs at 0.16mm layer height for higher precision. The acrylic hold-down (4mm thickness, hand-cut to size) attaches via M3 bolts in printed inserts. Frame holds 6 cards per cycle.
Project 5 — Rotary Glass Growler Adapter
Beer growlers and wine bottles have inconsistent bottom diameters that frustrate standard rotary chucks. A 3D-printed adapter with internal ribs grips the irregular base and centers the bottle on the rotary axis. Print in PETG with 4 perimeter walls — this jig sees the most mechanical stress of any project here.
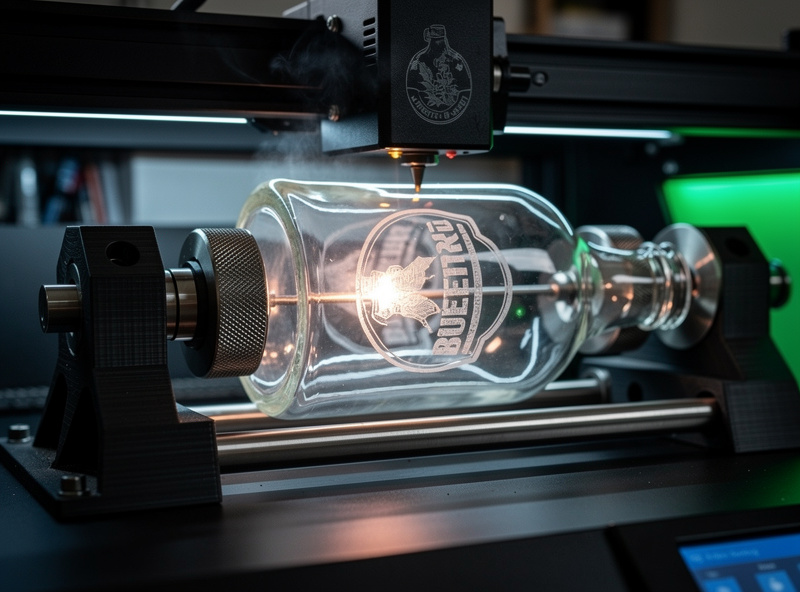
Adapter inner diameter: 95mm with three 60-degree spaced rib clusters. Each rib has a 1-degree friction taper to grip glass without slipping. The adapter mounts to rotary chuck via two M5 bolts. Print time 7-9 hours, material $5. One bottle per cycle, but laser-engraved glassware commands $25-45 retail per piece.
Designing Jigs in CAD With Laser Coordinates in Mind
The single most important design rule for laser jigs is matching the jig's coordinate system to your laser's home position. Two design conventions make this work:
Reference holes at 0,0 and a known offset point. Print two 3mm registration holes that align to the laser's home origin and a second known reference point. When the laser is homed, the jig sits in known coordinates. LightBurn's "Use Selection Origin" mode plus the registration alignment lets you place designs precisely on each workpiece slot.
Make jig height match laser focal distance. The Z-height of the workpiece in the jig must match where the laser's focal distance is set. Design the jig to lift the workpiece exactly to the laser's focal plane — typically 12-50mm depending on laser model. Auto-focus features on newer lasers help, but a designed jig height removes the need for re-focusing per piece.
For deeper coverage of CAD-side workflows that pair printing and laser cutting — including how to maintain a single parametric design file that drives both processes — our partners at PrintForgeHQ have a complete practical 3D printing projects guide that includes the print profiles, slicer settings, and post-processing techniques that make jig prints accurate enough to register on a laser bed. Their PETG settings reference is what makes the rotary cradle and growler adapter actually work — PLA cracks under rotational stress while PETG holds for hundreds of cycles.
Print Profiles That Make Jigs Last
A jig that warps, deforms, or wears out fast is worse than no jig — alignment errors compound across batches before the maker notices. Three print rules separate jigs that last from jigs that fail in week two:
| Jig type | Material | Layer height | Walls | Infill | Expected life |
|---|---|---|---|---|---|
| Pen jig (low stress) | PLA | 0.2mm | 3 | 30% | 500+ cycles |
| Coaster carrier | PLA | 0.25mm | 2 | 20% | 500+ cycles |
| Photo card frame | PLA+ or PETG | 0.16mm | 4 | 30% | 1000+ cycles |
| Tumbler cradle (rotary) | PETG | 0.2mm | 4 | 30% | 200-300 cycles |
| Growler adapter (heavy stress) | PETG | 0.2mm | 4 | 40% | 200-300 cycles |
PLA is fine for static jigs that hold their shape. PETG is required for any jig under continuous rotational or compressive stress — which usually means rotary attachments. ABS warps too much during printing to hold tolerance. Carbon-fiber-loaded PETG-CF holds up best for production shops doing 1000+ cycles, at roughly 4x the cost.
Material Compatibility — Will Your Laser Damage the Jig?
The laser cuts the workpiece, not the jig. But scattered laser energy, smoke residue, and proximity heat all degrade jigs over time. Three precautions extend jig life significantly:
Use a sacrificial layer between the jig and the workpiece. A piece of cardboard or 3mm balsa under the workpiece absorbs the laser pulse that bleeds through. Replace the sacrificial layer every 50-100 cycles.
Avoid PLA jigs near continuous high-power cuts. PLA softens at 60C, and a laser cutting steel through 40mm thickness can heat surrounding plastic to 70-90C from radiated heat alone. Reserve PLA for engraving jobs (low laser dwell time) and PETG/PETG-CF for cutting jobs.
Vent the laser enclosure properly. Smoke residue accumulates on jig surfaces and compounds dimensional drift over hundreds of cycles. According to OSHA laser safety guidance, proper enclosure venting is required for laser operation regardless of jig considerations — but it also doubles jig life by preventing residue buildup.
Cost and Time Math for a Production Run
Sample: a 50-piece pen-engraving job. With a 3D-printed jig:
- Jig design + print: 5 hours total ($3 PLA)
- Setup: 5 minutes (load 8 pens, set LightBurn placement once)
- Engraving: 90 seconds per pen
- Per-cycle reload: 30 seconds
- Total run time for 50 pens: about 60 minutes
Without a jig:
- Setup per pen: 30-45 seconds (manual alignment)
- Engraving: 90 seconds per pen
- Total run time for 50 pens: about 110-120 minutes
The jig saves 50-60 minutes on a single 50-pen run, and that jig is reusable indefinitely. After the first job, every subsequent batch saves the full 50-60 minutes. For commercial work, this is the difference between profitable promotional pen orders and orders that lose money to setup time.
For other practical maker projects that share the print-and-laser workflow described above, our existing project library includes the laser-engraved plant tags weekend project (uses a similar batch jig pattern) and the laser engraving leather settings reference (where a printed leather hold-down jig prevents shifting during engraving). The SVG for laser cutting reference covers the file-prep side that pairs with jig-positioned workpieces. For flat seasonal batch work where jigs are optional, the laser cut Christmas ornaments guide covers basswood and acrylic sizing, hanging hole placement, and running a 50-piece holiday batch efficiently.
Frequently Asked Questions
Can I use PLA for laser engraving jigs?
Yes for static jigs that hold workpieces in place during engraving (pen jigs, coaster carriers, photo frames). Avoid PLA for rotary attachments and any jig under continuous rotational or compressive stress — PLA cracks within 20-50 cycles in those scenarios. PETG is the right material for rotary chuck adapters and tumbler cradles.
How accurate does the 3D-printed jig need to be?
Within 0.2-0.5mm of CAD on slot diameters and reference points. A well-calibrated FDM printer in PLA at 0.2mm layers holds 0.2mm accuracy easily. The jig does not need to be more accurate than your laser is repeatable — most diode and CO2 lasers position to about 0.1mm, so 0.2mm jig accuracy is the ceiling that matters.
Will the laser damage the 3D-printed jig?
Direct beam contact will burn through PLA in seconds and PETG in 5-10 seconds. The goal is no direct beam contact — design slots so the workpiece blocks the beam from the jig surface. Add a sacrificial cardboard or balsa layer under the workpiece to catch beam pass-through. With these precautions, jigs last hundreds of cycles.
Do I need a special laser to use 3D-printed jigs?
No. Any laser that can hit a known coordinate works — diode, CO2, fiber, even most cheap entry-level engravers. The jig converts unreliable manual placement into reliable mechanical placement. The laser does not need to know the jig exists; LightBurn or your slicer just needs the design positioned correctly relative to the jig coordinates.
How do I align the jig to my laser bed?
Two registration holes in the jig that align to known points on your laser bed (typically the home origin and a fixed reference offset). Home the laser, drop the jig onto the bed with the registration pins, and the jig sits in known coordinates. Some makers tape a paper grid to the bed for visual alignment of jig outlines as a backup.
Can I use a single jig for multiple workpiece sizes?
Adjustable-slot jigs work for narrow ranges (a pen jig that handles 9-12mm pens via a tapered slot, for example). For wider ranges, design separate jigs per size. The cost of an extra $3 PLA jig is far smaller than the time cost of mis-aligning a workpiece, so most production shops keep 4-8 dedicated jigs rather than fighting universal designs.
Are 3D-printed jigs safe to use with food-grade laser projects (cutting boards, charcuterie boards)?
Use a food-safe sacrificial layer between the jig and the workpiece — typically a 3mm food-grade hardwood scrap. PLA itself is generally considered food-safe in static contact, but printed surfaces have layer ridges that can harbor bacteria. A sacrificial layer eliminates the issue and is the standard practice in food-related laser work.