Laser Engraved Photo Too Light? How to Fix It
A laser engraved photo that came out too light is almost always one of four things, in this order: focus is off, the scan is too fast, the power is too low, or the line interval is too coarse. Fix focus first — it is the most common cause and the easiest to overlook — then add energy by slowing down or raising power in small steps on a test strip. Nine times in ten the photo was starved of energy or burned out of focus, not cursed by a bad image.
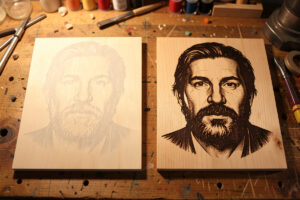
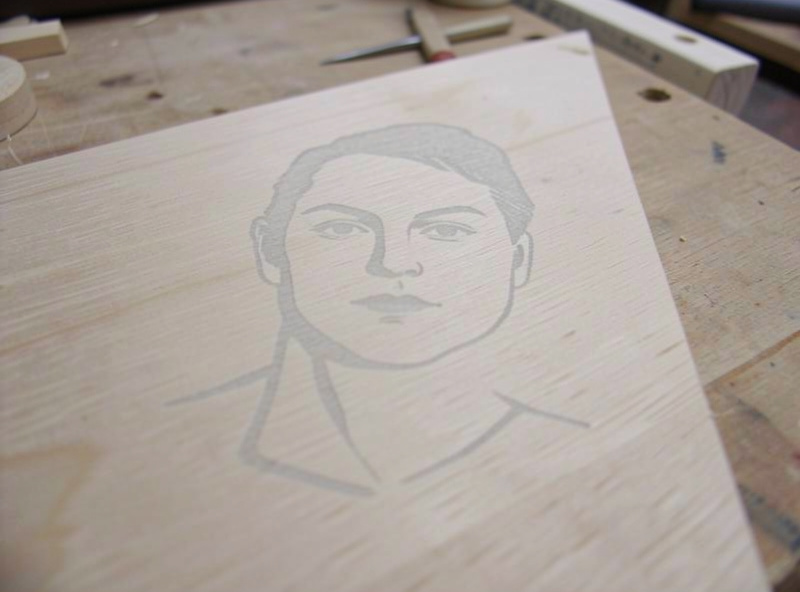
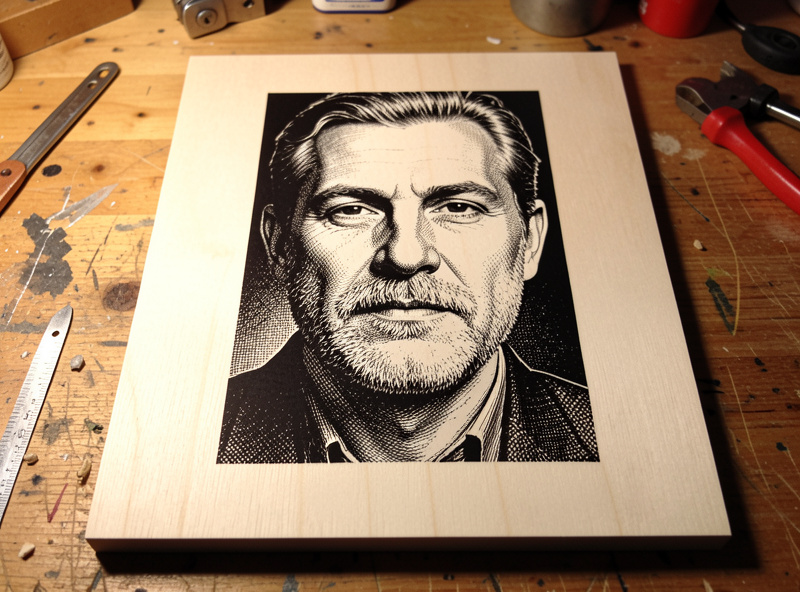
This is the troubleshooting chapter of the complete photo engraving guide. A faint, washed, grey portrait is the single most common first result, and the fixes are systematic, not magic. Here is the exact order I check them on my own bench when a face comes off too light.
First, rule out focus
Focus is the most common reason a photo is faint, and it is invisible until you fix it. When the head is even a millimetre off the correct focal height, the beam spot widens, energy spreads, and the whole image goes soft and grey no matter how high your power is. Re-set focus with the focus tool, autofocus, or a ramp test — never by eye — and confirm the material thickness is what the machine thinks it is. I have watched people chase power for an hour on a job that just needed the focus spacer. Check this before touching any other setting.
Add energy: slow down or raise power
If focus is good and the image is still pale, it is not getting enough energy per spot. Speed and power together set that energy, so either slow the scan or raise the power — in small steps, on a test strip, not by doubling everything at once. On a diode I usually drop speed first, say from 120 to 100 to 80 mm/s, because that deepens the darks without pushing the highlights as hard as a power jump does. If shadows are still weak at sensible speeds, then nudge power up a few percent. The full speed-and-power logic is in the photo settings guide.
Check the line interval
A line interval that is too coarse leaves gaps between scan lines, so the image looks sparse, striped, and washed even when the dots themselves are dark. Dropping to 0.1 mm (254 DPI) for diode photos packs the lines together and fills in the tone. This one masquerades as a power problem — people crank power to compensate and just get fat, scorched lines with white gaps between them. Tighten the interval instead.
| Symptom | Most likely cause | Fix |
|---|---|---|
| Whole image soft and grey | Focus off | Re-set focus with tool or ramp test |
| Shadows weak, no deep blacks | Too fast / too little power | Slow scan or raise power in small steps |
| Striped, sparse, white gaps | Line interval too coarse | Drop to 0.1 mm (254 DPI) |
| Flat, no contrast anywhere | Low-contrast source image | Boost contrast and gamma in software |
| Faint with hazy highlights | Smoke redeposit, air assist off | Turn on air assist, clean surface |
| Patchy / banded tone | Grayscale on a diode | Switch to Jarvis or Stucki dither |
Look at the source image
If the burn is technically fine but the face still looks flat, the image never had the contrast to begin with. A soft, evenly-lit phone photo has a narrow tonal range, and the laser faithfully reproduces that flatness. Open it in your editor, push contrast harder than feels natural, lift the midtones slightly with gamma, and make sure there is a true black and a true white in the image. Materials compress range, so the file has to start punchier than the final result you want. I re-burn more portraits for lazy image prep than for any settings reason — the prep matters more than the machine.
Confirm you are dithering, not grayscaling, on a diode
On a diode, grayscale mode produces pale, patchy, washed results because the diode cannot hold the smooth partial power grayscale needs — the lighter tones simply do not mark. If your photo is faint and blotchy on a diode, check the image mode and switch to a Jarvis or Stucki dither (an error-diffusion halftone), which fires the laser full-on for every dot and gives believable dark tone. This single change rescues a lot of “too light” diode photos. The full reasoning is in grayscale vs dithering, and the LightBurn mode location is in LightBurn photo settings (LightBurn’s own documentation covers image-mode options in detail).
Material and machine factors
Sometimes the material is the limit. A reflective or very hard surface, or a wood with a narrow tonal range, simply will not go as dark as you want — the fix there is a better material rather than more power, covered in best materials for photo engraving. Air assist matters too: with it off, smoke redeposits as a grey haze that mutes the highlights and flattens contrast, so it stays on for every photo. And a dirty or fogged lens scatters energy and weakens every burn — if your results have drifted lighter over time, clean the optics, as in the lens cleaning guide. The broader fault-finding playbook is in laser troubleshooting.
Why “just add more power” backfires
The instinct when a photo is too light is to crank the power, and it is usually the wrong first move. If the real problem is focus, more power on a fat beam spot just gives you a darker but still blurry face. If the problem is a coarse line interval, more power widens each scan line into a scorched stripe with white gaps between them — darker, but uglier. And if the source image is flat, more power crushes the whole thing toward black and loses the highlights that make a face read as a face. Power is one lever of several, and reaching for it before you have ruled out focus, interval, and image prep is how a faint photo becomes a burnt one. Diagnose the cause, then apply the matching fix from the table above.
Work the test strip, not the whole piece
Never debug on the final blank. Burn a small strip of the same photo at stepped speed and power, change one variable at a time, and read it under the light the finished piece will live in. That discipline turns “too light” from a frustrating mystery into a five-minute adjustment, and it is the same materials-test-card habit that prevents the problem in the first place. Log the winning numbers per material so the next portrait starts dialed in.
Frequently Asked Questions
Why did my laser engraved photo come out too light?
Most often focus is off, which softens the whole image, or the scan was too fast or the power too low, starving it of energy. A line interval that is too coarse also looks washed. Check focus first, then add energy in small steps on a test strip.
Should I raise power or slow down to fix a faint photo?
Slow down first. Dropping speed deepens the shadows without pushing highlights as hard as a power increase does, so you gain contrast with less risk of scorching. If shadows are still weak at sensible speeds, then nudge power up a few percent.
Can a bad focus make a photo look faded?
Yes, it is the most common cause. A millimetre of focus error widens the beam spot, spreads the energy, and turns the whole image soft and grey regardless of power. Always re-set focus with a focus tool or ramp test before adjusting any other setting.
Why is my photo faint and patchy on a diode laser?
You are likely using grayscale mode, which a diode cannot render well because it cannot hold smooth partial power. Switch the image mode to a Jarvis or Stucki dither, which fires the laser fully on for each dot and produces believable dark tone.
My image is technically fine but still looks flat. Why?
The source photo lacks contrast. Materials compress tonal range, so the file must start punchier than the result you want. Boost contrast and gamma in your editor and ensure there is a true black and true white before engraving.