Laser-Cut Christmas Ornaments: Batch Production Guide

Laser-cut Christmas ornaments are the project that turns a single sheet of thin plywood into dozens of finished pieces in one job, which makes them the best introduction to batch production on a laser. I cut ornaments from 3mm birch ply on my diode, nesting fifteen or twenty to a sheet, and the whole batch comes off the bed in one run. The skills you learn here — clean thin-ply cuts, nesting, and masking the engrave — carry into every production project after.
This build covers choosing and cutting thin plywood without scorching, nesting a sheet for maximum yield, the masking step that keeps soot off the faces, and finishing options from raw wood to paint-fill. It is one of the highest-volume builds on the laser project ideas hub, and once you can batch ornaments cleanly you can batch coasters, tags, and gift sets the same way.
Choosing Thin Plywood for Ornaments
Use 3mm baltic birch plywood for ornaments — it is thin enough to cut fast in a single or double pass, strong enough to survive handling, and engraves with clean contrast. Avoid thick stock that needs many passes and chars the edges, and avoid cheap ply with voids and glue-heavy cores that flare and leave dark cut edges. Consistent, low-void birch is the difference between clean ornaments and scorched ones.
The plywood quality matters more on ornaments than almost any other project because you are cutting a lot of intricate outline per sheet, and every void in a cheap core shows up as a flare or an incomplete cut that ruins that piece. Baltic birch is the standard for a reason: tight laminations, minimal voids, and a light face that takes engraving well. At 3mm a diode cuts it cleanly, usually in one pass for the engrave-free shapes and a second pass for anything with fine internal detail. If you want a darker cut edge as a design feature that is one thing, but an uncontrolled char edge from bad ply just looks cheap. For the full breakdown of how different woods and plywoods behave, the best wood for laser engraving guide is the reference, and the materials test card habit applies here too — test a corner of each new sheet before committing the whole batch.
Nesting a Sheet for Maximum Yield
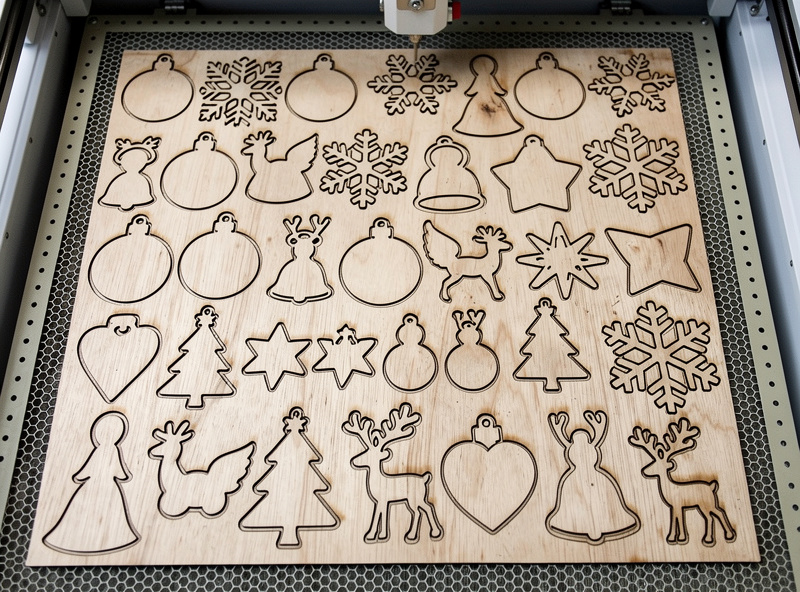
Nesting means arranging your ornament shapes on the sheet so they pack tightly with minimal wasted space — this is the core batch-production skill. A well-nested sheet yields fifteen to twenty-five ornaments from a single 300 by 300 panel instead of half that, and you set focus and origin once for the whole run.
The workflow is to lay out all your ornament outlines in your design software, rotate and interlock them so the gaps between pieces are as small as your cut kerf safely allows, and group the operations by type: run all the engraves first while every piece is still anchored in the sheet, then run all the through-cuts last so nothing shifts mid-job. Leaving the cuts for last is the single most important sequencing rule in batch work — if you cut a piece free early, it can lift or shift and ruin the engrave on its neighbours. A small bridge or tab left on intricate pieces keeps them anchored until you pop them out by hand afterward. This is exactly the kind of repeatable fixture-and-nest workflow that 3D-printed jigs take even further for non-flat batch jobs.
Masking to Keep the Faces Clean
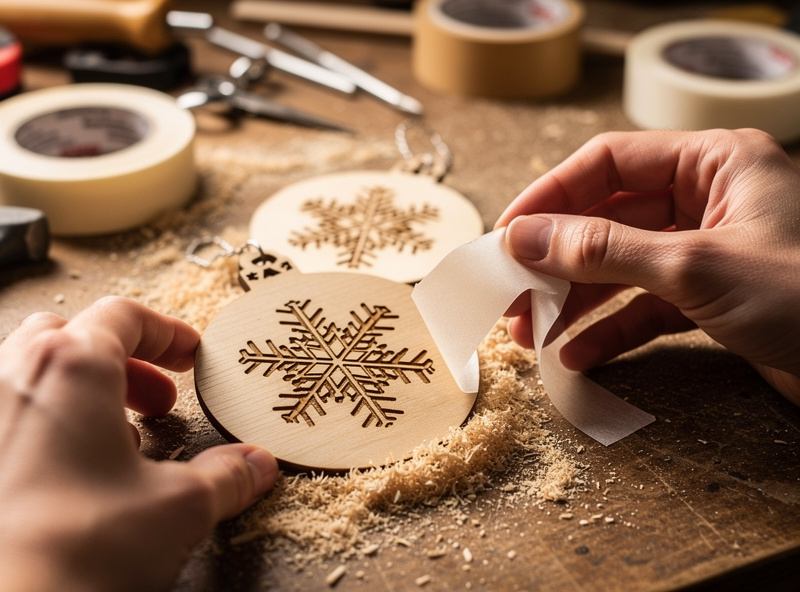
Mask the plywood with low-tack transfer or masking tape before engraving — this keeps the smoke and soot off the wood face, so you peel the tape after the job and the surface around the engrave is perfectly clean. Without masking, the resin and smoke from cutting settle on the face as a brown haze that is a chore to sand off every single ornament.
Apply the tape across the whole sheet, smooth it down, then run your engrave and cut straight through it. The engrave burns through the tape into the wood, the cut goes right through both, and when you peel the tape afterward the soot comes with it, leaving a clean face. On a batch of twenty ornaments this saves an enormous amount of finishing time — the alternative is wiping and sanding haze off forty faces. Masking is most worth it on light woods like birch where the brown smoke staining is most visible; it is the kind of small habit that separates a clean production batch from a smudged one. Pull the tape gently to avoid lifting any thin wood fibres on delicate cut details.
Finishing: Raw, Stained, or Paint-Filled
Ornaments finish three ways: left raw for a natural wood look, lightly stained or oiled for warmth, or paint-filled for high contrast. Paint-filling — brushing acrylic into the engraved recesses and wiping the excess off the masked face — gives the boldest, most retail-looking result and is why masking pays off twice.
Raw is the fastest finish and looks great on clean birch: just sand any fuzzy back edges, add a string or ribbon through a small cut hole, and they are done. A wipe of oil or a light stain warms the colour and pops the grain. Paint-fill is the premium option: with the masking tape still on, brush acrylic paint into the engraved lines, let it set slightly, then peel the tape to lift the overspill off the face, leaving crisp coloured engraving against clean wood. A spray of matte clear coat at the end protects any finish and gives a consistent sheen across the batch. Drill or laser-cut a small hole at the top of each ornament for the hanger, and a coil of baker’s twine or thin ribbon finishes the set.
Where to Get Ornament Designs and How to Prep Them
Ornament artwork needs to be clean vector outlines, not raster images, so the laser cuts a crisp edge. Free SVG repositories, the shape tools in your design software, and simple hand-traced silhouettes all work — the key is that every cut line is a closed vector path with no doubled-up overlapping lines that would make the laser cut the same edge twice.
The most common beginner mistake is importing a JPG or PNG of an ornament and trying to cut it directly; the laser cannot cut a pixel image, so it either traces it badly or refuses. Convert artwork to clean vectors first — the SVG preparation guide walks through exactly how to get a file the laser will cut cleanly. For ornaments specifically, separate your engrave details onto one layer and your cut outlines onto another, set the cut layer to a vector operation and the engrave layer to a raster or line fill, and the machine knows what to do with each. Snowflakes, stars, trees, baubles, and simple animal silhouettes are all forgiving first shapes. Add a small circle near the top of each as the hanger hole on the cut layer so it gets cut in the same pass. Keep internal detail above about 1mm wide so thin ply does not burn away the fine bridges.

Batching for Gifts and Sets
Ornaments are the ideal batch-and-gift project because a single sheet produces a whole coordinated set, and personalisation is just a text-layer swap. Engrave a name, a year, or a short message on each one, and a generic ornament becomes a keepsake. Because you are running a batch anyway, adding individual names costs only the design time, not extra setup.
For a coordinated set, pick one shape family — say, four different snowflakes or a series of woodland animals — and run them as a single nested job so the wood, finish, and style all match. Box them with a length of twine and they read as an intentional collection rather than a pile of cut shapes. The same batch discipline that makes ornaments efficient — nest, engrave-all-then-cut-all, mask, finish in one pass — is the production workflow you reuse for coaster sets, gift tags, and small wooden signs. Master it once on ornaments, where the stakes per piece are low, and you have the core skill for every multi-piece project on the bench. This site never quotes income figures, but ornaments are genuinely one of the most batch-friendly things a laser makes, which is why they show up in so many maker portfolios.
Ornament Finishing Options Compared
| Finish | Look | Effort | Best For |
|---|---|---|---|
| Raw wood | Natural, light | Lowest | Rustic / Scandinavian style |
| Oil or stain | Warm, grain-popped | Low | Traditional wood look |
| Paint-fill | Bold, high contrast | Medium | Names, logos, retail sets |
| Clear coat over any | Consistent sheen | Low add-on | Durability and gift sets |
Disclosure: Some links below are affiliate links. If you buy through them I may earn a small commission at no extra cost to you. I only point to materials I actually keep on my own bench.
For the stock, a pack of 3mm baltic birch plywood sheets sized for a desktop bed is what I cut ornaments from — consistent and low-void. To keep the faces clean through the batch, a roll of low-tack laser masking tape is the single cheapest upgrade to your finished result, and it makes paint-filling possible.