Laser-Cut Bus Bar Insulators and Terminal Covers for DIY Battery Banks
A laser-cut acrylic bus bar insulator costs $0.40 in material and 3 minutes of cut time. The same part from an electrical supply house costs.
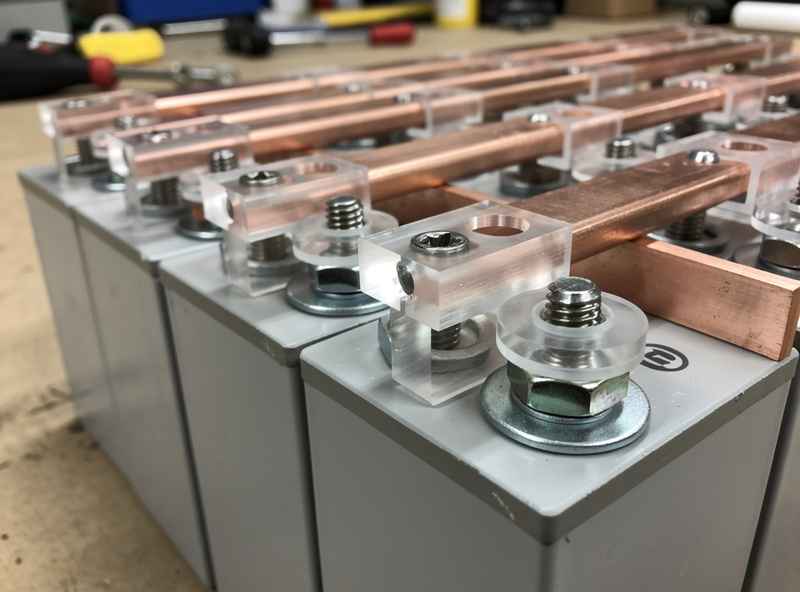
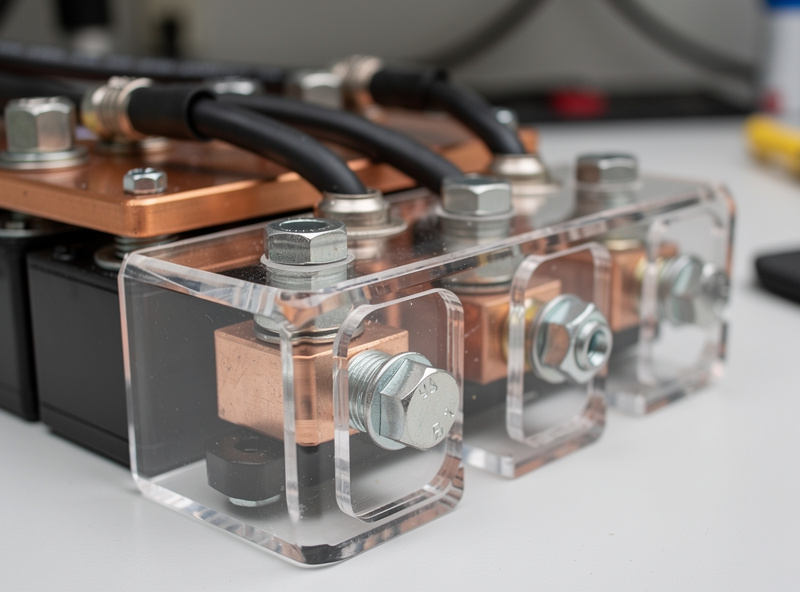
The diode laser I run cuts 3mm acrylic bus bar insulators at 200 mm/min at 85% power — the same enclosure that engraves leather also scores the insulator blanks. The Laser Engraving Leather Settings covers the foundational networking setup this article depends on. $6 and ships in a bag of ten that you do not need. A DIY battery bank with eight bus bars needs eight insulators, and the laser cuts all of them from a single sheet of 3-millimeter acrylic in under half an hour. The cut is clean, the edges are straight, and the part snaps into place between the bus bar and the battery terminal with zero post-processing.
Bus bar insulators are the ideal laser project: electrically critical enough to justify the laser’s precision, geometrically simple enough to design in five minutes in LightBurn, and commercially overpriced enough that every cut part saves real money. The same sheet of acrylic that cuts eight insulators also cuts terminal covers, cell-spacer blocks, and BMS mounting plates — a full set of battery-bank electrical isolation parts for under $5 in material.
Why Acrylic, Not Wood or Plywood, for Electrical Insulators
Cast acrylic has a dielectric strength of roughly 18 kilovolts per millimeter at 3-millimeter thickness, which means a 3-millimeter acrylic insulator withstands 54 kilovolts before breakdown — roughly a thousand times the 48-volt nominal voltage of a LiFePO4 battery bank. Wood insulates poorly because it absorbs moisture from the air, and moisture turns wood from an insulator into a resistor — a wooden bus bar spacer that measures 10 megohms when dry drops to 100 kilohms on a humid day, and that leakage current heats the spacer until it chars. Charred wood is carbon, and carbon is conductive. The first arc that jumps across a charred wooden insulator is the last one your battery bank produces before the fire starts.
Acrylic is the laser’s material for electrical work because it cuts clean with a sealed edge, does not absorb moisture, and does not carbonize under normal battery-bank temperatures of 25 to 40 degrees Celsius. At 60 degrees — extreme for a battery bank — acrylic softens but does not conduct. At 160 degrees, it melts, but by the time your battery bank reaches 160 degrees, the bus bar insulator is the least of your problems. Cut it at 70 percent power and 8 millimeters per second on a 20-watt diode laser with air assist, and the edge comes out polished — no sanding, no sealing, install-ready off the honeycomb bed. The laser does in three minutes what a CNC router does in 15, and the laser’s cut edge needs no deburring because there is no burr.
Designing Bus Bar Insulators in LightBurn
A bus bar insulator is a rectangle with two holes. The rectangle covers the bus bar’s footprint plus a 3-millimeter margin on all sides for creepage distance — the path electricity would have to travel along the surface of the insulator to arc to a neighboring component. At 48 volts, 3 millimeters of creepage distance is conservative. The holes match the bus bar’s bolt pattern, typically M6 or M8 on a 72-millimeter center-to-center spacing for standard LiFePO4 prismatic cells. Draw the rectangle, place two circles at the bolt center points, and send it to the laser. The rectangle cuts as a red-line vector; the holes cut as blue-line vectors on a separate layer with a slight power reduction to prevent the beam from scorching the honeycomb bed beneath the cut.
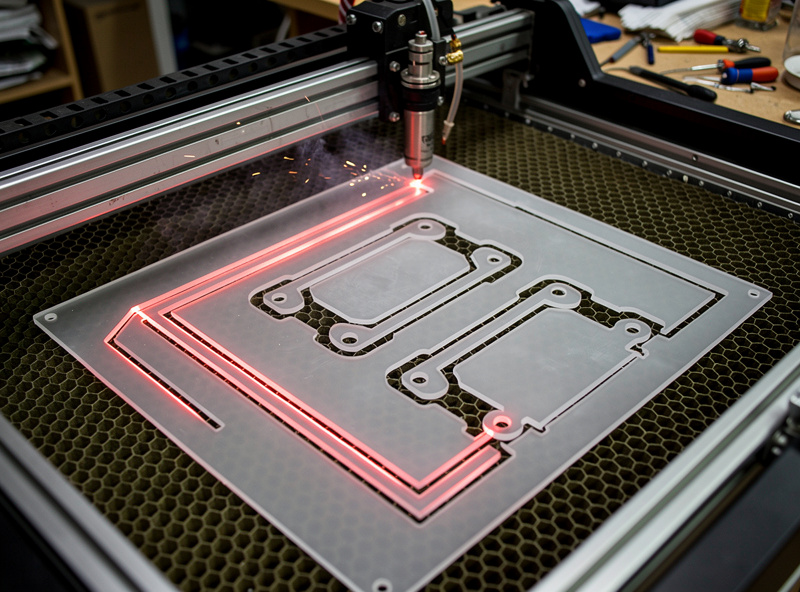
The production workflow: draw one insulator, verify the fit on the first cell, then duplicate the design eight times on the same sheet and cut all eight in one job. The sheet nests each insulator with a 2-millimeter gap for the kerf, and the honeycomb bed supports the entire sheet so the small parts do not fall through and get lost in the debris tray. For the full battery-bank build that these insulators belong to — including cell compression, bus bar torque specs, and BMS wiring — the complete DIY LiFePO4 battery bank build guide covers every step from cell selection to final commissioning. The laser’s job is the electrical isolation layer — one part of the build, done fast and done right.
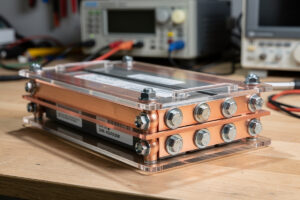
Terminal Covers, Cell Spacers, and BMS Mounts From the Same Sheet
The laser cuts the insulators from the center of the acrylic sheet, leaving the perimeter for other parts. Terminal covers — rectangular boxes with tabs that snap over the bus bar terminals — cut from the same 3-millimeter acrylic with a fold-line engrave at 15 percent power to create a flexible hinge. The engrave weakens the acrylic enough to bend without snapping, and the tabs lock into slots cut in the adjacent face. One sheet, one material, four different part types, all cut in the same job. Cell spacers — thin rectangles that fit between prismatic cells to maintain the manufacturer’s recommended gap for cooling — cut from the same sheet with no additional design work beyond sizing the rectangle to the cell face dimensions.
A BMS mounting plate — a flat plate with holes for the BMS PCB mounting screws and slots for the balance-lead wiring to pass through — cuts from the same acrylic sheet in the same job. Design it as a vector cut with engraved mounting-hole centers at 15 percent power to mark the drill points without cutting through. The engrave marks are accurate to within 0.1 millimeters on a well-focused diode laser, which is tighter than the tolerance of the M3 screws that mount the BMS. The full sheet takes roughly 20 minutes from start to finish, and when the job is done, you have every electrical-isolation part for a complete battery bank — parts that cost $4 in acrylic and two hours of design time, replacing $40 to $60 in commercial equivalents.
Laser Settings Reference for Acrylic Electrical Parts
The cut profile for 3-millimeter cast acrylic on a 20-watt diode laser: 70 percent power at 8 millimeters per second with air assist at 50 percent flow. Two passes at 80 percent power and 12 millimeters per second if the first pass leaves a fuzzy edge — cast acrylic varies slightly between manufacturers and a test cut on a corner of the sheet confirms the settings before the production run. Engrave at 15 percent power and 50 millimeters per second for fold lines and screw-point marks. The honeycomb bed must be clean — acrylic residue from previous cuts burns under the laser and marks the bottom face of new parts. Scrape the bed with a razor blade between sheets, which takes 30 seconds and saves the bottom finish on every part.
One profile, one material, one sheet, and the laser produces a complete electrical-isolation kit for a 16-cell LiFePO4 battery bank in less time than it takes to order and receive the commercial equivalents. The laser is not just an engraving toy — it is the fastest tool in the workshop for producing precision electrical parts, and the only reason more DIY battery builders do not use it is that nobody has told them the cut settings. Now they have them.
Frequently Asked Questions
Is acrylic safe for use around lithium battery terminals?
Yes. Cast acrylic has a dielectric strength of approximately 18 kilovolts per millimeter. A 3-millimeter acrylic insulator withstands 54 kilovolts before dielectric breakdown, which is over a thousand times the 48-volt nominal voltage of a LiFePO4 battery bank. Acrylic is non-conductive, non-hygroscopic, and widely used in commercial electrical isolation applications.
Can I use extruded acrylic instead of cast acrylic for insulators?
Extruded acrylic works but cuts less cleanly because it has a lower melting point and tends to gum up on the laser kerf. Cast acrylic produces a polished edge that needs no post-processing. Extruded acrylic is cheaper but the cut-quality difference is noticeable on thin insulators where edge cleanliness matters for creepage distance.
What thickness of acrylic should I use for bus bar insulators?
Three millimeters is standard for 48-volt systems. Two millimeters works for 12-volt and 24-volt banks but the thinner material flexes under bolt torque and can crack at the mounting holes. Five millimeters is overkill for electrical isolation but useful if the insulator also serves as a cell-spacer.
Why can’t I use wood or MDF for battery bank insulators?
Wood absorbs moisture from the air and becomes partially conductive. A wooden bus bar spacer that reads 10 megohms in dry conditions drops to 100 kilohms or lower in humid conditions, creating a leakage path that heats the spacer and eventually carbonizes it. Carbonized wood is conductive and can arc across bus bars, starting a fire. Use only non-hygroscopic materials — acrylic, polycarbonate, or FR4 fiberglass.
Do I need air assist when cutting acrylic for electrical parts?
Yes. Air assist clears the laser kerf of molten acrylic during the cut, producing a clean edge with no residue that could absorb moisture over time. Without air assist, the cut edge re-melts slightly and creates a rough surface that reduces the effective creepage distance. Air assist also reduces the fire risk that all laser cutting carries.
Can I laser-cut FR4 fiberglass for battery insulators instead of acrylic?
Do not laser-cut FR4. The epoxy resin in FR4 fiberglass releases chlorine gas and other toxic compounds when cut with a laser — the same reason you never laser-cut PVC. FR4 should be milled on a CNC, not cut with a laser. Acrylic and polycarbonate are the safe laser-cuttable electrical insulator materials.
Related Articles
- Laser Engraving Project Ideas: Builds by Material and Skill
- 3D-Printed Jigs for Laser Engraving
- Best Laser Software 2026: LightBurn vs LaserGRBL
- Diode vs CO2 vs Fiber Laser: Which Is Right for You
- Laser Engraving Leather Settings: Power, Speed, Material Guide
- Best Diode Laser Engravers 2026: Top Picks Compared