Laser-Cut Finger-Joint Box: Kerf and Press-Fit Guide
The finger-joint box is the project that turns someone who cuts flat shapes into someone who builds objects. It uses kerf-aware design and press-fit joinery — the two skills that separate real laser cutting from making coasters — and once you can cut a box that closes with a satisfying click, trays, enclosures, and inlay projects all open up. The fit lives or dies on one number: the kerf your specific machine cuts, which you measure rather than guess.
This build covers generating a box file, measuring your kerf, tuning the finger width for a snap fit, adding a lid, and gluing up square. It is one of the most rewarding intermediate builds on the laser project ideas hub because the skill compounds: kerf-aware design carries into every press-fit project you make afterward.
Kerf: The Number the Whole Box Depends On
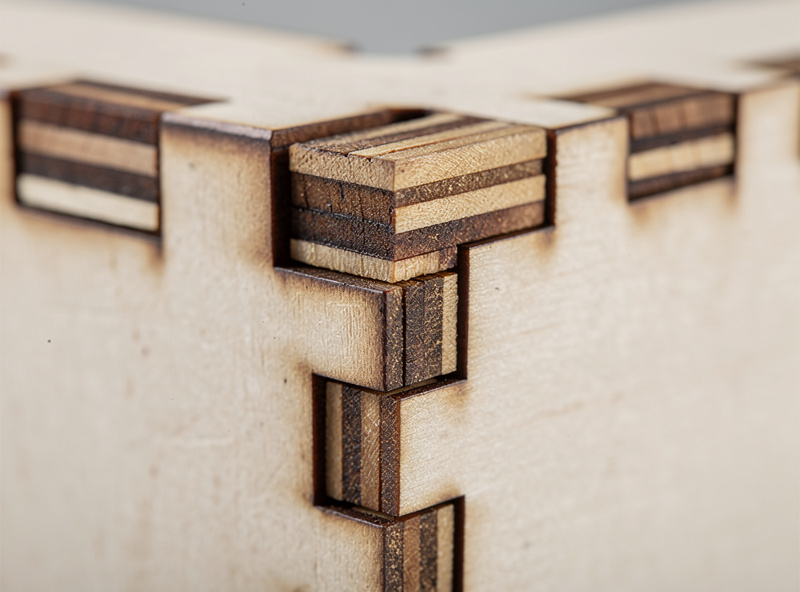
Kerf is the width of material the laser beam removes as it cuts — typically around 0.1 to 0.2mm on a desktop laser, varying with the machine, material, and settings. For a finger-joint box, the kerf determines whether the joints are loose, perfect, or impossibly tight, because every cut edge sits half a kerf in from where the line was drawn.
Here is why it matters so much: when you cut a 6mm-wide finger, the laser removes material on both sides of the cut line, so the actual finger comes out slightly narrower than drawn, and the slot it fits into comes out slightly wider. If your design does not account for kerf, the fingers are loose and the box rattles. Compensating for kerf — making fingers a fraction wider and slots a fraction narrower by the kerf amount — is what produces a press fit that holds together by friction alone. The exact kerf depends on your machine and the material, which is why you measure it rather than copy a number, the same materials-test-card discipline the materials guide applies to power and speed. Get the kerf right and the box snaps together; get it wrong and you are gluing gaps.
How to Measure Your Kerf
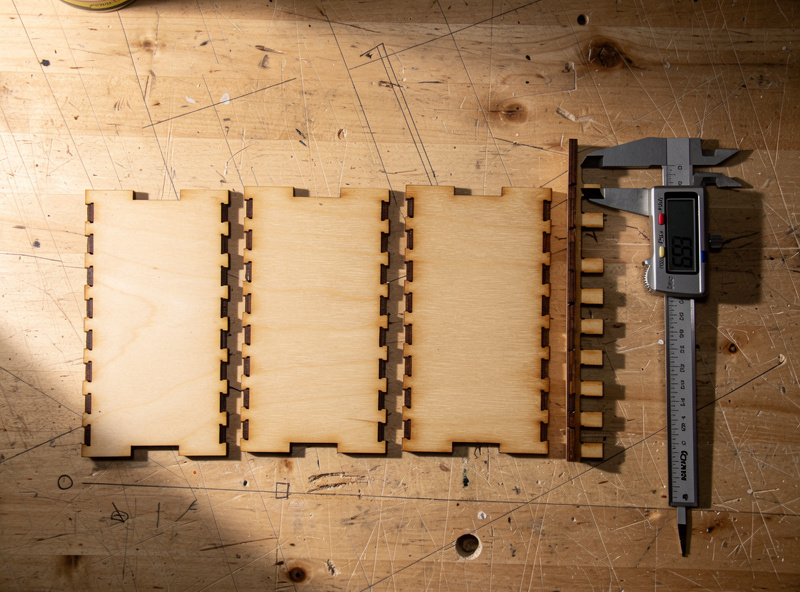
Measure kerf by cutting a test piece of known drawn dimension and measuring the actual result with calipers — the difference is your kerf. A common method: cut a small square designed at exactly 20mm, measure the real cut piece, and the shortfall divided across the two cut edges gives your kerf per edge.
A cleaner method for box-making specifically is the comb-and-slot test: cut a strip with several slots of slightly different widths and a matching tab, then find which slot the tab press-fits into. That tells you the effective fit directly in the material and thickness you will actually use. Either way, measure in the exact material and at the exact settings you will cut the box with, because kerf shifts with material, thickness, power, and speed — a kerf measured in 3mm acrylic does not transfer to 6mm plywood. Keep a small logbook of measured kerf per material; mine lives on the bench and saves re-testing every time. Calipers are essential here — eyeballing a tenth of a millimetre is not possible, and that tenth is the whole difference between a snug box and a sloppy one.
Generating the Box File
Use a box generator to create the starting file — free tools like MakerCase or boxes.py produce a finger-jointed box from your dimensions, material thickness, and kerf input. Enter your measured kerf and the actual thickness of your stock, and the generator outputs a flat layout of panels with matching fingers and slots ready to cut.
The generators ask for three critical inputs: internal or external dimensions, material thickness, and kerf. The thickness must be your stock’s real measured thickness, not its nominal label — “3mm” plywood is often 2.8 to 3.2mm, and the finger slots are cut to that thickness so the panels seat flush. Enter your measured kerf so the generator compensates the joints automatically. From there you can choose finger count and whether to add a lid. Export the layout, bring it into your cutting software, and you have a box ready to cut — though I always cut one test box in cheap ply before committing nice material, because a generator’s defaults are a starting point, not a guarantee of a perfect fit on your machine. Prepping the file cleanly is the same vector discipline covered in the SVG preparation guide.
Adding a Lid
Boxes take several lid styles: a friction-fit slide-on lid, a hinged lid using a living hinge cut into the wood, a separate drop-on lid, or a finger-jointed lid that mirrors the box. The slide-on and drop-on lids are the simplest; a living hinge is the showpiece option that flexes wood by cutting a pattern of thin slots.
For a first box, a simple drop-on or slide lid is the right choice — it just needs its own kerf-compensated fit. A living hinge is the impressive upgrade: by cutting a dense pattern of staggered slots into a panel, you make rigid plywood bend smoothly, so a single piece wraps around as a flexible lid or curved side. Living hinges are material-specific and take tuning — the slot spacing controls how tight the wood can bend without snapping — so test the hinge pattern on a scrap before building it into a box. Match the lid style to the box’s purpose: a slide lid for a pencil box, a hinged lid for a presentation box, a finger-jointed removable lid for a sturdy storage box.
Gluing Up Square
Assemble the box dry first to confirm the fit, then glue up square. A good kerf-compensated box holds together by friction for the dry fit; wood glue in the finger joints makes it permanent. The critical step is checking square as the glue sets, because a box glued out of square stays that way forever.
Dry-fit every panel first — the fingers should press together snugly without forcing. If they are too tight, your kerf compensation is slightly off; if loose, the same. Once the dry fit is good, run a thin bead of wood glue along the finger joints, press the box together, and check it for square with a small engineer’s square on at least two corners. A strap clamp or a few rubber bands hold it while the glue cures. Wipe squeeze-out immediately with a damp cloth before it dries, because dried glue resists stain and shows as a blotch on the finished box. Let it cure fully, then sand the joints flush — the end grain of the fingers sands down level with the panels for a clean seamless look. A finish of oil or clear coat at the end protects the box and pops the joint pattern that is the whole point of finger joinery.
Finger-Joint Box Fit Troubleshooting
| Symptom | Likely Cause | Fix |
|---|---|---|
| Joints too loose, box rattles | Kerf over-compensated | Reduce kerf value in generator |
| Joints will not press together | Kerf under-compensated | Increase kerf value slightly |
| Panels do not seat flush | Wrong thickness entered | Measure real stock thickness |
| Box glued out of square | Not checked while curing | Use a square and strap clamp |
| Living hinge snaps | Slot spacing too aggressive | Test hinge pattern on scrap |
Disclosure: Some links below are affiliate links. If you buy through them I may earn a small commission at no extra cost to you. I only point to tools and stock I actually use on my own bench.
The one tool this project genuinely requires is a decent set of digital calipers to measure kerf and stock thickness — you cannot tune a press fit without it. For the box stock, baltic birch plywood in 3mm and 6mm cuts clean finger joints and stays dimensionally consistent across the sheet.
Related Builds
- Laser Engraving Project Ideas: The Project Hub
- SVG Preparation for Laser Cutting
- Laser Cutting Materials Guide
- Acrylic Laser Cutting Settings
- Edge-Lit Acrylic Night-Light
Frequently Asked Questions
What is kerf in laser cutting?
Kerf is the width of material the beam removes as it cuts, typically 0.1 to 0.2mm on a desktop laser. It matters for finger-joint boxes because every cut edge sits half a kerf in from the drawn line, affecting joint fit.
How do I measure my laser’s kerf?
Cut a test piece of known drawn dimension and measure the real result with calipers; the shortfall is your kerf. For boxes, a comb-and-slot test tells you the press fit directly in your actual material and thickness.
What box generator should I use?
Free tools like MakerCase or boxes.py produce finger-jointed box files from your dimensions, measured stock thickness, and kerf. Enter real measured values, not nominal labels, and export a flat layout ready to cut.
Why do my finger joints come out loose?
Usually kerf is over-compensated, so the fingers cut too narrow. Reduce the kerf value in your generator slightly and re-cut a test. Loose joints can be glued, but a true press fit holds by friction alone.
What is a living hinge?
A living hinge is a pattern of staggered thin slots cut into a panel that lets rigid plywood bend smoothly, so one piece can wrap as a flexible lid or curved side. The slot spacing controls how tight it bends.
What wood is best for a finger-joint box?
Baltic birch plywood in 3mm or 6mm cuts clean finger joints and stays dimensionally consistent across the sheet. Avoid void-prone cheap ply, whose inconsistent thickness ruins the press fit.
How do I keep the box square when gluing?
Dry-fit first, then glue the joints, press together, and check at least two corners with an engineer’s square while the glue cures. A strap clamp or rubber bands hold it; wipe squeeze-out before it dries.