Laser Engraver Upgrades: The 7 Mods That Actually Improve Your Machine
Laser engraver upgrades make the biggest difference to cut quality, safety, and machine longevity — and most of them cost under $150 while transforming a stock machine into something a professional shop would recognize. After running my xTool S1, OMTech Polar 350, and Atomstack X20 Pro through hundreds of material tests, I’ve settled on seven hardware additions that pay for themselves on the first serious project.
This guide covers every upgrade worth buying — from the air-assist pump that should have shipped in the box to the Z-axis autofocus module that eliminates half a manual-focusing step. I’ll tell you which mods work across machine classes and which are diode-specific or CO2-specific, because the right upgrade depends on what you’re actually cutting.
Why Upgrade Before You Buy More Power
Most laser owners chase higher wattage when their cuts aren’t clean. That’s almost always the wrong diagnosis. A 10W diode with proper air assist, a focused lens, and a stable honeycomb bed cuts cleaner than a 40W machine running air-free on a flat pan. The physics are straightforward: airflow clears combustion products from the kerf so the beam keeps coupling to the material instead of burning through smoke residue. Adding power on top of a poorly-ventilated setup just scorches faster and dirtier.
The upgrade order I follow on every machine I add to the bench: air assist first, work surface second, fume extraction third, then optics, then accessories like rotary attachments and cameras. That sequence maps to what affects cut quality most directly and what catches fire and poisons lungs fastest.

Air Assist: The First Upgrade Every Machine Needs
Air assist is the single highest-ROI upgrade on any diode laser. A dedicated pump pushing 10–20 L/min through a nozzle at the laser head clears combustion gases from the kerf, cools the cut zone, and reduces char by roughly 60–70% on wood and leather. On my Atomstack X20 Pro — which shipped without one — adding a 30 PSI pump and a brass nozzle converted it from a machine that needed masking tape on every wood engrave to one that cuts clean-edged parts without tape on most hardwoods.
Stock air assist on mid-tier diodes like the xTool S1 uses an integrated pump that’s adequate for engraving but undersized for cutting. An external pump in the 30–50 PSI range with a separate air line bypasses the internal one completely. For the OMTech Polar 350, the CO2 machine already has a decent air-assist nozzle but benefits from a higher-volume compressor for acrylic — the factory pump leaves micro-melting on the cut edge on thicker cast sheet. I run a 4-gallon pancake compressor at 30 PSI on the CO2 for any acrylic thicker than 3mm.
Key specs to look for: pumps rated for continuous duty (not intermittent), a pressure regulator so you can dial down for thin materials, and a moisture trap if you’re using a compressor. Moisture in the air line frosts acrylic surfaces and causes inconsistent engraving depth on leather. The diaphragm pumps sold specifically for laser use (like the 30 L/min units bundled with Sculpfun machines) work well for diodes without a compressor in the room — quiet and purpose-built.
See the dedicated air assist setup guide for pump selection, nozzle sizing, and the installation sequence I use on all three machine classes.
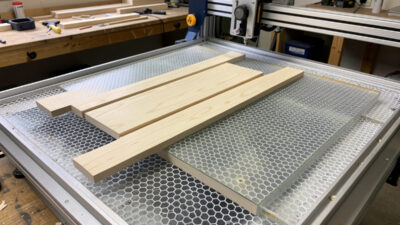
Honeycomb Bed vs Slat Bed: Work Surface Matters More Than You Think
A flat metal pan underneath your material is a reflection hazard and a smoke trap. The beam bounces off the pan surface, hits the underside of the material, and burns a secondary char pattern that smears light-colored wood pieces and destroys leather reverses. A honeycomb bed lifts the material 15–20mm off any reflective surface, lets airflow clear combustion products from below, and gives cut pieces a clean fall-through when you’re doing full cuts.
Slat beds — parallel aluminum rails — are the alternative used on larger CO2 machines. They’re better for heavy material (thick hardwood, stone slabs) because honeycomb deflects under load. For anything under 6mm, honeycomb is my default. The OMTech Polar 350 came with a thin honeycomb that warps at CO2 power levels after a few months; I replaced it with a 20mm deep laser honeycomb that handles the heat from longer acrylic-cutting sessions without deforming.
On diodes, the stock aluminum pan that ships with most open-frame machines is the worst possible work surface. A $25–$35 laser honeycomb cut to size is a meaningful quality upgrade — it’s one of the first things I do when a new diode comes off the shipping pallet.
The full comparison — honeycomb depth options, slat pitch, which surface wins for which material — is in the honeycomb vs slat work bed guide.
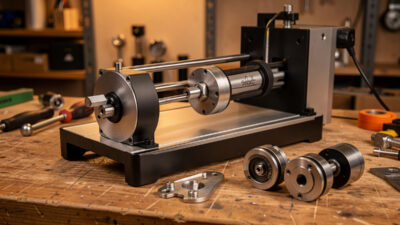
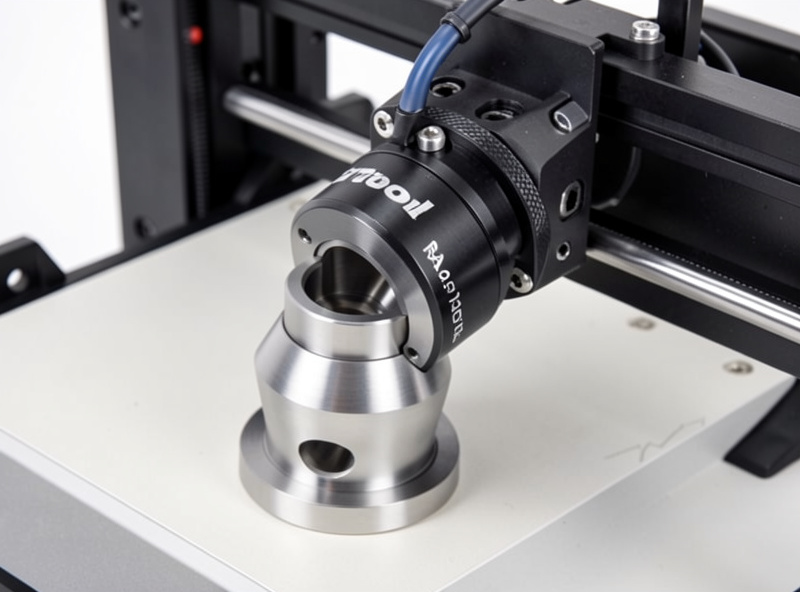
Rotary Attachment: Cylinders, Rings, and Chuck vs Roller
A rotary attachment converts a flat-format laser into a cylindrical engraving machine. Every diode and desktop CO2 in my shop has used one at some point — the xTool RA2 Pro lives on the xTool S1, and I keep a roller-style rotary for the OMTech when I’m running larger tumblers that the RA2 Pro’s chuck can’t grip cleanly.
Chuck rotaries grip the object at one end like a lathe. They’re the right choice for tapered objects — wine glasses, conical tumblers, anything where the diameter changes along the axis. Roller rotaries use driven wheels to spin the object from the sides and work better for straight cylinders. The friction drive on a roller can slip on lightweight objects, so I default to the chuck for anything under 500g. The RA2 Pro solves this with adjustable rollers and a foam grip surface that handles glass without slipping.
In LightBurn, rotary setup requires entering the roller diameter (or chuck circumference) and setting the rotary steps-per-rotation — then running the Y-axis test to confirm one rotation equals exactly 360 degrees of wrap-around. Getting this wrong means a seam. I spend five minutes on calibration before every rotary session; the materials test card habit applies here too.
The critical distinction this cluster note flags: this guide covers the hardware side of rotary — chuck vs roller mechanics, installation, calibration. LightBurn’s rotary software setup (steps-per-rotation math, the Y-stretch correction, preview rotation in software) is a separate spoke. Don’t let hardware and software rotary topics blur into one page — they serve different searcher intents.
Full hardware coverage in the rotary attachment guide.
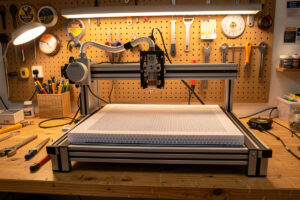
Laser Engraver Camera: Job Positioning Without Guesswork
A camera module mounted above the laser bed lets you see your material on-screen and position cuts precisely over a design — without the measuring-and-jogging workflow that eats 10–15 minutes per job. LightBurn’s camera calibration routine takes about 20 minutes on first setup and then holds to within 0.5mm accuracy on subsequent sessions. For production runs where I’m placing 30+ engravings on a sheet of leather panels, that accuracy compounds into serious time savings.
The xTool S1’s built-in camera (a standard feature on that enclosed machine) is what I use for its LightBurn camera alignment — it’s good enough for ±1mm work but occasionally drifts after moving the lid. External camera mounts for open-frame diodes vary in quality significantly; the branded xTool and Sculpfun cameras calibrate cleanly with LightBurn; cheap third-party USB cameras struggle with the lens distortion correction step and end up with accuracy worse than manual positioning.
For the OMTech CO2, I use a fixed overhead camera on a DIY bracket — not the machine’s native software (which doesn’t support LightBurn camera mode). The bracket height affects calibration accuracy; the camera needs to be far enough from the bed to see the full working area in one frame.
Full installation and calibration walkthrough in the camera setup guide.
Z-Axis Autofocus: Eliminating the Manual Focus Step
Z-axis autofocus modules use a contact probe or a rangefinder to measure material height and set the focus distance automatically before each job. On machines without autofocus, I use the manual focus tool (the plastic spacer that ships with most diodes) or a ramp test — cut a line across a ramped board and find the narrowest kerf, then record that as the correct Z height for that material thickness. That works, but it adds 3–5 minutes of setup per job.
The xTool S1 has autofocus built in via a motorized Z table that reads material height on a probe touch. That’s the reference standard I work from. Third-party autofocus modules for open-frame diodes — the type that add a motorized Z gantry or use a laser ranging module — range from excellent to frustrating depending on firmware compatibility. The OMTech Polar 350 uses a manual focus, and I use a calibrated acrylic focus gauge rather than a probe for the CO2 bench.
Autofocus matters most for materials with inconsistent thickness — rough-sawn hardwood can vary 0.5–1mm across a board, and a diode at wrong focus loses significant edge sharpness across that variance. Autofocus eliminates that variable. For flat, consistent sheet goods (plywood, acrylic sheet, leather from a single hide), manual focus set once per session is adequate.
Details on module types, installation, and firmware flashing in the Z-axis autofocus upgrade guide.
Upgraded Laser Lens: Smaller Dot, Better Detail
The stock lens on most diode lasers ships as a compromise — optimized for a working distance that covers most materials at an acceptable spot size. Aftermarket lenses with shorter focal lengths produce a smaller dot at the focal point (sometimes 40–50% smaller), which translates directly to finer engraving resolution and cleaner thin-line vector cuts.
For the Atomstack X20 Pro, I’ve run both the stock 100mm focal-length lens and a 60mm aftermarket lens. The 60mm produces noticeably finer text engraving on wood — lines that would blur into each other at 254 DPI stay crisp at the same setting. The tradeoff is a shallower depth of focus, which makes uneven material surfaces more punishing. If your bed isn’t perfectly flat or your material warps under heat, a short focal-length lens exposes that problem immediately.
CO2 lens upgrades follow different physics. The OMTech Polar 350 uses a ZnSe (zinc selenide) lens that absorbs CO2 wavelengths; the factory 2-inch lens is a solid choice for general work. A 1.5-inch lens produces a tighter spot for fine engraving work but reduces depth of focus significantly — I only swap to it for fine-detail projects and swap back after. Lens cleaning matters as much as lens quality: a 2-inch ZnSe lens cleaned with IPA and lens tissue outperforms a dirty 1.5-inch lens every time.
Full lens selection and swap procedure in the laser lens upgrade guide.
Fume Extractor vs Raw Exhaust: The Safety Upgrade That Protects the Operator
Every laser I run exhausts to outside — I built the enclosures specifically to duct outside through the wall. That’s the baseline, and it’s non-negotiable. A fume extractor adds a second stage: filtration before the air either recirculates or exits, using activated carbon for VOCs and HEPA for particulate. The difference matters most when you’re in a space where exterior ducting isn’t possible, or when you’re engraving materials that produce fine particulate that the exhaust blower alone doesn’t capture.
For laser work specifically, I treat fume extractors as a complement to ducted exhaust, not a replacement. The argument you’ll see in some forums — “a good fume extractor means you don’t need exterior ducting” — is wrong. Carbon filters saturate over time and when they’re near capacity, they pass VOCs transparently with no warning. Exterior exhaust is the failsafe. The national consensus laser-safety standard, ANSI Z136.1, treats laser-generated air contaminants (LGAC) as a recognized hazard that engineering controls — capture-at-source ventilation plus filtration — must address, which is exactly why I run both ducting and a filter stage rather than treating either as sufficient on its own. A fume extractor adds protection margin on top of that, especially during long engraving sessions on MDF or composite materials that outgas formaldehyde.
The safety tie to the Safety cluster is real: the fume extractor spoke covers the hardware — units, filter ratings, CFM requirements for different machine power levels. The laser safety article covers the full fume and fire protocol, PVC/vinyl bans, and eye protection. These are different articles serving different intents; linking between them is correct because the reader buying a fume extractor should understand the full safety stack, not just the appliance.
Fume extractor selection and filter maintenance in the fume extractor upgrade guide.

Laser Engraver Upgrade Comparison: Cost, Impact, and Priority
| Upgrade | Approx. Cost | Impact on Quality | Impact on Safety | Priority | Works On |
|---|---|---|---|---|---|
| Air Assist Pump | $30–$80 | High — reduces char 60–70% | High — clears combustion gas | #1 First | Diode + CO2 |
| Honeycomb Work Bed | $25–$50 | High — eliminates underside burn | Medium — airflow from below | #2 Second | All machines |
| Fume Extractor | $80–$300 | Medium — cleaner environment | Very High — VOC + particulate | #3 Third | All machines |
| Rotary Attachment | $50–$200 | Enables new material shapes | Low | When needed | Diode + CO2 |
| Camera Module | $40–$120 | Medium — precision positioning | Low | Production use | Diode + CO2 |
| Z-Axis Autofocus | $60–$150 | High — consistent focus | Low | Uneven materials | Diode (mainly) |
| Upgraded Lens | $20–$60 | Medium-High — finer detail | Low | Detail work | Diode + CO2 (different lenses) |
What to Buy First: My Upgrade Order for Any Machine
If you’ve just unboxed a diode laser and want to make it genuinely useful for production work, here’s the sequence I’d follow based on running all three machines in my shop:
Air assist first — always. If the machine didn’t come with one, that’s the first $40 you spend. Then a honeycomb bed if the machine shipped with a flat pan. Those two changes transform cut quality before you touch any other setting. Third is the exhaust and fume management setup, because once you’re running longer sessions, the fume load from even safe materials like wood and leather adds up in an enclosed workshop.
The accessories — rotary, camera, autofocus, lens — come after you’ve addressed the fundamentals. I see too many diode owners buying a rotary before they’ve fixed their air assist and wondering why their tumbler engravings look scorched. The rotary doesn’t help if the baseline machine setup is still fighting combustion products. Get the foundations right, then add the features.
For CO2 machines like my OMTech Polar 350, the stock configuration is closer to production-ready — the machine ships with air assist and a honeycomb bed. The upgrades that make sense there are a higher-volume compressor for thicker acrylic, a replacement honeycomb for heat durability, and potentially a lens swap for detail work. The fundamentals are already there; you’re tuning from a solid base.
Installation Tips That Apply Across All Upgrades
A few habits that save time and prevent problems regardless of which upgrade you’re adding. First: run a materials test card after every hardware change. A new lens changes your focus distance. A new air-assist nozzle changes the pressure at the kerf. A new bed height changes your Z position. Document the new baseline before running production work.
Second: check firmware compatibility before buying any motorized module. Autofocus modules and motorized Z gantries for open-frame diodes often require specific firmware versions, and firmware flashing on a budget machine can brick it if done wrong. Read the forum threads for your specific machine before ordering.
Third: buy a dedicated maintenance kit — lens tissue, IPA, a rubber air squeeze bulb — when you buy the lens upgrade. Lens cleanliness matters more than lens quality. A dirty stock lens cuts worse than a clean aftermarket lens of lower theoretical quality. The habit of cleaning before each session pays compounding dividends over the life of the machine.
What is the most important upgrade for a laser engraver?
Air assist is the single most impactful upgrade on any diode laser. A dedicated pump pushing 10-20 L/min through a nozzle at the laser head reduces char by 60-70% on wood and leather, clears combustion gases from the kerf, and cools the cut zone. Most mid-tier diodes ship with an undersized internal pump or none at all.
Do I need a fume extractor if I already have an exhaust fan?
A fume extractor adds a filtration stage on top of exterior exhaust — it is a complement, not a replacement. Carbon filters catch VOCs and HEPA captures fine particulate that a raw exhaust blower passes through. Ducted exterior exhaust is the non-negotiable baseline; a fume extractor adds safety margin on top, especially for long sessions on MDF or composite materials.
What is a honeycomb bed and why does a laser engraver need one?
A honeycomb bed is a metal grid that lifts material 15-20mm off the laser table, allowing airflow from below and eliminating reflection from a flat metal pan underneath. Without one, the beam bounces off the pan and burns the underside of the material, creating char and smearing on light-colored wood and leather. A honeycomb bed is a $25-$35 upgrade that fixes this immediately.
Chuck rotary vs roller rotary: which should I buy?
Chuck rotaries grip the object at one end and are the correct choice for tapered objects like wine glasses and conical tumblers. Roller rotaries use friction wheels and work better for straight cylinders. If you plan to engrave both, start with a chuck rotary — it handles tapered objects that rollers cannot grip, and it handles most straight cylinders adequately.
Will a lens upgrade improve my laser engraving quality?
A shorter focal-length lens produces a smaller dot size at the focal point, which improves fine detail engraving and thin-line vector cuts. On a diode laser, switching from a 100mm to a 60mm focal-length lens can reduce spot size by 40-50%. The tradeoff is a shallower depth of focus, making uneven material surfaces more problematic.
Is laser engraver autofocus worth buying?
Z-axis autofocus is most valuable for materials with inconsistent thickness, such as rough-sawn hardwood that varies 0.5-1mm across a board. For flat, consistent sheet goods like plywood, acrylic sheet, and cut leather, manual focus set once per session is adequate. Autofocus saves 3-5 minutes per job and eliminates focus variance on uneven stock.
Further Reading
- Air Assist Setup: Pumps, Nozzles, and Installation for Diode and CO2
- Honeycomb Bed vs Slat Bed: Which Work Surface for Which Material
- Rotary Attachment Guide: Chuck vs Roller Hardware and Calibration
- Bolt-On Fume Extractor Guide: Filtration Ratings and CFM for Laser Use
- Upgraded Laser Focusing Lens: Spot Size, Focal Length, and Swap Procedure