Honeycomb Bed vs Slat Bed for Laser Engravers: Which Work Surface Wins
The work surface under your material affects cut quality more than most laser owners realize. The stock flat aluminum pan that ships with most open-frame diodes reflects the beam back into the material’s underside, burns a secondary char pattern, and traps fumes below the piece instead of letting them clear. A honeycomb bed fixes all three problems for $25–$35 and takes ten minutes to drop in. Whether to use honeycomb or slats depends on what you’re cutting and how heavy it is — this guide breaks down the choice by material and machine type.
After running the OMTech Polar 350’s factory honeycomb until it warped and replacing it with a 20mm deep aftermarket unit, I have opinions about what actually holds up under CO2 power levels versus what works fine for diode work.
Why the Flat Aluminum Pan Is the Wrong Work Surface
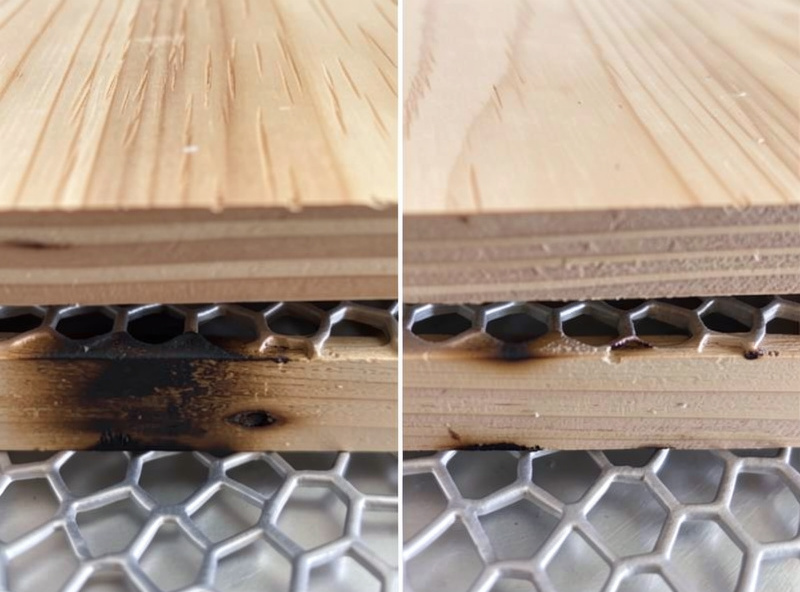
A flat metal pan creates two problems that directly hurt cut quality. First, the beam passes through the material on a full cut and strikes the pan surface, bouncing diffuse energy back through the kerf and into the underside of the cut piece. This creates backburn — a brown scorched stripe on the bottom edge of the cut that’s visible on lighter woods and ruins clean leather pieces. Second, the cut piece sits directly on the pan with no airflow from below. Combustion gases and fine particulate accumulate under the material, where they re-deposit on the cut edge rather than clearing upward through the kerf to the exhaust system.
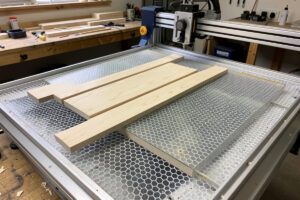
Lifting the material on a honeycomb bed solves both. The hexagonal grid allows the beam to pass through and scatter into the open cells below the cutting plane, reducing reflection back into the material. Air can flow up through the honeycomb from the exhaust-driven airstream, clearing fumes from below. The contact points between material and honeycomb are minimal, reducing marking on the material’s underside. The difference on light-colored birch plywood is immediately visible: the underside of a cut piece from a flat pan is smeared brown; from a honeycomb bed, the underside is clean with only minor grid contact marks.
Honeycomb Bed Types: Cell Depth and Material Matters
Not all honeycomb beds are the same. The key spec is cell depth — the distance from the top surface to the bottom of the honeycomb cells. Shallow honeycomb (10mm or less) reduces downward reflection adequately but doesn’t allow much airflow from below. Deep honeycomb (20mm or more) provides significantly better airflow and more beam scatter below the cutting plane.
The OMTech Polar 350 ships with a 10mm honeycomb. That was adequate for the first few months of CO2 work, but after sustained acrylic-cutting sessions at 70% power, the aluminum cell walls started deforming from heat accumulation. I replaced it with a 20mm laser honeycomb — the thicker cell walls and deeper geometry dissipate heat better, and after a year of regular CO2 use it shows no deformation. For CO2 machines running above 30W, I’d go with a 20mm deep honeycomb from the start.
For diode lasers, a standard 10–15mm honeycomb is fine. Diode power levels don’t generate enough sustained heat in the work surface to deform aluminum honeycomb. The $25–$35 panels sold generically as laser cutting honeycomb on Amazon work well and can be cut to fit your specific machine footprint with a straightedge and a scoring tool — aluminum honeycomb cuts cleanly by hand.
Stainless steel honeycomb is the premium option for CO2 machines that do sustained high-power runs. The steel construction handles heat better than aluminum, doesn’t deform, and resists the corrosive effect of acid-containing fumes from certain materials. It’s 3–5x the price of aluminum honeycomb, and for most hobbyist use it’s overkill — but if you’re running the OMTech 6–8 hours a day on production cuts, it’s the right material.
Slat Beds: When Parallel Rails Beat Honeycomb
Slat beds use parallel aluminum or steel rails spaced 10–25mm apart, running in one direction across the work area. The rails support the material on their top edges, leaving open gaps for beam pass-through and fume clearance below.
Slats outperform honeycomb in two situations: heavy material and large-format cutting. A 20mm thick hardwood slab or a 5kg ceramic tile deflects aluminum honeycomb under its own weight — the deflection changes the Z-height mid-piece and affects cut depth consistency. Steel slat rails handle the weight without deflection. For the OMTech Polar 350, I keep a set of steel slat rails for cutting thick hardwood and stone; the honeycomb handles everything else.
The downsides of slats are specific to certain materials. Thin, flexible stock — leather, thin card, fabric — can sag between slat gaps and bow away from the focal plane. A material that’s flat at the edges but dips 2–3mm in the middle will engrave unevenly as the focal distance changes. Honeycomb provides more uniform support across the material surface because the contact points are distributed across the whole grid rather than at parallel lines.
Slats are also directionally biased — rail spacing creates a preferred cutting direction. Vector cuts parallel to the slat gaps are unsupported on both sides of the kerf, while cuts perpendicular to slats have support. For complex vector cutting with paths in all directions, honeycomb’s even support distribution is better.
Which Work Surface for Which Material
| Material | Recommended Surface | Reason |
|---|---|---|
| Birch/hardwood plywood (3–6mm) | Honeycomb | Even support, clean underside, airflow from below |
| Thick hardwood (10mm+) | Steel slats | Weight support without deflection |
| Leather (up to 4mm) | Honeycomb | Flexible material needs uniform support |
| Thick leather (5mm+) | Honeycomb or slats | Either works; slats if piece is very stiff |
| Cast acrylic | Honeycomb | Rigid and flat, benefits from underside airflow |
| Slate / stone | Steel slats | Weight and rigidity require slat support |
| Thin card / paper | Honeycomb | Flat support prevents sagging between slat gaps |
| Ceramic tile | Steel slats | Weight and smooth bottom require rail grip |
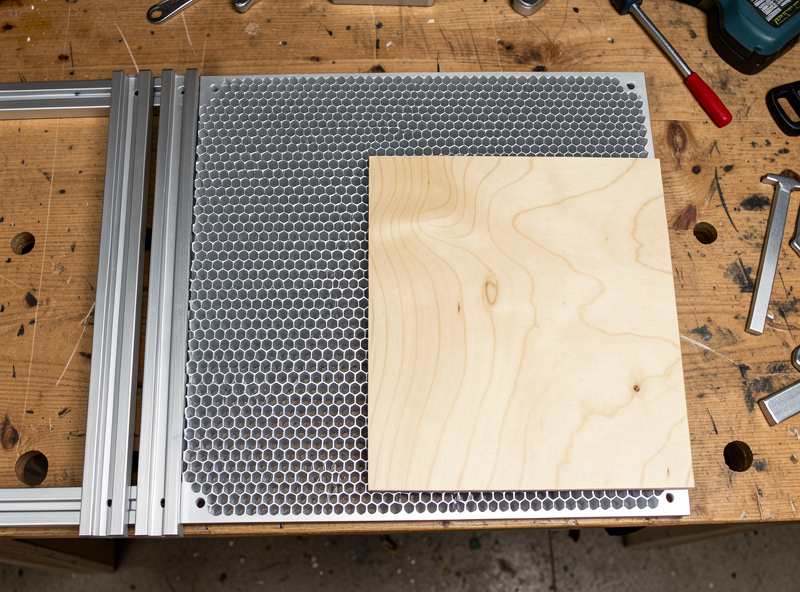
Installation and Fit Notes
Most desktop laser machines have a defined bed frame that accepts a work surface panel. The standard size for many CO2 machines is 300x200mm — measure your machine’s internal frame first before ordering. Honeycomb panels are easy to cut to size with tin snips or a scoring tool; cut from the bottom side for cleaner edges.
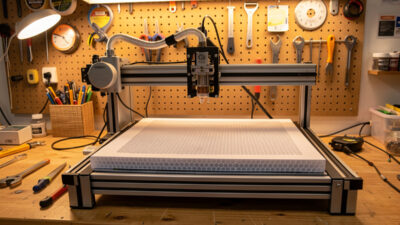
On my Atomstack X20 Pro, the open-frame diode, I cut a honeycomb panel to match the 400x400mm working area and zip-tied it to the frame rails so it doesn’t shift during jobs. On the OMTech Polar 350, the honeycomb drops into a recessed tray in the machine cabinet — the replacement panel I bought needed a 5mm trim on one edge to fit cleanly.
Pin magnets or rare-earth magnets secured at the honeycomb corners help hold thin, lightweight stock flat during engraving. Leather in particular tends to curl at the edges from heat; a set of four 10mm disc magnets at the corners keeps it flat without tape residue on the surface. This applies to both honeycomb and slat surfaces.
The full context for where work surface fits in the priority upgrade stack is in the laser engraver upgrades guide — honeycomb is the second upgrade after air assist, for good reason.
Does a laser engraver need a honeycomb bed?
Not strictly required, but it makes a significant difference to cut quality. A flat aluminum pan reflects the beam back into the material underside, causing backburn on the bottom of cut pieces. A honeycomb bed lifts the material 15-20mm, allows airflow from below, and reduces reflection — the underside of a cut piece from a honeycomb bed is noticeably cleaner than from a flat pan.
What size honeycomb bed do I need for my laser engraver?
Measure your machine’s internal work area before ordering. Common sizes are 300x200mm for small CO2 machines, 400x400mm for larger diodes, and custom cuts for everything else. Aluminum honeycomb panels can be cut to size with tin snips or a scoring tool. Measure the internal frame dimensions, not the machine’s rated working area — they may differ.
What depth honeycomb is best for a laser engraver?
For diode lasers, 10-15mm depth is adequate. For CO2 machines above 30W running sustained sessions, use 20mm deep honeycomb — the deeper cell walls handle heat better and resist deformation. The original 10mm honeycomb in my OMTech Polar 350 deformed after several months of high-power acrylic cutting; the 20mm replacement has held flat for over a year.
When should I use slats instead of honeycomb under a laser?
Use slat rails instead of honeycomb when cutting heavy material — thick hardwood above 10mm, ceramic tile, or stone slabs that deflect aluminum honeycomb under their weight. Slats also work for large-format CO2 machines where honeycomb panels are cost-prohibitive. For most hobbyist material up to 6mm, honeycomb is the better choice.
Can I cut the honeycomb bed to fit my laser engraver?
Yes. Aluminum honeycomb panels cut cleanly with tin snips, aviation shears, or a scoring tool. Cut from the bottom face for cleaner top edges. Mark the cut line with a permanent marker, score with a straightedge and utility knife across the cell walls, then snap or shear along the score line. Wear gloves — aluminum honeycomb edges are sharp after cutting.