Laser Engraver Rotary Attachment Guide: Chuck, Roller, and Ring Hardware
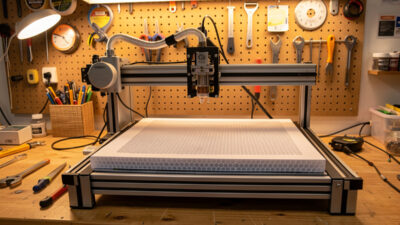
A rotary attachment converts a flat-format laser into a cylindrical engraving machine — and the hardware choice between chuck, roller, and ring drive determines whether your tumblers come out perfectly wrapped or with a visible seam. I’ve run the xTool RA2 Pro chuck attachment on my xTool S1 for over a year and kept a roller-style rotary for the OMTech Polar 350 for straight cylinders too large for the RA2 Pro’s chuck grip. The hardware side is what this guide covers — not the LightBurn rotary software setup, which is a separate workflow with its own calibration math.
Understanding which rotary type fits your actual objects saves a bad purchase. Most people start with a roller and then buy a chuck when they realize their wine glasses won’t stay seated. This guide helps you get that decision right the first time.
Chuck vs Roller Rotary: The Physics Behind the Choice
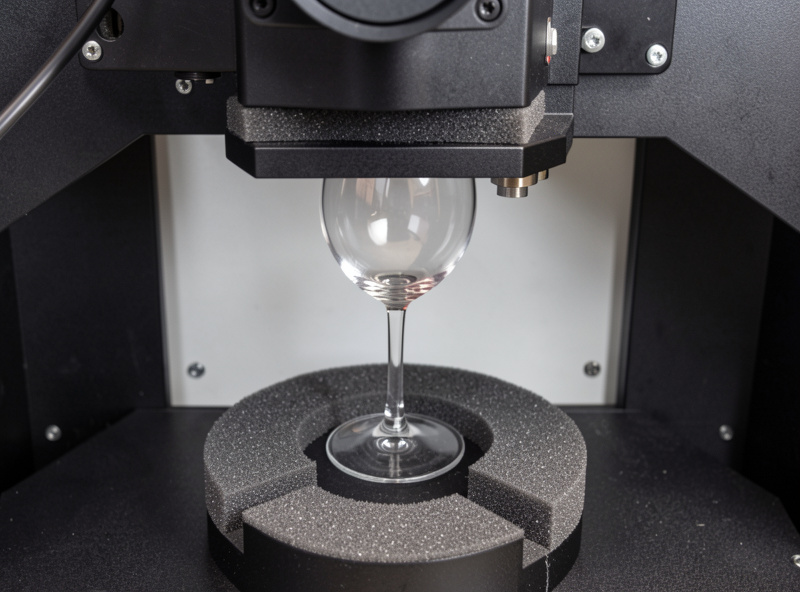
A chuck rotary grips the object at one end in a four-jaw or collet chuck, like a lathe. The other end of the object is unsupported and hangs free, spinning around the chuck’s central axis. This design handles tapered objects — wine glasses, conical tumblers, any cylinder that changes diameter from top to bottom — because the chuck only makes contact at one point. The object’s taper doesn’t cause the friction-slip problem that ruins roller rotary work on cones.
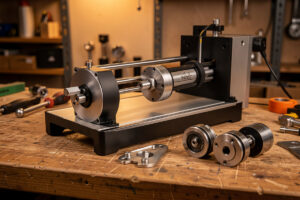
A roller rotary uses two pairs of wheels — one driven, one idle — that contact the object from the sides and spin it by friction. This design works well on straight cylinders of consistent diameter: standard 20oz straight-wall tumblers, pipes, round dowels. The wheels can handle significant weight (most roller rotaries are rated to 4–5kg), which makes them the right tool for heavy objects that a chuck can’t grip. The failure mode is on anything tapered: one end of the object has a smaller diameter, spins at a different surface speed than the other end, and the result is a distorted image that stretches on one side and compresses on the other.
Ring-drive rotaries — a third type, less common — grip the object via rings at both ends and are specifically designed for tall items like tumblers that exceed a chuck’s grip range on one end. The xTool RA2 Pro includes a ring-drive mode alongside the chuck. I’ve used it for 12-inch tall cylinders that the chuck couldn’t center properly — it works, but setup is more fiddly than a standard chuck mount.
What I Run and Why: Machine-by-Machine Setup
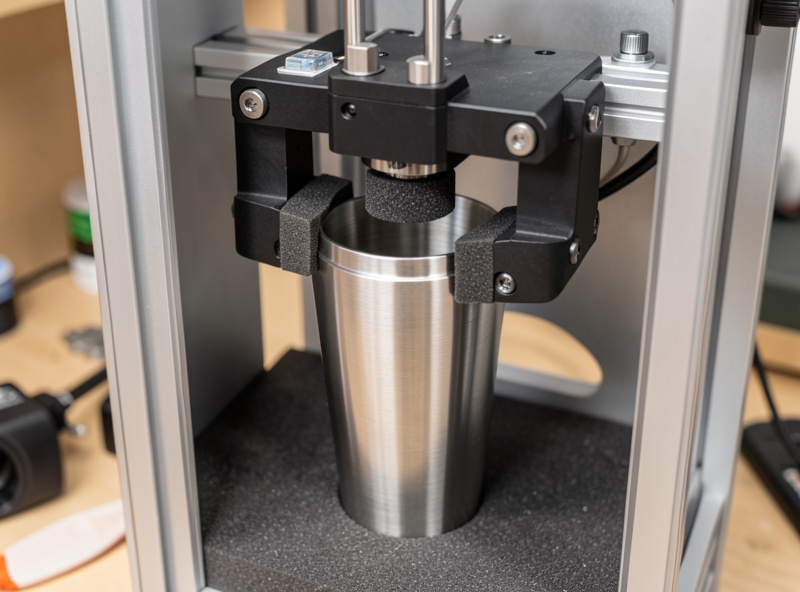
On the xTool S1, I run the xTool RA2 Pro as the primary rotary. The RA2 Pro is a dual-mode unit — it operates as both a chuck rotary and a roller rotary depending on how you configure it, with adjustable roller width and a chuck jaw set that handles 10mm to 65mm diameter objects. The foam-grip rollers prevent slipping on smooth glass surfaces. I keep it configured as a chuck for most work because the majority of what I engrave on it is either wine glasses (tapered) or 20oz Skinny tumblers (straight but benefiting from precise centering).
On the OMTech Polar 350, I use a standalone roller rotary rated to 5kg. The CO2 machine’s Y-axis travel is larger, so I use it for bigger cylindrical pieces that don’t fit in the xTool’s enclosed working area — full-height beer steins, large straight tumblers, and occasionally 4-inch diameter acrylic tubes for projects. The roller handles straight cylinders on CO2 without problems; the machine’s power and speed combination on CO2 give cleaner engraving on coated steel tumblers than the diode does.
Physical Installation: What to Check Before the First Test Run
Installing a chuck rotary involves three steps: connecting the rotary to the machine’s Y-axis motor output, centering the object in the chuck, and setting Z-height to focus distance above the object’s highest point at the rotation axis.
Most laser rotaries connect via a Y-axis motor bypass cable. The rotary’s stepper motor plugs into the controller where the Y-axis motor was, and the Y-axis motor disconnects. On the xTool S1, this is a labeled connector on the machine’s rear panel — the RA2 Pro ships with the cable pre-wired for it. On the OMTech Polar 350, the Y-axis motor cable is inside the gantry channel; I run the rotary cable out through the front access panel and swap at the controller board. Always power off the machine before swapping motor connectors — hot-swapping stepper motor cables can damage the driver board.
Z-height for the rotary is different from Z-height for flat-bed work. The object sits higher in the machine (on the rotary’s frame), and the top surface of the object at the rotation axis is where you focus. For a chuck rotary holding a tumbler, that means measuring from the chuck’s mounting plate height to the top of the tumbler’s curved surface, then setting Z accordingly. I use the same focus tool I use for flat work — the plastic spacer — and position it on top of the object rather than on the bed.
Centering the object in a chuck rotary is the step that most beginners rush. A poorly centered object creates wobble during rotation, which shows up as a blurred image. On the RA2 Pro, the four-jaw chuck allows independent jaw adjustment — I center by eye first, then do a slow rotation at 50mm/min in the LightBurn console to watch for runout before running the full job. Less than 0.5mm runout is acceptable for most engraving work; visible wobble means re-center.
Gripping Difficult Materials: Glass, Ceramic, and Thin-Wall Steel
Glass wine glasses are the most common challenging grip on a chuck rotary. The thin stem can’t take clamping force from metal jaws without cracking, so all rotaries that claim glass compatibility use foam-padded jaws or rubber sleeve inserts. The RA2 Pro’s foam-padded rollers handle glass properly — I’ve run hundreds of wine glass engravings without cracking a single stem, but I’ve seen people crack glass by overtightening metal-jaw chuck clones. If your rotary ships with bare metal chuck jaws, add foam tape or rubber sleeve inserts before using it on glass.
Ceramic mugs are heavier than glass and generally safer to grip — the walls are thicker. The challenge is that most mugs have handles, which makes them eccentric loads on a roller rotary. I handle mugs on the chuck rotary where I can use counterweights on the opposite side, or I position the handle at 9 o’clock (horizontal) and let the chuck center on the cylindrical body. Mugs with handles over 3cm projection will vibrate on a roller rotary.
Thin-wall tumblers (20oz powder-coated steel) are the most common production piece. They’re straight cylinders, well-suited to both chuck and roller. On the roller, keep the grip wheels at about 60% of maximum spring tension — enough to hold the piece without deforming thin walls. On the chuck, the RA2 Pro’s foam-padded rollers handle standard tumbler walls without deformation at normal clamping force.
Hardware Calibration: Steps-Per-Rotation and Roller Diameter
This is the hardware side of calibration — the software side (LightBurn rotary setup, Y-axis steps configuration) is covered in a separate guide. What you need to measure and verify at the hardware level:
For a roller rotary, the single most important measurement is the roller diameter. LightBurn uses the roller diameter to calculate how many motor steps equal one degree of rotation. Measure across the wheel at its contact surface with calipers — don’t trust the nominal spec. My roller rotary’s wheels measured 30.3mm when the spec said 30mm; that 1% error adds up over 360 degrees and creates a subtle seam. Measure, don’t assume.
For a chuck rotary, you need the object diameter for circumference-based calibration. The chuck itself doesn’t have a relevant diameter — the object’s outer diameter at the contact point determines the effective circumference LightBurn wraps around. Again, measure with calipers at the point where the image will be engraved, not at the thickest point.
The physical test I run before every rotary session: mark a line on the object, rotate exactly one revolution in the LightBurn console, and confirm the mark returns to its start position. If it’s off, the steps-per-rotation value is wrong — adjust in LightBurn’s rotary setup and re-test. This takes five minutes and prevents the “seam” problem on wrapped images.
| Rotary Type | Best For | Not Good For | Weight Capacity | Key Hardware Spec |
|---|---|---|---|---|
| Chuck (RA2 Pro) | Wine glasses, tapered tumblers, centered cylinders | Objects too wide for chuck jaws | ~2kg typical | Jaw opening range (10–65mm on RA2 Pro) |
| Roller | Straight cylinders, heavy objects, large diameter | Tapered objects, lightweight glass | 4–5kg typical | Roller diameter (measure precisely) |
| Ring drive | Tall cylinders, both-end support needed | Objects with irregular ends | 3kg typical | Ring diameter range compatibility |
Hardware Problems and Fixes From My Bench
Seam visible on wrapped image: almost always a calibration problem, not a hardware defect. Steps-per-rotation is off. Run the one-revolution test and recalibrate before troubleshooting anything else.
Object slipping on roller rotary: insufficient grip force or a contaminated wheel surface. Clean the rollers with isopropyl alcohol and increase spring tension. If the object still slips, the foam-grip roller variant is the right choice — the bare urethane wheels don’t grip smooth powder-coated steel as reliably as foam-grip wheels do.
Image stretched on one side, compressed on the other: tapered object on a roller rotary. Switch to a chuck rotary. This is a physics problem, not a calibration problem — the taper means each end of the object is traveling at a different speed across the roller, and no calibration fix corrects that.
Wobble/blur in the engraved image: runout in the object centering or an unbalanced object on the chuck. Re-center with the four-jaw independent adjustment and check runout at slow speed before firing.
See the full upgrade priority guide for where a rotary fits in the upgrade sequence — and why fixing air assist and the work surface first makes the rotary output noticeably cleaner.
What is the difference between a chuck rotary and roller rotary for laser engraving?
A chuck rotary grips the object at one end in a lathe-style jaw and is correct for tapered objects like wine glasses and conical tumblers — the taper does not cause slip. A roller rotary spins the object using friction wheels and works best on straight cylinders. Using a roller on a tapered object produces an image that stretches on the wide end and compresses on the narrow end.
Can I use a rotary attachment on any laser engraver?
Most diode and CO2 desktop lasers support rotary attachments via a Y-axis motor bypass connector. The rotary plugs in where the Y-axis motor connects. Check your machine’s controller board for a labeled rotary port — most machines after 2021 include one. Open-frame diodes and enclosed machines like the xTool S1 both support rotary use with compatible hardware.
How do I prevent a seam when engraving cylindrical objects with a laser rotary?
A seam appears when the steps-per-rotation calibration is off — the image does not wrap exactly 360 degrees and leaves a gap or overlap. Mark a point on the object, rotate one full revolution in LightBurn’s console, and confirm the mark returns to its start position. If it does not, adjust the steps-per-rotation value in LightBurn’s rotary setup and repeat until the seam disappears.
Can a rotary attachment engrave wine glasses without cracking them?
Yes, with the correct hardware. Wine glass stems require foam-padded or rubber-lined chuck jaws — bare metal jaws crack thin glass stems under clamping force. The xTool RA2 Pro uses foam-grip rollers that hold glass safely. Avoid chuck rotaries with bare metal jaws on any thin-glass item.
What is the weight limit for a laser rotary attachment?
Chuck rotaries typically handle up to 2kg. Roller rotaries are rated to 4-5kg for most commercial models. Heavy objects like full-height glass beer steins or large steel cylinders are better suited to roller rotaries — the dual wheel contact distributes load more evenly than a single-end chuck grip.